
How to Build a Halloween Village Mantel: Cozy Fall Decor on a Budget

You’ve seen the pins. A fireplace mantel with a tiny haunted town glowing orange inside — little houses with warm windows, a ghost drifting between them, pumpkins stacked at the edges.
It looks like a $500 project and a weekend of work.
Here’s the secret nobody tells you: a Halloween village mantel is a three-piece project. One lit anchor building, one box of figurines, one strand of lights.
That’s it. Everything else — the tombstones, the ghost, the second house — gets added slowly, a piece each year, until October rolls around and your mantel looks like the picture.
I’ve spent this season researching how real collectors stage their Spooky Town villages on a mantel (not a giant table, not a dedicated shelf — a normal fireplace mantel). I found a repeatable formula, and I priced out every piece so you can start for under $50 and look finished on day one.
Here’s exactly how to build your Halloween village mantel, step by step.
Why Halloween Villages Feel Out of Reach (It’s Not Your Fault)
If you’ve looked at Lemax Spooky Town prices and closed the tab, I get it. A single signature animated building runs $100–$260. Department 56 pieces sit even higher. But that’s the “third-year collector” price tag, not the starting price.
Reason 1: Everyone Says “Start With a Village,” No One Says “Start With One Building”
Real collectors say the same thing: one big lit building already looks like a village. It’s the centerpiece everything else gathers around. Buy that first. A second house only works once you have an anchor to group it with.
Reason 2: The Power Cord Problem
Every lit building needs power. Three buildings means three cords snaking along your mantel. That’s why the magazines look clean — they plan the power before the pretty part. Battery-operated lights and figurines solve most of it.
Reason 3: Lining Up Houses in a Row Looks Like a Store Display
A row of buildings is a shelf. A grouped village with deliberate gaps, varied heights, and a “graveyard zone” is a scene. The difference is layout, not budget — and layout costs nothing.
What Real Collectors Are Saying (Beyond the Product Pages)
I spent time in village-collector spaces before writing this. Here’s the pattern:
- r/halloween: When someone asks for an “affordable Halloween village,” the top advice is patient growth — “Lemax has pricy pieces for sure. I’ve been slowly building a village one building at a time.” Nobody recommends buying it all at once.
- Vintage Villages (Lemax collector resource): Their beginner guide spells out the shortcut: “One big building already looks like a village. Everything you add afterwards has something to gather around.” They also call out the power reality: four buildings = four cords, so buy a multi-output adapter early.
- Long-time DIY decorators: Shannon O’Neil (who’s built villages for years) started with one Gothic Haunted Mansion and added a building every year. She swears by battery lights to avoid outlet chaos and calls the slow growth “part of the whole annual ritual.”
The pattern I noticed: nobody builds a Spooky Town in one October. Collectors buy one anchor, then grow by a piece or two each season — and they stage by zones (a haunted house zone, a graveyard zone, a street zone), never in a straight line.
The Step-by-Step Mantel Staging Formula
Here’s the formula I researched and costed out. It works on a standard fireplace mantel — roughly 54–60 inches wide and 6–8 inches deep.
Step 1: Buy the Anchor First (The 3-Piece Entry Kit)
Your starter kit is three things: one lit anchor building + one box of figurines + one strand of lights. That’s genuinely a “village” — a glowing house with ghosts and pumpkin light overhead. Total cost: about $86.
Step 2: Choose Two Zones, Not a Row
Split your mantel into two scenes. Left zone: the haunted house with tombstones around it (your “graveyard”). Right zone: the village street — the second building or the ceramic pumpkins. Leave a deliberate gap in the middle with just the ghost set. This is the single trick that makes a display look designed instead of stocked.
Step 3: Stagger the Heights
Books under a cloth or a folded towel make instant risers. Put the anchor building on a 2-inch riser so it stands above the figurines. Height variety is what photographs well.
Step 4: Plan the Power Before the Pretty
Run cords to the back corners, then lay your figurines in front of them. Use battery lights for anything that glows without a plug. If you add a second plugged-in building later, run both cords to the same side and hide them behind a pumpkin.
Step 5: Add One Small Story Piece Per Year
This is the fun rule: after the anchor, add one interesting piece each season — a second building, an animated figure, a new figurine. You’ll hit “wow” by year three without ever having a $500 October.
The 6 Pieces That Actually Make the Village Work
These are the pieces I researched and verified for a real mantel village. Budget first, premium when it matters, all with honest flaws.
1. Lemax Ghouly Grocer Lighted Building — The Budget Anchor
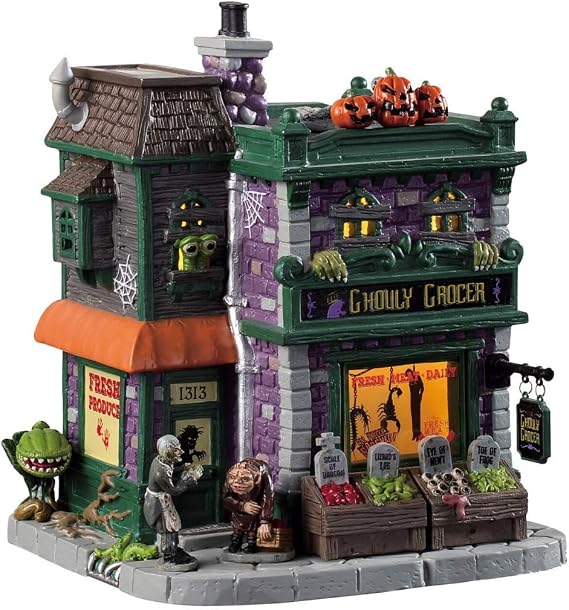
Why this is your anchor: A lit Lemax building is the shortcut — one house, glowing from the inside, instantly reads as a village. The Ghouly Grocer is the mid-size sweet spot collectors point beginners to: big enough to anchor a mantel, affordable enough to be your first piece. It comes with a cord and on/off switch, so no batteries to swap.
Where it goes in the formula: This is Step 1 — your anchor building. Everything else gathers around it.
The real story: A buyer named Monica put it plainly: “Beautiful little piece really made my village.” One building, and her whole mantel had a center of gravity.
Pros & Cons:
| ✅ Pros | ❌ Cons |
|---|---|
| Lit building that anchors the whole scene | Runs smaller than other Lemax buildings — still reads “village” at close range, but don’t expect signature-piece size |
| Plug-in cord with switch (no battery swaps) | The cord needs hiding — plan your power placement before you stage the figurines |
| Strong detail for the price | It’s a grocery store, not a haunted mansion — if you want maximum spooky, go with #2’s haunted house instead |
What Real Buyers Say:
⭐⭐⭐⭐⭐ “This grocery store added so much fun to my Spooky Town! Great addition to my Spooky Town!” — Kindle Customer, Verified Purchase
⭐⭐⭐⭐⭐ “Beautiful little piece really made my village. In my personal opinion I feel like it runs a little bit smaller than other lemax buildings but it could just be me. But I still love it!” — Monica S., Verified Purchase
Best for: First-time village builders, mantel-scale displays, anyone starting the 3-piece entry kit.
Worried it’s too small? It’s compact, which is why it works on a mantel — signature pieces can exceed 12 inches and crowd a 6-inch-deep shelf. This one fits, and it’s the price that lets you start this season.
2. Lemax Grimsbury Haunted House Lighted Building — The Spooky Second Zone

Why this is the perfect second piece: Once your anchor is up, this is the “second zone” building — a proper haunted mansion with a peaked roof, creepy detailing, corded light, and even sound effects. It gives your right-side street zone its own glow, and the two buildings together make the mantel feel like a real town square.
Where it goes in the formula: Step 5, year two — the one-piece-per-year add that turns a “cute starter” into a “scene.”
The real story: “I love that it is lighted and came w/ cord and on/off switch,” one buyer said. “This one is very detailed and spooky looking!” The detail is the draw — shingles, windows, a front stoop that reads from across the room.
Pros & Cons:
| ✅ Pros | ❌ Cons |
|---|---|
| Genuine haunted-house look, not a cute shop | Fine detail increases break risk — handle when arranging, and skip it if toddlers grab the mantel |
| Corded light with switch (no batteries) | One of the pricier starter pieces — wait for a sale or budget this as your year-two add |
| Sound effects included | It’s a loud house next to a quiet one — the sound on/off switch is there for a reason |
| Great scale for mantel depth |
What Real Buyers Say:
⭐⭐⭐⭐⭐ “It’s a great addition to my Halloween village. Excellent.” — Elisa, Verified Purchase
⭐⭐⭐⭐⭐ “I love that it is lighted and came w cord and on/off switch… This one is very detailed and spooky looking!” — Teresa S., Verified Purchase
Best for: Building the second zone, collectors who want the classic haunted-house silhouette, adding a yearly “wow” piece.
Worried about breakage? The spindly details (peaked roof trim, fence posts) are the price of looking good. Assemble it once, set it on a riser, and don’t move it around — the reviewer who flagged this loved the detail anyway.
3. Tuitessine Ceramic Ghost Figurines — The Cozy Figurine Set

Why these are the soul of the scene: Buildings set the stage; figurines tell the story. This set of small glossy-white ceramic ghosts is exactly the “ceramic ghost figurine” vibe of the Pinterest villages — tiny, cute, cottage-core friendly. They’re the piece that makes people lean in and laugh.
Where it goes in the formula: Step 1 of the entry kit — one box of figurines, scattered through both zones. Place a ghost on the riser next to the anchor, one peeking from behind a tombstone.
The real story: One buyer called these “the highlight of my Halloween” — the little details are what make a village feel handmade and loved instead of store-bought.
Pros & Cons:
| ✅ Pros | ❌ Cons |
|---|---|
| Glossy white ceramic — matches the cozy aesthetic, not cheap plastic | They’re small and lightweight — easy to knock over or lose among bigger pieces (and behind toy-happy kids) |
| Cute expression that photographs well | No LEDs — they glow only if you add the lights from #6 |
| Three sizes for depth in the scene | At $24.99 for the set, a full “village crowd” would need two boxes |
What Real Buyers Say:
⭐⭐⭐⭐⭐ “These are adorable little ceramic ghosts. Well crafted and such so darn cute.” — AngieDaz, Verified Purchase
⭐⭐⭐⭐⭐ “These cute little ghosts are the highlight of my Halloween. They are the cutest things I’ve ever seen — so cute and tiny.” — Nicky, Verified Purchase
Best for: The entry-kit figurine box, tiered trays beside the village, readers who want warm-and-quirky over scary.
Worried they’re too tiny? Small is the point — they tuck into corners a big piece can’t reach. That’s what makes a mantel feel layered.
4. Valery Madelyn Jack-O’-Lantern Figurines (2-Piece, With Light) — The Orange Glow

Why these earn their spot: You need orange in a Halloween mantel — the warm pumpkin tone is what makes the scene read “fall” instead of “horror.” These two resin jack-o’-lanterns with witch hats are battery-lit, so they add glow without a cord, right where you need it: the right-side street zone or flanking the anchor building.
Where it goes in the formula: The budget-light alternative for anyone allergic to cords. They’re the pre-lit pumpkins that fill the middle gap in Step 2.
The real story: “I bought a set for each side of my mantel,” one buyer said — the exact placement the formula recommends. Battery lights, cheerfully on, zero outlet math.
Pros & Cons:
| ✅ Pros | ❌ Cons |
|---|---|
| Battery-lit — soft orange glow with no cords to hide | Light is “pretty decent,” not blinding — fine for ambiance, not a room light |
| Perfect 6.5-inch mantel scale | Some buyers feel the price runs a touch high for the size (“a little expensive though”) |
| Witch hats add personality (they’re not plain pumpkins) | 2 pieces only — you’ll want the set from #3 on the other side for balance |
What Real Buyers Say:
⭐⭐⭐⭐⭐ “Great choice. Got the lg size. Packaged well, perfect paint job. Lights a plus… Bought a set for each side of my mantle.” — Amazon Customer, Verified Purchase
⭐⭐⭐⭐ “These are so cute and small enough to decorate on my desk or on a shelf… The quality is good and the light is pretty decent. They are a little expensive though.” — Brianna, Verified Purchase
Best for: Flanking your anchor, adding pumpkin-orange warmth without plugging anything in, mantels where cords are a dealbreaker.
Worried they’re small? At 6.5 inches they’re tabletop scale by design — small enough to tuck beside buildings, big enough to read as pumpkins from across the room.
5. Miniature Tombstone Figurines (21-Piece Set) — The Graveyard Zone

Why $9 is the best value in the whole village: Every pro village has a graveyard zone — a cluster of tombstones that instantly tells a story. This 21-piece set of resin tombstones, skeletons, pumpkins, and ghosts costs less than a fast-food lunch and gives you the exact “graveyard accent” your anchor house needs. Scatter them around the base of the Grimsbury Haunted House and the scene writes itself.
Where it goes in the formula: Step 2 — the graveyard zone. This is what turns “a house on a shelf” into “a haunted neighborhood.”
The real story: A village owner said it best: “We used these to enhance our village for Halloween and they were perfect!” That’s the whole point — they’re village-adjacent pieces that elevate the big-ticket items.
Pros & Cons:
| ✅ Pros | ❌ Cons |
|---|---|
| 21 pieces for $8.99 — cheapest storytelling in the post | The pieces are small (miniature scale) — they fill the base of a building, not the whole mantel |
| Resin, so they hold up year after year | Some pieces lean toward cute/party-favor rather than spooky — mix with #3 for a cohesive look |
| Skeletons + pumpkins + ghosts cover every zone | Battery-free — the tombstones don’t glow (use #6 overhead for light) |
What Real Buyers Say:
⭐⭐⭐⭐⭐ “We used these to enhance our village for Halloween and they were perfect!” — Brook P., Verified Purchase
⭐⭐⭐⭐⭐ “Great little Halloween decorations.” — Ken, Verified Purchase
Best for: The graveyard zone around your haunted house, filling empty mantel space on a $9 budget, kid-friendly Halloween scenes.
Worried they’re too small? They’re miniatures — that’s the genre. Group them close together under the houses and they read as a proper cemetery, not a scattering of toys.
6. Runleo Pumpkin String Lights (16.4 ft, 30 LED) — The Overhead Glow

Why this is the finishing move: The magazines never photograph a village without warm light. These 3D pumpkin string lights drape along the top of the mantel or over the front edge, casting that Halloween-orange glow across the whole scene — exactly the “light/power placement” step in the formula. Battery operated, remote control, timer, 8 modes. No outlet drama.
Where it goes in the formula: Step 1 of the entry kit (the light) and Step 4 (battery = no cord to hide).
The real story: One buyer said the pumpkins have “a true 3D look (not flat ‘printed’ bulbs)” — they’re the decorative kind that photograph like real tiny pumpkins, which is the whole aesthetic.
Pros & Cons:
| ✅ Pros | ❌ Cons |
|---|---|
| True 3D pumpkin covers — reads as decor, not string lights | Battery-operated means battery swaps if you run them all month — use the timer to stretch them |
| Remote + 8 modes + timer (off by itself at night) | 30 LEDs over 16.4 ft is cozy, not blinding — perfect for a mantel, underwhelming for a yard |
| Weatherproof, so porch-season is covered too | One reviewer hit a minor remote/button quirk — test the remote day one so you know the modes |
What Real Buyers Say:
⭐⭐⭐⭐⭐ “These jack-o’-lantern string lights are an easy way to add a warm, festive glow without needing complicated setup or outlets. The pumpkin covers have a true 3D look (not flat ‘printed’ bulbs), so the lights feel decorative.” — Dillan, Verified Purchase
⭐⭐⭐⭐⭐ “They were nice and bright and super cute! I’ve had them for a couple years now and they still are bright with different flashing lights!” — Dawn, Verified Purchase
Best for: Draping above the village, warm light in the middle gap, anyone who wants the glow without an extension cord.
Worried about batteries? The timer solves it — set it for 6 hours and it sleeps all day until October evenings. One set has lasted Dawn multiple seasons.
How to Choose Your Village Starter (My Cheat Sheet)
If your budget is under $50 — Get the 3-piece entry kit: the Ghouly Grocer (product 1, $48.47) plus the tombstone minis (product 5, $8.99). That’s a lit village with a graveyard zone for $57. Add the Runleo lights (product 6, $12.99) when you can — about $70 for a fully glowing mantel.
If your budget is $80–$100 — The sweet spot: Ghouly Grocer (product 1) + ceramic ghosts (product 3) + pumpkin lights (product 6) + tombstone minis (product 5). That’s the exact formula from Step 1 — anchor, figurines, light, story — for about $95, and it looks finished.
If you’re planning year two — The Grimsbury Haunted House (product 2) becomes your second zone and the Valery Madelyn pumpkins (product 4) flank it with battery glow.
Budget vs premium: People get sticker shock at Lemax, but you’re paying for molded-resin detail that photographs like a movie set. The $9 tombstone set and the $13 lights keep the average sane. The ceramic pieces fill the middle.
Buying Guide: What I’d Actually Consider (Beyond Price)
Power source first. Corded buildings are brighter but demand cord management. Battery pieces cost pennies to run and place anywhere. Plan your mantel’s power before shopping: count available outlets near the fireplace and decide which pieces will be battery-only. The formula assumes the anchor is corded and everything else runs on batteries.
Scale vs. footprint. Mantels are shallow — about 6–8 inches deep. Signature Lemax pieces run 12+ inches tall and deep, which is why they’re “table” pieces, not “mantel” pieces. For a mantel, choose buildings in the 7–10 inch range and test the footprint with the box before you commit.
Plastic vs. ceramic vs. resin. Cheap plastic looks like a toy up close. Ceramic figurines (the ghosts, the pumpkins) have the weight and gloss that make Pinterest-style photos. Polyresin buildings (Lemax) carry fine painted details. Match your material to what you want to photograph: ceramic + resin reads “cozy,” plastic reads “kid’s room.”
Grow-ability. The best starter pieces are the ones that stay useful as the village grows. A mid-size anchor, a neutral ceramic figurine set, and battery lights all survive year three. A one-season novelty piece does not. When in doubt, buy anchors and figurines.
Frequently Asked Questions
Q: How much does a Halloween village mantel actually cost?
A: The 3-piece entry kit — anchor building, figurine set, pumpkin lights — runs about $70–$95 total. Real collectors grow by one piece a year after that. A “finished-looking” mantel does not need to cost $500.
Q: How many buildings do I need to start?
A: One. Buy one lit anchor building first. Collectors are unanimous: one big building already looks like a village, and everything you add afterwards has something to gather around. Add a second building in year two.
Q: How do I hide the power cords?
A: Route cords toward the back corners before placing figurines, then sit a ceramic pumpkin or tombstone in front of each cord. Use battery-powered pieces whenever you can — the pumpkins and string lights in this guide run on batteries, so only the buildings need outlets.
Q: Where do I even put a village if I have a small mantel?
A: Use Step 2 — two zones with a deliberate gap — and stagger heights with books under a cloth. Mid-size buildings (7–10 inches) fit the average mantel. Skip signature 12-inch pieces unless your shelf has real depth.
Q: Is Lemax worth the price over cheaper brands?
A: For the anchor building, yes — the glowing resin houses are what make a village look like a village. But you don’t need all-Lemax. Pair one Lemax building with $9 tombstones, ceramic ghosts, and $13 lights and the scene reads “curated,” not “expensive.”
Final Thoughts
You don’t need a $500 October to get the Pinterest mantel. You need one glowing house, a handful of little pieces that tell a story, and a strand of pumpkin lights — staged in two zones, with the cords hidden and the heights staggered.
Start with the 3-piece kit: the Ghouly Grocer (the anchor that does the heavy lifting), the ceramic ghosts (the personality), and the pumpkin lights (the glow). That’s a village on your mantel tonight, and a tradition your kids will remember every October.
The best part? Next year, you get to add one piece. And the year after that. That’s how the collectors do it — one haunted house at a time, until the mantel feels like a tiny town you built together.
If you’re starting today, the anchor is the move: See Today’s Price on the Ghouly Grocer →
And if you love the vintage-spooky look, don’t miss my vintage Halloween decor roundup — and the keepsake gift list when you want to make the season last past October.
This post contains affiliate links. If you buy through them, I may earn a commission at no extra cost to you.
Sources
- Vintage Villages — How to Build a Lemax Spooky Town Village in Canada: A Beginner’s Guide
- Southwood Halloween Shop — How to Create a Lemax Spooky Town Halloween Village?
- The Christmas Loft — Halloween Village Guide: Department 56 vs Lemax Spooky Town
- Shannon O’Neil — 7 Tips for a Spooktacular DIY Halloween Village
