
How to Make a Sourdough Starter: Beginner Guide for Homemade Bread

Day 1, your jar of flour and water looks alive. Bubbles appear. You feel like a bread genius.
Day 3, the bubbles stop. The jar goes flat and quiet.
And a thousand internet beginners do the same thing: they throw it out and quit.
Here’s the secret nobody tells you: Day 3 is supposed to look dead. It’s called the “quiet phase,” it happens to every starter, and it’s the moment your starter is actually doing the most important work. Quitting there is the #1 reason homemade sourdough dreams die.
I’ve been through the full day-1-to-day-7 journey more times than I’d like to admit — including the day I nearly tossed a perfectly healthy starter because I thought I’d failed. This guide gives you the exact day-by-day feeding schedule, the visual cues to look for at every stage, and the honest list of tools you truly need to start (it’s shorter than the internet says).
You don’t need a bread pro’s kitchen. You need a jar, a scale, patience, and this guide.
Why Sourdough Starters Fail (And Why Yours Won’t)
Before the day-by-day schedule, let’s name the real problems — because they’re almost never about your flour.
Problem 1: Nobody Explains the Quiet Phase
The internet shows you a bubbling day-2 starter and then a perfect loaf. What it skips is day 3 through 5, when the starter looks flat, smells a little like feet, and seems like a lost cause.
The truth: that flat, quiet phase is the lactic acid bacteria taking over. It’s the fermentation actually starting. Every healthy starter goes through it. The smell will even out by day 5 or 6.
Problem 2: Guessing Instead of Weighing
Sourdough is chemistry, and chemistry likes grams, not “a handful” or “about a cup.” When you eyeball your feedings, your ratios drift, and your starter gets sluggish.
The fix: a $14 digital scale with a tare function. It’s the single highest-leverage tool on this list, and you can’t make a consistent starter without it.
Problem 3: Using the Wrong Jar
A narrow-mouth jar makes feeding a sticky mess, and a jar that’s too small doesn’t leave room for your starter to double. Beginners who fight their container quit before they fight their flour.
The fix: a wide-mouth 40oz jar with a marked feeding band, so you can see exactly where your starter started and where it needs to double to.
What Real Sourdough Beginners Are Saying (Community Voice)
I dug through the sourdough communities to find what beginners actually struggle with — and it confirmed every one of these problems.
- r/Sourdough: The most common beginner question by far is “my starter was active and now it’s not — what did I do wrong?” The answer, repeated by experienced bakers dozens of times: it’s the quiet phase, keep feeding and don’t restart. Many commenters admit they tossed their first starter at day 3 and regretted it.
- r/Breadit: The recurring advice for new bakers is to buy a scale before anything else. Multiple threads on “what should I buy first” have the top answer as “a kitchen scale, then a banneton.” Precision beats gadgets.
- r/AskCulinary: When asked why starters fail, the pros point to inconsistent feeding schedules and contaminated containers — not the flour. They stress measuring by weight and keeping the jar clean.
The pattern I noticed: The beginners who succeed don’t have fancier kitchens. They have three things: a scale, a schedule, and the knowledge that day 3 is not a failure. You’re about to have all three.
The Day-by-Day Starter Timeline (Print This)
Here’s the schedule that got my starters from zero to bake-ready in seven days. Room-temperature water and all-purpose or bread flour work fine — no special flour required.
Day 1: The Mix
Mix 50g flour + 50g water in your wide-mouth jar. Stir until no dry flour remains. Cover loosely with a cloth or a loose lid and set it in a warm spot. Expect: not much. Maybe a few bubbles by evening.
Day 2: The First Rise
Feed again: discard half, then add 50g flour + 50g water, stir. Expect: activity! Bubbles, a bit of sour smell, maybe some liquid on top. This is the exciting day.
Day 3: The Quiet Phase (Don’t Panic)
Feed again: discard half, 50g flour + 50g water, stir. Expect: flat. Quiet. A little funky-smelling. This is normal and healthy. Your starter is building acid and bacteria — the flavor factory. Keep feeding. Do NOT restart.
Day 4–5: The Comeback
Feed again: discard half, 50g flour + 50g water, stir. Expect: bubbles returning, more consistently, with a sweeter, more “bread-like” smell. It may double in size for the first time.
Day 6: The Double Test
Feed again: discard half, 50g flour + 50g water, stir, and mark the feeding band. Expect: your starter should double within 6–8 hours. This is the classic “it’s working” signal.
Day 7: Bake Day
Feed one final time in the morning. When your starter doubles in 4–6 hours and passes the float test (a spoonful floats in water), it’s ready to bake.
The honest note: some kitchens take 10–14 days, especially in cooler weather. That’s fine. The schedule is a guide, not a race.
The 6 Tools You Actually Need (In Order)
Now, the tools. This is the honest starter list — nothing here is a splurge, and everything earns its place in your day-1-to-day-7 journey.
1. Premium Pro Sourdough Starter Jar Kit 40oz — Best Starter Home
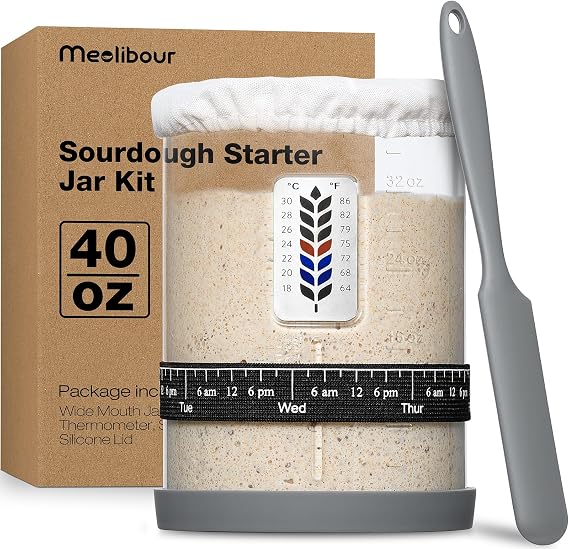
Why this is the first tool you need: Your starter lives in this jar for the rest of its life, so the jar matters more than you’d think. The 40oz wide-mouth design makes feeding and scraping easy without the mess that kills motivation on day 3. It includes a marked feeding band so you can see exactly where your starter starts and when it doubles — no guesswork.
The real story: I started in a too-small mason jar and fought sticky dough for a week. The wide opening alone was worth the upgrade, and the included thermometer and cloth cover mean nothing else to buy.
Pros & Cons:
| ✅ Pros | ❌ Cons |
|---|---|
| Wide mouth = mess-free feeding and scraping | Slight learning curve if you’re switching from a plain jar |
| 40oz size leaves room for doubling | Glass needs gentle handling (it’s not unbreakable) |
| Feeding band, thermometer, scraper, and cover included | Cloth cover works best with a rubber band for a snug fit |
What Real Buyers Say:
⭐⭐⭐⭐⭐ “The wide opening makes it super easy to mix, feed, and scrape down the sides without making a mess. That was one of my biggest frustrations with other containers… it has made maintaining my starter much easier.” — Shannon H, Verified Purchase
⭐⭐⭐⭐⭐ “This sourdough starter jar kit has been a significant upgrade over using a basic jar… The larger 40oz size provides plenty of room for feeding and growth. There’s a slight learning curve if you’re switching from a simple jar, but once you start using it, the benefits are clear.” — Brian, Verified Purchase
Best for: Every sourdough beginner, especially anyone who has already fought a narrow-mouth jar.
2. Etekcity Digital Kitchen Scale — Best Accuracy Tool

Why this is the non-negotiable tool: Sourdough is a ratio game — 1:1:1 feedings by weight. A scale with a tare function turns feeding from guesswork into a 30-second routine. This Etekcity scale weighs in grams up to 11 pounds with 1g increments, has a backlit display, and cleans up with a wipe. At $14, it’s the best return on investment in your entire sourdough setup.
The real story: Every starter failure I’ve ever debugged for a friend traced back to eyeballed feedings. Once they weighed, their starters stabilized within days. This scale is the one I recommend because it’s cheap, accurate, and dead simple.
Pros & Cons:
| ✅ Pros | ❌ Cons |
|---|---|
| 1g precision and tare function make feeding exact | Display can be partially blocked by a very large bowl |
| 11lb capacity covers all baking needs | Uses 2 AAA batteries (included) |
| Stainless steel surface wipes clean in seconds | Compact size means it won’t hold a huge mixing bowl |
What Real Buyers Say:
⭐⭐⭐⭐⭐ “The tare function works flawlessly, and the scale responds instantly with consistent precision… I used it several times for making bread and the results were excellent. I highly recommend.” — Lauri CT, Verified Purchase
⭐⭐⭐⭐⭐ “I’ve been really happy with this Etekcity kitchen scale. It’s accurate, easy to use, and has made meal prep and baking much more consistent. I especially like that it switches between grams, ounces, and other units with the press of a button.” — Angela Lee, Verified Purchase
Best for: Anyone who’s ever “guessed” a feeding ratio — which is every beginner, honestly.
3. Sourdough Banneton Bread Proofing Basket, 2-Pack — Best for Shaping

Why this earns its spot: Once your starter is alive, your next challenge is shaping a round loaf that holds its form. A banneton (proofing basket) is the tool that gives your dough structure and those beautiful spiral lines on the crust. This 2-pack includes two 9″ round baskets with cloth liners — enough to proof one loaf while baking another, or to keep one as a backup.
The real story: You can proof bread in a bowl lined with a floured towel. But a banneton wicks moisture and shapes the dough far better, and the difference shows in your first loaf’s height and crust pattern.
Pros & Cons:
| ✅ Pros | ❌ Cons |
|---|---|
| Two baskets = bake back-to-back loaves | Cloth liners may need extra flour if dough is very wet |
| Natural rattan wicks moisture for a better crust | Clean with a dry brush, not water |
| Fits a standard 500g dough loaf | Takes a bit of cabinet space when not in use |
What Real Buyers Say:
⭐⭐⭐⭐⭐ “Great gift idea for sourdough bakers. My friend loves it. Quality of the basket is good. Perfect for a 500 g dough.” — Sarah Hayes, Verified Purchase
⭐⭐⭐⭐⭐ “These bannetons are so easy to use and make the bread proofing process simple and consistent. The loaves release cleanly, hold their shape beautifully, and show a nice spiral pattern after baking.” — Amazon Customer, Verified Purchase
Best for: The moment your starter passes the double test and you’re ready for your first loaf.
4. SAINT GERMAIN Premium Bread Lame — Best for Scoring
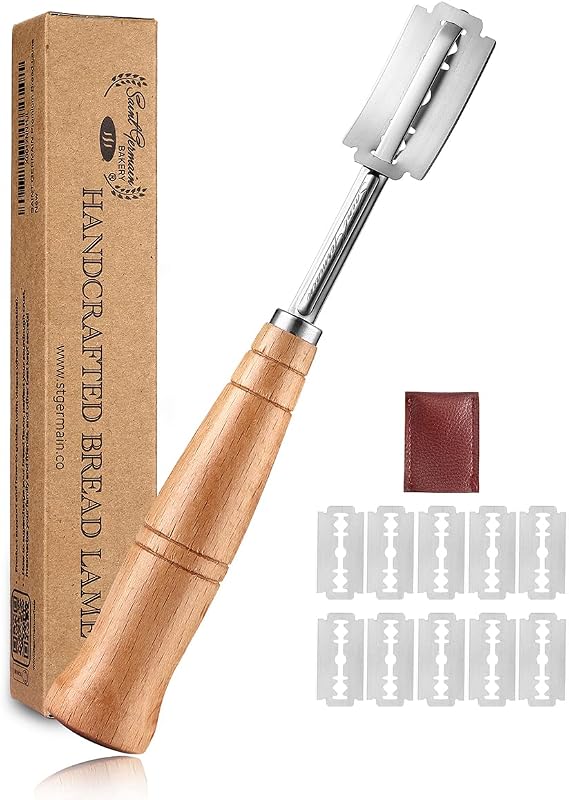
Why this earns its spot: Scoring is what turns a plain baked blob into an artisan loaf with an ear. A lame (the bread-scoring tool bakers use) holds a razor blade at the right angle so you can slash the dough confidently right before it goes in the oven. This hand-crafted one comes with 10 replacement blades and a leather cover — everything a beginner needs.
The real story: I scored my first loaf with a butter knife and got a sad, flat crack instead of a beautiful ear. A real lame with a sharp blade made the difference immediately. And at $9, it’s one of the cheapest upgrades in bread baking.
Pros & Cons:
| ✅ Pros | ❌ Cons |
|---|---|
| Sharp double-edged blades give clean, deep scores | Attaching a fresh blade takes practice — bend carefully |
| Includes 10 replacement blades + leather cover | Blades are thinner than standard razor blades |
| Wooden handle is comfortable and looks great | You’ll need to replace blades periodically |
What Real Buyers Say:
⭐⭐⭐⭐⭐ “I needed a sharper dough scoring blade for my sourdough breads. My knives just weren’t doing the job… The quality is nice and the value for the money spent is wonderful. You can spend a lot more on a bread lame, but you don’t need to with this item.” — Island Gal, Verified Purchase
⭐⭐⭐⭐⭐ “You feel like an artist using this handy device! The most enjoyable part of being a sourdough baker is the scoring of the dough before baking and this little tool is a must have for that portion of the experience.” — Carolyn R., Verified Purchase
Best for: Your first scored loaf — the moment you want the bread to look as good as it tastes.
5. Lamson Bench Scraper — Best for Handling Dough

Why this earns its spot: Sourdough is sticky. A bench scraper is the tool that lets you lift, fold, divide, and clean up wet dough without it clinging to your fingers. This Lamson scraper pairs a sharp high-carbon steel blade with a comfortable walnut handle — and it doubles as the best countertop cleaner you’ll ever own.
The real story: The folding technique (stretch and fold) that gives sourdough its structure is miserable without a scraper. This one makes it pleasant. It also scrapes flour and dried dough off your counter in seconds, which matters on every single bake day.
Pros & Cons:
| ✅ Pros | ❌ Cons |
|---|---|
| Sharp steel blade divides and lifts dough cleanly | Wood handle may need light oiling over time |
| Walnut handle is comfortable and well-weighted | Pricier than plastic scrapers — worth it for the quality |
| Doubles as a countertop cleaner for flour messes | Hand-wash and dry to preserve the wood |
What Real Buyers Say:
⭐⭐⭐⭐⭐ “Using this thing is incredibly satisfying. It glides across the counter, effortlessly scooping up flour, dough scraps, and anything else in its path… Fantastic for dividing dough with precision.” — MBS, Verified Purchase
⭐⭐⭐⭐⭐ “Add some class to your baking. Sturdy, great weight and hand feel. Very effective!” — Clay Kiichli, Verified Purchase
Best for: Every sourdough baker from day one — you’ll use it at every single step of the process.
6. Lodge Cast Iron Double Dutch Oven — Best for Baking Your First Loaf

Why this earns its spot: The secret to a bakery-crust sourdough loaf at home is steam. A covered cast iron pot traps that steam and gives you the crust and oven spring that artisan bakeries get from professional steam ovens. The Lodge Double Dutch is special because both the lid and pot are cooking surfaces — you can bake on the flat lid or use the whole thing upside down as a baking cloche.
The real story: This is the pan I bake every sourdough loaf in. I preheat it in the oven, drop in the scored dough, cover it for the first 15 minutes of baking, then remove the lid to brown the crust. The results genuinely rival bakery bread — and the same pot handles stews and skillet dinners on non-bake days.
Pros & Cons:
| ✅ Pros | ❌ Cons |
|---|---|
| Traps steam for bakery-quality crust and oven spring | Heavy — lifting it in and out of a hot oven needs care |
| 2-in-1: lid works as a skillet for everyday cooking | Cast iron needs hand-washing and light oiling |
| Pre-seasoned, PFAS-free, made in the USA | 5qt size fits one standard boule at a time |
What Real Buyers Say:
⭐⭐⭐⭐⭐ “I have been cooking with Lodge cast iron for about 7 years… The Double Dutch Oven is my favorite Lodge cookware due to its versatility… Baking super awesome bread that rivals anything you can get at your bakery.” — Joe MacBu, Verified Purchase
⭐⭐⭐⭐⭐ “I recently learned how to bake sourdough and this dutch oven has made the learning process very easy. Being able to use the dutch oven upside down makes this incredibly versatile. The size of the dutch oven is perfect for boules.” — Verified Purchase
Best for: Your day-7 bake — the moment all that quiet-phase patience pays off in a crusty, golden loaf.
How to Choose the Right Starter Tools (Buying Guide)
Here’s the honest framework for spending on your starter setup, with the decision criteria that actually matter.
Budget: What’s the True Minimum?
You can start a starter with just flour, water, and any clean jar. But the two tools that prevent failure are the scale ($14) and the wide-mouth jar ($13) — together, less than $28, and they remove the two biggest beginner mistakes (guessy ratios and messy containers).
Material: Glass vs. Plastic vs. Ceramic
Glass is the beginner default — it’s easy to see activity through, easy to clean, and won’t hold odors. Plastic works but can scratch (scratch = hiding place for bacteria). Ceramic crocks look gorgeous and are the “artisan aesthetic” choice, but you can’t see through them to check for doubling — which is why the marked glass jar wins for day-by-day monitoring.
Weight: Why Precision Beats Fancy
Any scale with 1g increments and a tare button works. You don’t need a $50 bakery scale — the Etekcity at $14 covers 100% of sourdough needs. Spend the saved money on a better baking vessel instead.
One vs. Two Baskets
If you bake one loaf at a time, one banneton is enough. Two is worth it if you bake for a crowd or want to proof two loaves back-to-back. The 2-pack costs barely more than a single premium basket, so most beginners should just get the pair.
The “Invest Later” Upgrade
Don’t buy the Dutch oven on day 1. Buy it on day 6, when your starter is clearly alive and you’re committed. That way, the $60 goes into a proven habit — not a maybe. This is the one rule that keeps your kitchen from becoming a graveyard of abandoned bread tools.
Frequently Asked Questions
Q: My starter was active on day 2 but went flat on day 3. Did I fail?
A: No — that’s the quiet phase, and it’s completely normal. Keep feeding on schedule. Most starters pick back up around day 4–5 and double by day 6–7.
Q: Do I need special flour for a starter?
A: No. All-purpose or bread flour and room-temperature water work perfectly. Some bakers add rye or whole wheat for a faster start, but it’s not required.
Q: Can I use a regular mason jar instead of a starter jar?
A: Yes, but a wide-mouth jar makes feeding dramatically easier and less messy. If you’re already using a narrow jar and fighting with it, the wide-mouth upgrade is worth $13.
Q: How do I know my starter is ready to bake?
A: It doubles within 4–6 hours of feeding, and a spoonful floats in water. That’s the classic ready signal. Until then, keep feeding.
Q: What’s the hardest day of making a starter?
A: Day 3. The quiet phase makes beginners think they failed. Push through it — the flavor your starter builds during those “dead” days is what makes sourdough taste like sourdough.
Final Thoughts
Remember the day-3 moment — the flat jar, the doubt, the urge to dump it and start over?
That’s the moment this whole guide is about. The quiet phase isn’t failure. It’s fermentation doing its invisible, important work. Every starter you’ve ever admired on social media went through it. Yours is no different.
So here’s your plan: weigh your feedings, keep your jar clean, and trust the schedule for seven days. When your starter finally doubles and you slide that first scored loaf into your preheated Dutch oven, you’ll understand why bakers call sourdough a labor of love — and why they say the quiet days are the ones that make the bread taste so good.
Day 3 is coming. You’re ready for it now.
Sources
- King Arthur Baking: Sourdough Starter Guide
- The Clever Carrot: Sourdough Starter, Day by Day
- Serious Eats: How to Make and Keep a Sourdough Starter
This post contains affiliate links. If you buy through them, I may earn a commission at no extra cost to you.
