10 Easy Halloween Crafts to Sell for High Profit

Discover 10 profitable, easy halloween crafts to sell at fall markets and school bazaars with high margins and fast batch assembly! 🎃
💬 The Real Mom Question (from Reddit’s r/Craftfairs):
“I spent $8 in supplies making elaborate autumn wreaths for our elementary school bazaar, but shoppers balked at paying $15. What are the best Halloween crafts with sub-$2 material costs that actually sell out?”
Nancy’s Fix: The golden rule of craft fairs is the $5-to-$10 impulse sweet spot! Shoppers will casually pull a $5 or $10 bill from their pocket for cute items like beaded ghost wristlets, clay earrings, or cinnamon pumpkins without second-guessing. Keep your raw material costs under $1.50 and price at 3x to 4x your investment for effortless profit!
Every autumn, thousands of moms and hobby crafters sign up for school bakes, church harvest festivals, and neighborhood craft bazaars hoping to turn their creative passion into extra holiday cash. But between expensive craft store trips that eat your margins and multi-hour projects that leave you exhausted, it is easy to end up working for pennies.
The secret to a wildly successful Halloween booth isn’t making complex 5-hour centerpieces. It is all about batch-making high-margin, visually irresistible impulse buys that solve a problem or bring an instant smile. Whether you want to fund your family’s Christmas budget or build a thriving seasonal side-hustle, these 10 fail-proof projects combine lightning-fast assembly with massive 80% to 95% profit margins. Pair them with our popular halloween craft booth ideas and sturdy halloween treat boxes to dominate your local market!
⚡ The Quick Mom Skim (TL;DR)
- The $5 to $10 Sweet Spot Rule: Stock at least 60% of your vendor display with impulse items priced between $5 and $10 (like earrings, keychains, and scrunchies). These low-friction items sell 3x faster than high-ticket home decor.
- The “Rule of Threes” Pricing Formula: Calculate your exact material cost per unit, multiply by three, and round up to the nearest whole dollar. Never price below 3x your raw material investment.
- Go Vertical on Your Table: Use tiered wooden display risers like the 4-Tier Rotating Wooden Carousel Display to lift products into eye-level line of sight. Flat tablecloth layouts lose up to 50% of browsing foot traffic.
- Eliminate Cashless Friction: At least 70% of modern bazaar shoppers carry zero physical cash. Set up a contactless mobile reader like the Square Contactless Chip Bluetooth Card Reader and display a tabletop QR code sign for Venmo.
🏆 Nancy’s Top 3 Quick Picks for Halloween Crafts to Sell
| Category | Product Name | Why Busy Moms Love It |
|---|---|---|
| Best Merchandising Display | 4-Tier Rotating Wooden Carousel Display | Compact 360-degree rotating rack that holds 40+ earring cards while taking up less than 1 square foot of table space. |
| Best Mobile Payment Tool | Square Contactless Chip Bluetooth Card Reader | Pocket-sized reader that accepts tap-to-pay, chip cards, and Apple Pay with offline transaction queuing for spotty fairgrounds. |
| Best High-Margin Supply | Real Ceylon Cinnamon Sticks for Holiday Crafting | Ultra-fragrant authentic cinnamon sticks that give handmade twine pumpkins an irresistible aroma that draws customers straight to your booth. |
👀 People Also Read
🧺 Nancy’s Real-Mom Supply Swap Table
| Craft Supply Needed | Real-Mom Pantry / Household Swap | What to Buy if Starting Fresh |
|---|---|---|
| Wooden Sign Bases | Free scrap wood 2×4 cutoffs from home renovations | Apple Barrel Matte Acrylic Craft Paint Set |
| Earring Display Packaging | Hand-cut cereal box cardstock stamped with your logo | Kraft Brown Earring Display Cards 100-Pack |
| Pumpkin Stems | Real twigs gathered from the backyard and pruned | Real Ceylon Cinnamon Sticks for Holiday Crafting |
| Glass Luminary Jars | Clean recycled pasta sauce or pickle glass jars | Ball Regular Mouth 16 oz Glass Mason Jars |
| Tabletop Price Signs | Cardstock folded into tent cards written with marker | UNOMOR Mini Chalkboard Signs with Easel Stands |
1. Rustic Wooden Tiered Tray Ghost Signs
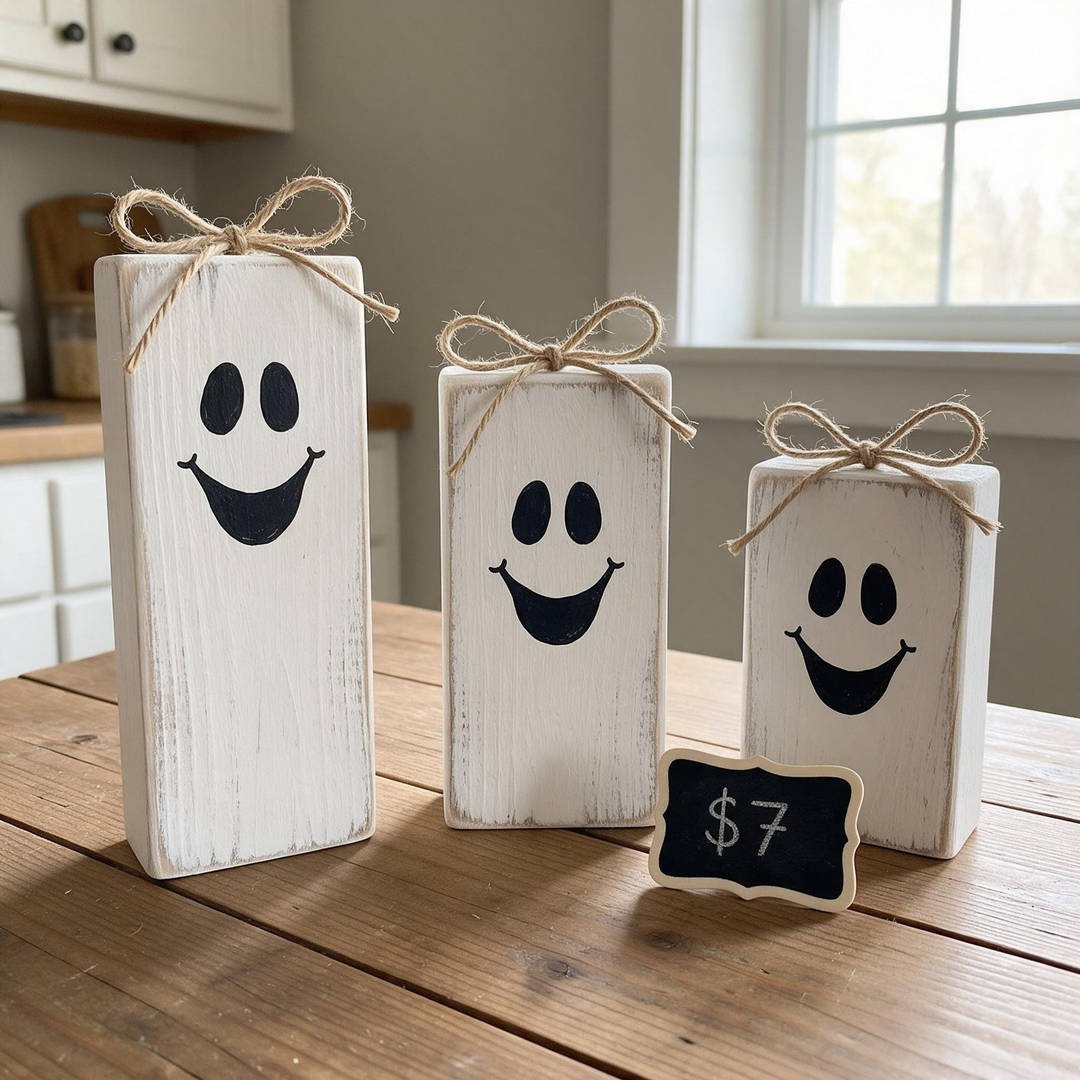
⏱️ Active & Dry Time: 15 mins active, 30 mins dry | 🧼 Mess Level: 2/5 | 👶 Age Adaptation: Adult & Teen (kids can help sand and paint blocks) | 💰 Est. Cost: ~$0.75/sign | 💵 Sells For: $7.00 (89% Profit)
💬 Real Mom Question (from Reddit’s r/Craftfairs): “Do tiered tray wooden signs actually sell, or are they over-saturated?”
Nancy’s Fix: Chunky mini wood signs under $8 are impulse gold! Tiered tray decorators love mixing and matching small accents, and buying three for $20 feels like a budget-friendly treat for shoppers.
These chunky little ghost blocks are my top-selling bazaar item every October. They stand independently without easels, making them ideal for kitchen tiered trays, floating shelves, and teacher desks.
You can ask local hardware stores or contractors for leftover 2×4 pine scraps for free, bringing your production costs down to just pennies of paint and twine!
How to Craft It:
- Cut 2×4 scrap wood into 4-inch, 5-inch, and 6-inch blocks and sand all edges smooth.
- Apply two coats of white chalk paint from your Apple Barrel Matte Acrylic Craft Paint Set and allow to dry.
- Lightly distress edges with coarse sandpaper to create an authentic farmhouse rustic look.
- Paint two simple black oval eyes and an open smiling mouth using black acrylic craft paint.
- Wrap three loops of KINGLAKE Natural Jute Twine Cord around the top of the block and tie a neat rustic bow.
Amazon Craft Materials You Should Buy:
| Material | Purpose & Recommendation |
|---|---|
| Acrylic Paint Set | Apple Barrel Matte Acrylic Craft Paint Set – Fast-drying matte acrylic paints with high opaque coverage. |
| Natural Jute Twine | KINGLAKE Natural Jute Twine Cord – 100% natural textured twine for charming rustic bow accents. |
👉 Watch the Rustic Wooden Ghost Signs Tutorial on YouTube
2. Polymer Clay Ghost & Pumpkin Earring Studs
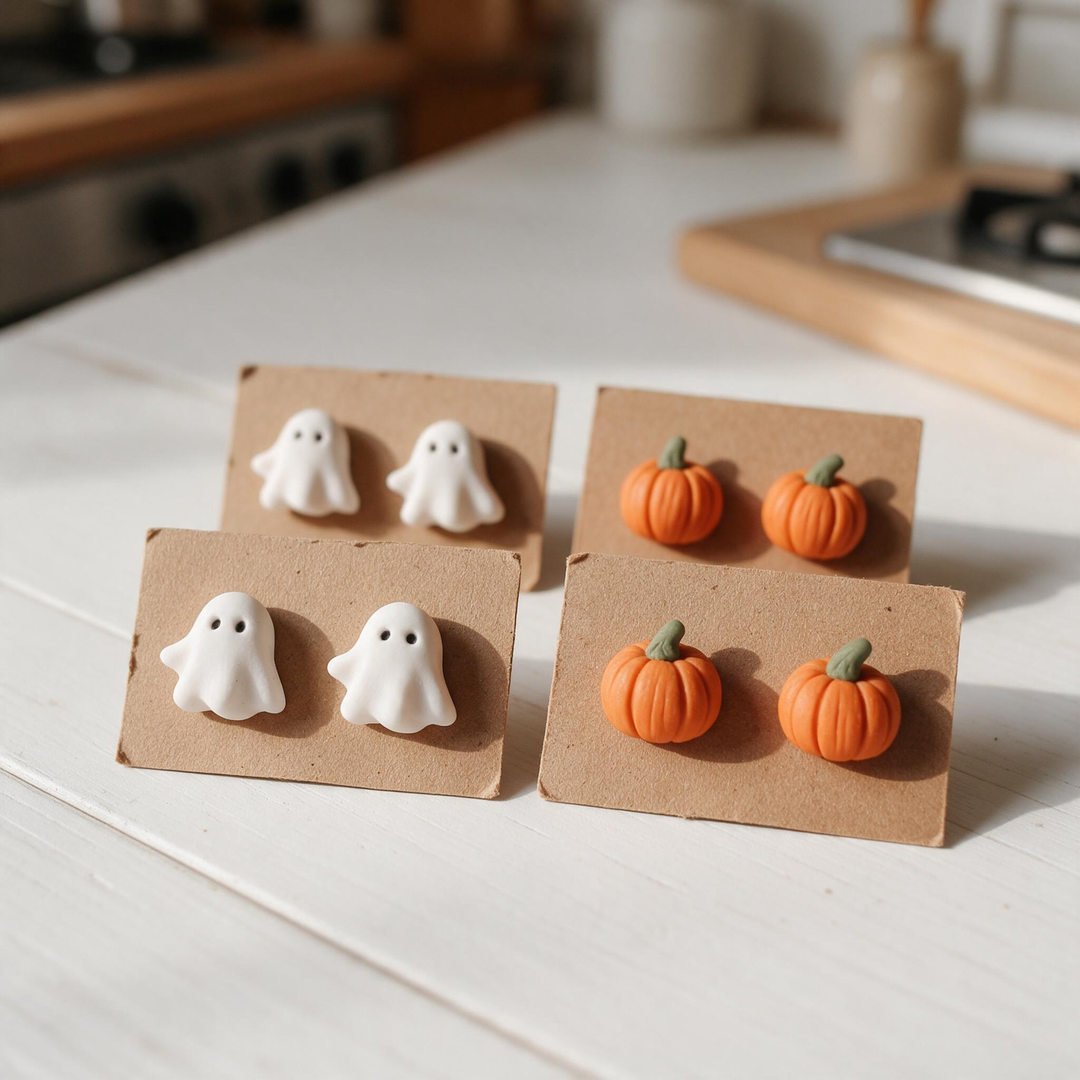
⏱️ Active & Dry Time: 20 mins active, 30 mins bake | 🧼 Mess Level: 1/5 | 👶 Age Adaptation: Adult & Teen (great table craft while listening to podcasts) | 💰 Est. Cost: ~$0.50/pair | 💵 Sells For: $12.00 (95% Profit)
💬 Real Mom Question (from Reddit’s r/EtsySellers): “How do I keep delicate clay studs from snapping off the metal earring posts when customers handle them?”
Nancy’s Fix: Never glue posts on after baking with basic superglue! Embed the metal post head into raw liquid clay or bake a tiny dot of clay over the post base so it becomes permanently fused during curing.
Handmade polymer clay statement studs are arguably the highest-margin craft in the handmade market. A single $3 block of white clay produces over 20 pairs of adorable miniature ghost studs!
Mounting them on professional kraft cards immediately elevates perceived value from “home project” to “boutique artisan jewelry.”
How to Craft It:
- Condition white and orange polymer clay until pliable and roll to an even 1/8-inch thickness.
- Cut tiny ghost and ribbed pumpkin shapes using mini polymer clay cutters or a craft knife.
- Indent eyes and details using a ball-stylus tool and bake on parchment paper at 275°F for 30 minutes.
- Secure hypoallergenic surgical steel posts to the back using UV resin or bake-and-bond clay.
- Mount onto Kraft Brown Earring Display Cards and slide into protective cellophane pouches for your display.
Amazon Craft Materials You Should Buy:
| Material | Purpose & Recommendation |
|---|---|
| Earring Display Cards | Kraft Brown Earring Display Cards 100-Pack – Pre-punched kraft cards with matching self-seal clear bags. |
| Rotating Carousel Display | 4-Tier Rotating Wooden Carousel Display – High-capacity 360-degree rotating spinner for craft tables. |
👉 Watch the Polymer Clay Halloween Earrings Tutorial on YouTube
3. Beaded Ghost & Pumpkin Wristlet Keychains
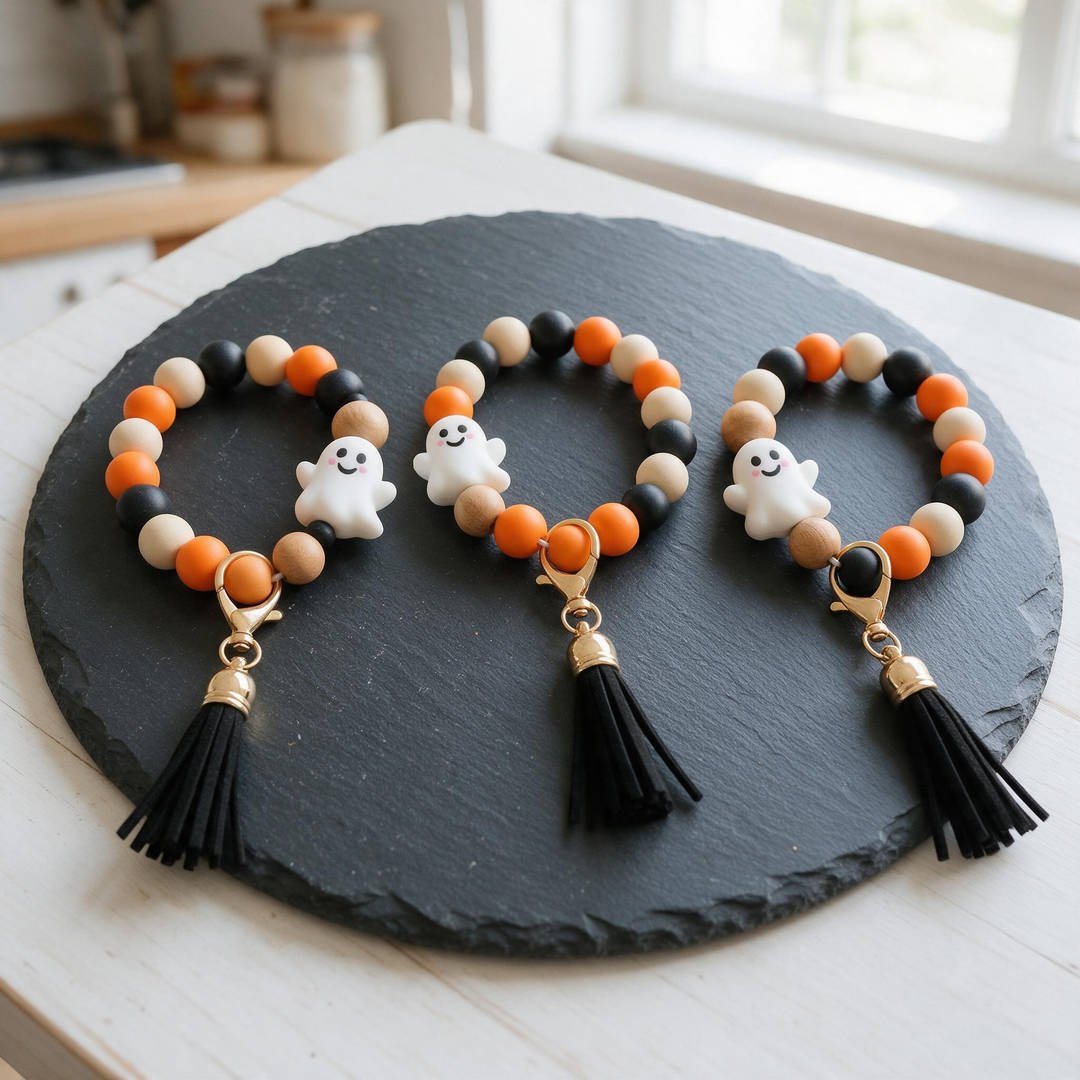
⏱️ Active & Dry Time: 10 mins active, 0 mins dry | 🧼 Mess Level: 0/5 | 👶 Age Adaptation: Ages 8+ (kids love stringing colorful focal beads) | 💰 Est. Cost: ~$1.10/wristlet | 💵 Sells For: $9.00 (88% Profit)
💬 Real Mom Question (from Reddit’s r/Craftfairs): “What is the best impulse craft to sell to middle schoolers, teens, and young moms who browse our booth?”
Nancy’s Fix: Beaded silicone wristlets with cute Halloween focal beads are an undeniable teen and mom favorite! They clip directly onto car keys, diaper bags, or backpacks and make perfect $10 teacher gifts.
If you hate messy glues, loud power tools, and wet paints, beaded wristlets are your dream inventory craft. You can string 30 of these while watching your favorite autumn movies!
Older kids and tweens can easily help assemble them, making this a fun whole-family business venture.
How to Craft It:
- Cut a 12-inch length of durable 1.5mm satin nylon cord and fold in half to create a loop.
- Thread on a gold swivel lobster clasp and secure with a tight overhand knot.
- String alternating 15mm round silicone beads in orange, black, and marble cream.
- Add a silicone smiling ghost or pumpkin focal bead in the center flanked by natural wooden spacer beads.
- Tie off tightly with a double surgeon’s knot, singe cord ends with a lighter, and clip a matching black faux suede tassel.
Amazon Craft Materials You Should Buy:
| Material | Purpose & Recommendation |
|---|---|
| Clear Packaging Bags | Small Clear Self-Adhesive Cellophane Cookie Craft Bags – Crystal-clear resealable bags for professional gift packaging. |
| Mobile Card Reader | Square Contactless Chip Bluetooth Card Reader – Pocket-sized reader that accepts tap-to-pay and mobile wallets. |
👉 Watch the Beaded Halloween Keychain Wristlet Tutorial on YouTube
4. Frosted Mason Jar Spooky Silhouette Lanterns
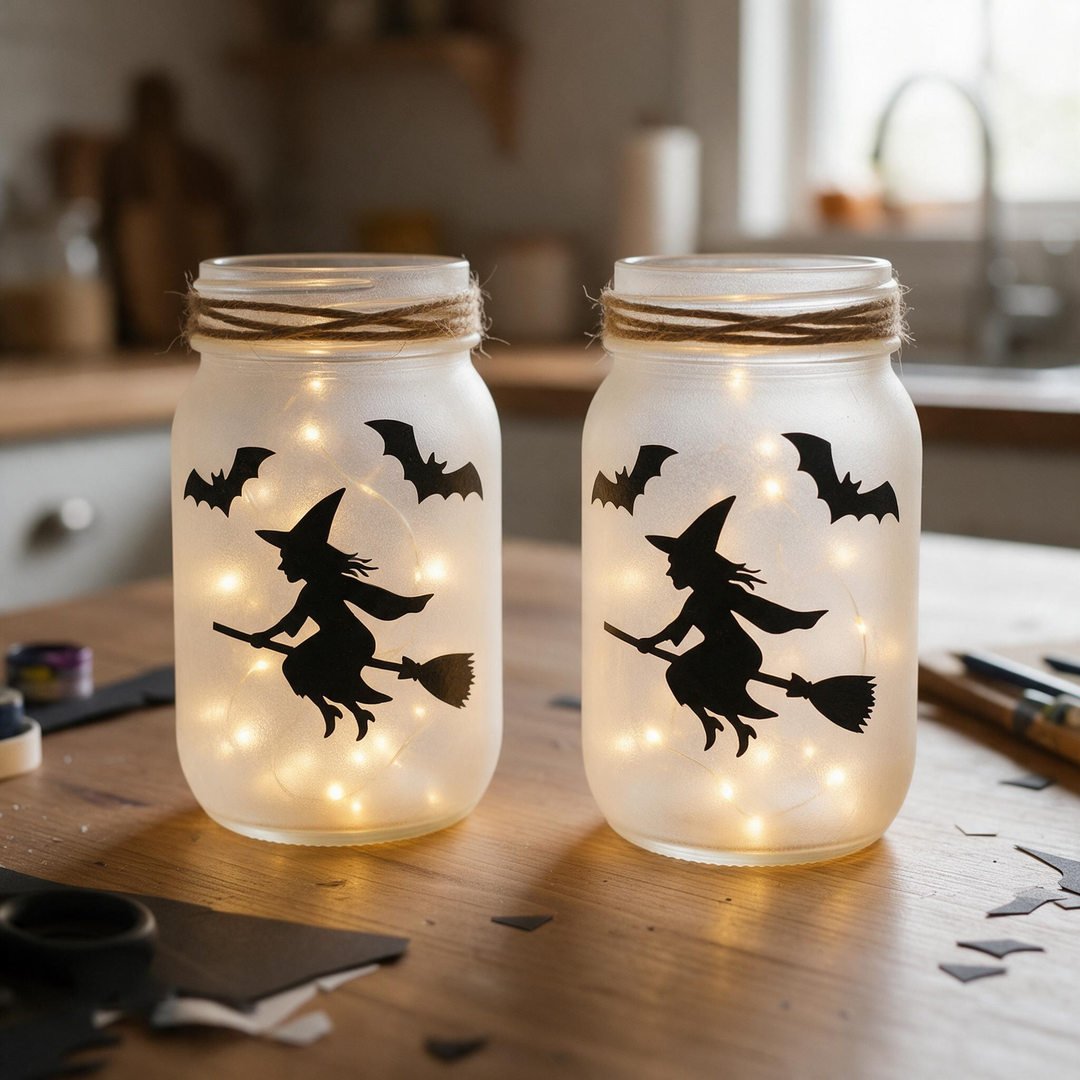
⏱️ Active & Dry Time: 15 mins active, 20 mins dry | 🧼 Mess Level: 2/5 | 👶 Age Adaptation: Ages 6+ (kids can apply vinyl cutouts) | 💰 Est. Cost: ~$1.35/jar | 💵 Sells For: $12.00 (89% Profit)
💬 Real Mom Question (from Reddit’s r/Mommit): “Outdoor craft markets get gloomy and dim around 4 PM in October. How do we keep our booth looking lively?”
Nancy’s Fix: Lighted crafts are like visual magnets when late afternoon shadows fall! Having 4 to 6 glowing mason jar lanterns illuminated on your risers will draw people straight to your booth from across the entire market aisle.
These ethereal glowing lanterns look like enchanted apothecary decor. When paired with flickering micro LED wire lights inside, the semi-translucent frosted glass creates an irresistible warm autumn glow.
Sell them individually for $12 or offer a pair for $20 to encourage bundle sales!
How to Craft It:
- Clean 16 oz glass canning jars thoroughly from your Ball Regular Mouth Glass Mason Jars.
- Spray with two light coats of frosted glass semi-transparent spray paint or brush on matte Mod Podge.
- Apply black vinyl silhouettes of flying witches, howling wolves, or haunted castles to the front glass.
- Wrap natural jute twine tightly around the threaded screw rim and tie off with a small knot.
- Coil a strand of Warm White Micro LED Battery Operated Fairy Lights inside the jar and secure the battery pack under the lid.
Amazon Craft Materials You Should Buy:
| Material | Purpose & Recommendation |
|---|---|
| Mason Jars | Ball Regular Mouth 16 oz Glass Mason Jars 12-Pack – Authentic heavyweight American canning jars. |
| Micro Fairy Lights | Warm White Micro LED Battery Operated Fairy Lights – Flexible copper wire lights with miniature toggle battery packs. |
👉 Watch the Frosted Mason Jar Lanterns Tutorial on YouTube
5. Halloween Pattern Cotton Scrunchie Bundles
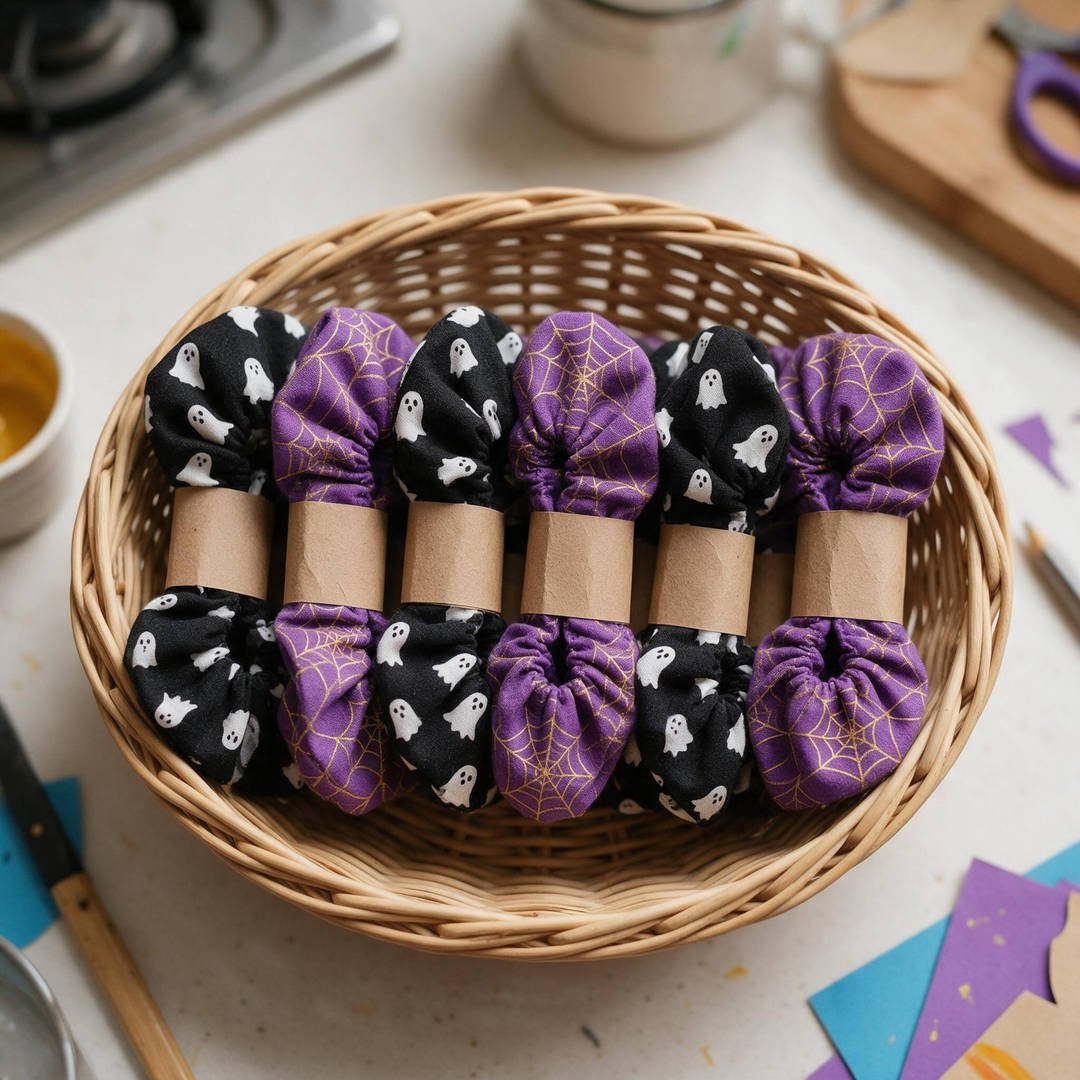
⏱️ Active & Dry Time: 12 mins active, 0 mins dry | 🧼 Mess Level: 0/5 | 👶 Age Adaptation: Teens & Adults (basic beginner sewing machine project) | 💰 Est. Cost: ~$0.40/scrunchie | 💵 Sells For: $6.00 (93% Profit)
💬 Real Mom Question (from Reddit’s r/Craftfairs): “I have bags of Halloween fabric scraps from making costumes. What is the fastest way to turn them into cash?”
Nancy’s Fix: Cotton scrunchies eat up scrap fabric strips like nothing else! Sell them individually for $4 or wrap them in pairs with a cute kraft brand sleeve for $6 to double your transaction volume.
Hair scrunchies are the quintessential low-risk, high-reward craft fair staple. Grandmothers, moms, and schoolgirls love grabbing festive holiday prints to wear all October long.
A single yard of discount holiday cotton produces up to 18 scrunchies, making your profit margin an astounding 93%!
How to Craft It:
- Cut fabric strips measuring 3.5 inches wide by 20 inches long.
- Fold the strip lengthwise right sides together and stitch a 1/4-inch seam down the long edge to form a tube.
- Turn the tube right side out using a safety pin or loop turner.
- Thread an 8-inch piece of 1/4-inch braided elastic through the casing and knot the ends securely.
- Tuck raw fabric ends inside each other and topstitch the opening closed, then wrap in pairs with kraft paper bands.
Amazon Craft Materials You Should Buy:
| Material | Purpose & Recommendation |
|---|---|
| Earring & Tag Cards | Kraft Brown Earring Display Cards 100-Pack – Heavyweight cards easily trimmed into custom product sleeves. |
| Chalkboard Price Signs | UNOMOR Mini Chalkboard Signs with Easel Stands – Mini erasable signs to display “$6 Each or 2 for $10” promos. |
👉 Watch the Halloween Fabric Hair Scrunchies Tutorial on YouTube
6. Soy Wax Pumpkin Spice Wax Melt Clamshells
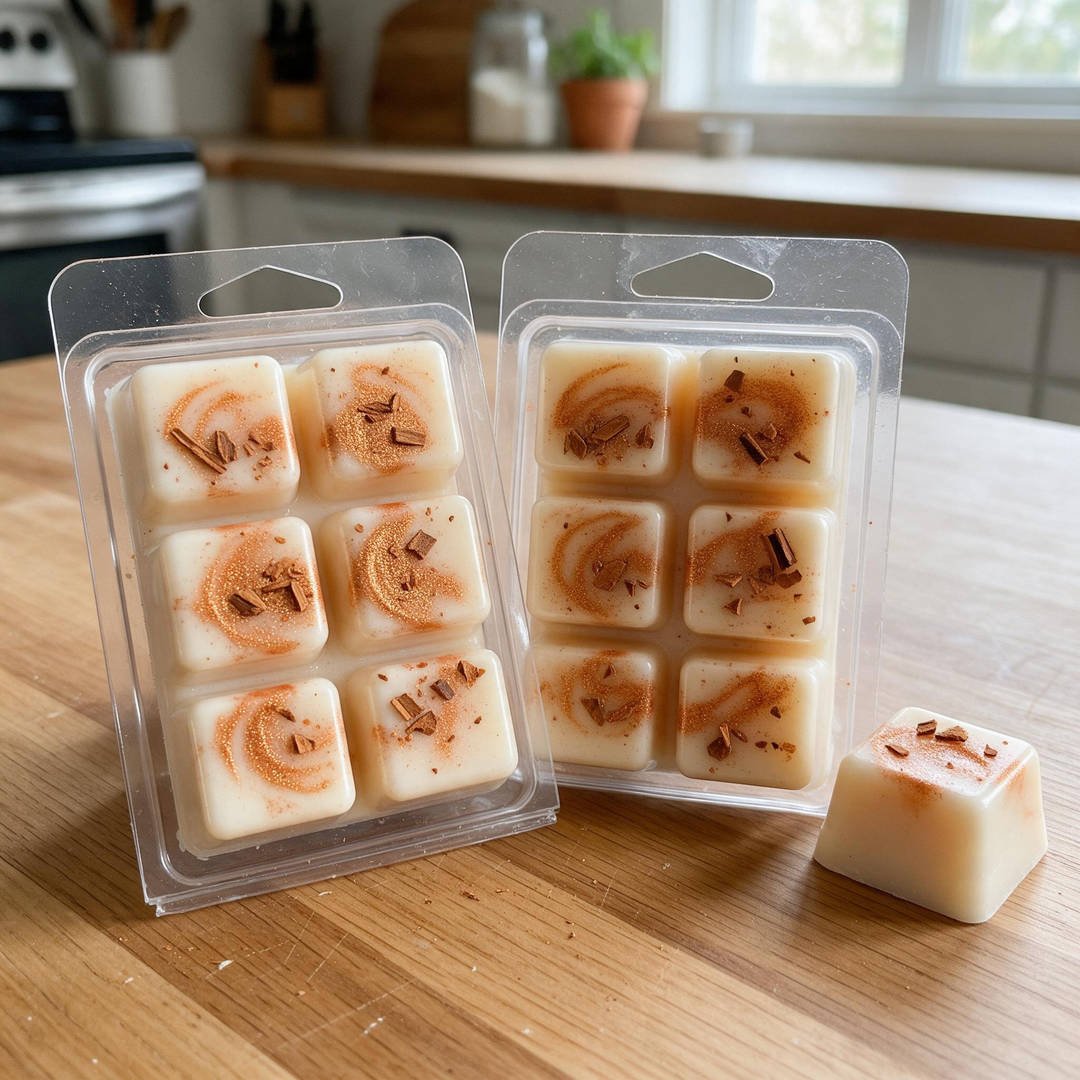
⏱️ Active & Dry Time: 20 mins active, 2 hours cure | 🧼 Mess Level: 2/5 | 👶 Age Adaptation: Adult only (hot wax melting) | 💰 Est. Cost: ~$1.40/clamshell | 💵 Sells For: $8.50 (84% Profit)
💬 Real Mom Question (from Reddit’s r/smallbusiness): “How do small candle businesses compete with big box store candles at fall craft fairs?”
Nancy’s Fix: Wax melts are much cheaper to produce than poured glass jar candles because there are zero glass jars to buy and zero wick centering issues! Clamshell melts ship flat, won’t break in transit, and retail fast under $10.
Fragrance is one of the most powerful emotional sales triggers at any autumn craft market. The comforting aroma of warm pumpkin spice, clove, and vanilla wafting from your booth will stop shoppers dead in their tracks!
Adding a pinch of copper-orange cosmetic mica to the top of each wax cube creates a shimmering, molten lava effect when customers melt them at home.
How to Craft It:
- Melt 100% natural soy wax flakes in a double boiler until temperature reaches 185°F.
- Stir in high-quality pumpkin spice candle fragrance oil at a 10% fragrance load ratio.
- Cool wax to 140°F, then pour carefully into 6-cavity clear plastic wax melt clamshell molds.
- Lightly dust the surface with bronze-orange cosmetic mica powder and crushed real cinnamon bark.
- Allow to cure solid for 48 hours, snap clamshell lids closed, and apply your custom ingredient and safety warning label.
Amazon Craft Materials You Should Buy:
| Material | Purpose & Recommendation |
|---|---|
| Cellophane Bags | Small Clear Self-Adhesive Cellophane Cookie Craft Bags – Clean barrier bags to seal wax clamshells and keep scent fresh. |
| Square Card Reader | Square Contactless Chip Bluetooth Card Reader – Effortless tap-to-pay checkout so customers can buy 3-packs instantly. |
👉 Watch the Pumpkin Spice Soy Wax Melts Tutorial on YouTube
7. Farmhouse Twine Cinnamon Stick Pumpkins
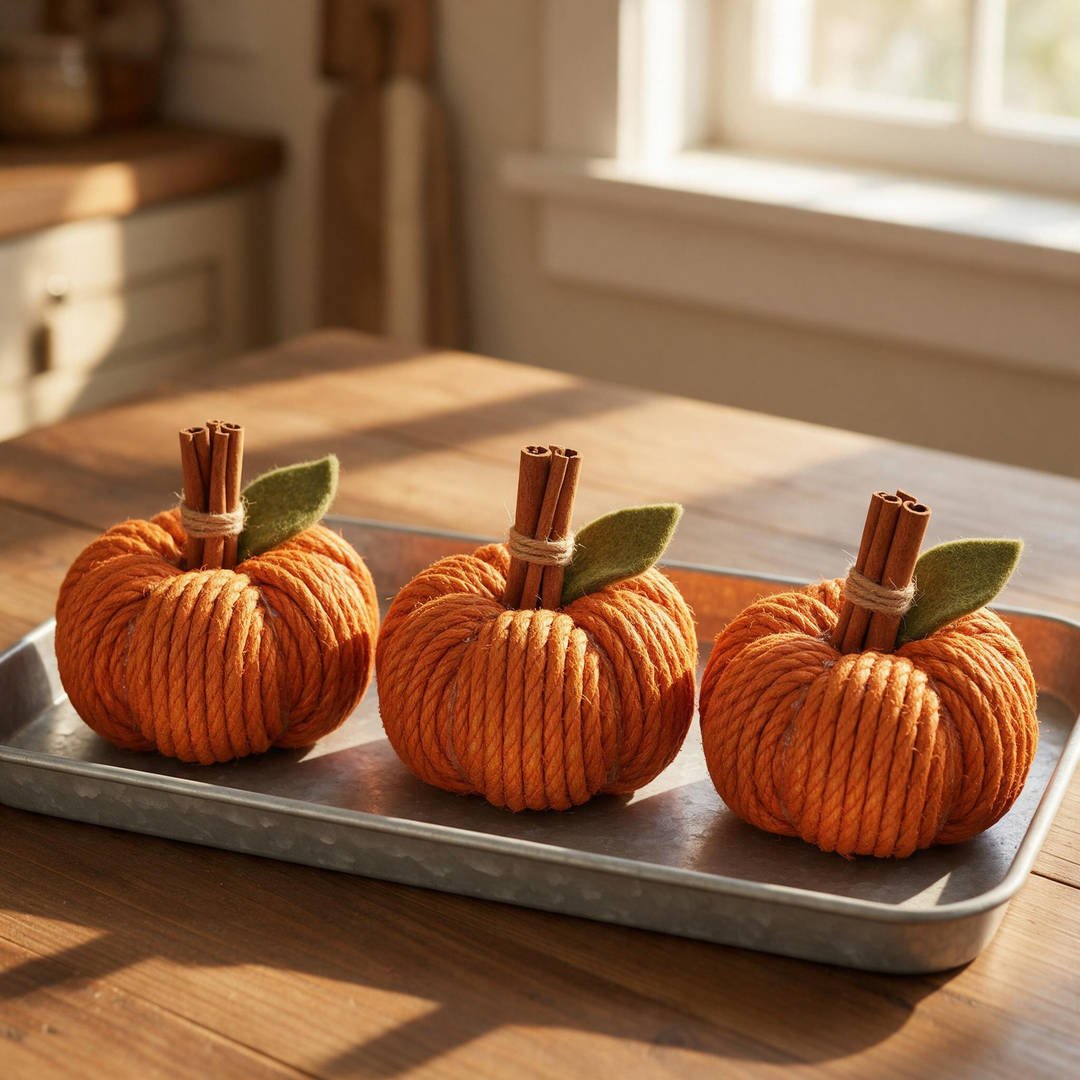
⏱️ Active & Dry Time: 15 mins active, 5 mins dry | 🧼 Mess Level: 1/5 | 👶 Age Adaptation: Ages 7+ (fun tactile rope winding) | 💰 Est. Cost: ~$0.85/pumpkin | 💵 Sells For: $8.00 (89% Profit)
💬 Real Mom Question (from Reddit’s r/Mommit): “I need a craft fair item that smells like autumn without needing open flames or wax warmers.”
Nancy’s Fix: Cinnamon stick stem pumpkins provide natural, room-filling autumn scent that lasts for months! Customers pick them up to sniff them, and once a customer holds an item in their hands, they are 80% more likely to buy it.
These cozy, tactile pumpkins fit right into modern farmhouse and boho autumn home aesthetics. They look gorgeous grouped in bowls on Thanksgiving dining tables or perched on office desks.
Using real Ceylon cinnamon sticks as the pumpkin stem gives them an authentic, spicy holiday fragrance that artificial scent sprays can never replicate.
How to Craft It:
- Coil thick orange-dyed jute rope or twine into a doughnut shape, securing every few loops with hot glue dots.
- Build up layers until a plump, ribbed pumpkin form is achieved.
- Bundle 3 or 4 fragrant sticks from Real Ceylon Cinnamon Sticks for Holiday Crafting and tie tightly with KINGLAKE Natural Jute Twine Cord.
- Insert the cinnamon stick bundle firmly into the center hole of the rope pumpkin and anchor with hot glue.
- Cut a green wool felt leaf and tuck it beside the cinnamon stem for a charming finished touch.
Amazon Craft Materials You Should Buy:
| Material | Purpose & Recommendation |
|---|---|
| Cinnamon Sticks | Real Ceylon Cinnamon Sticks for Holiday Crafting – Pure fragrant natural cinnamon sticks with long-lasting scent. |
| Jute Twine Cord | KINGLAKE Natural Jute Twine Cord – Sturdy natural jute twine for binding and decorative wrapping. |
👉 Watch the Twine Cinnamon Stick Pumpkin Tutorial on YouTube
8. Decoupaged Book Page Halloween Bauble Ornaments
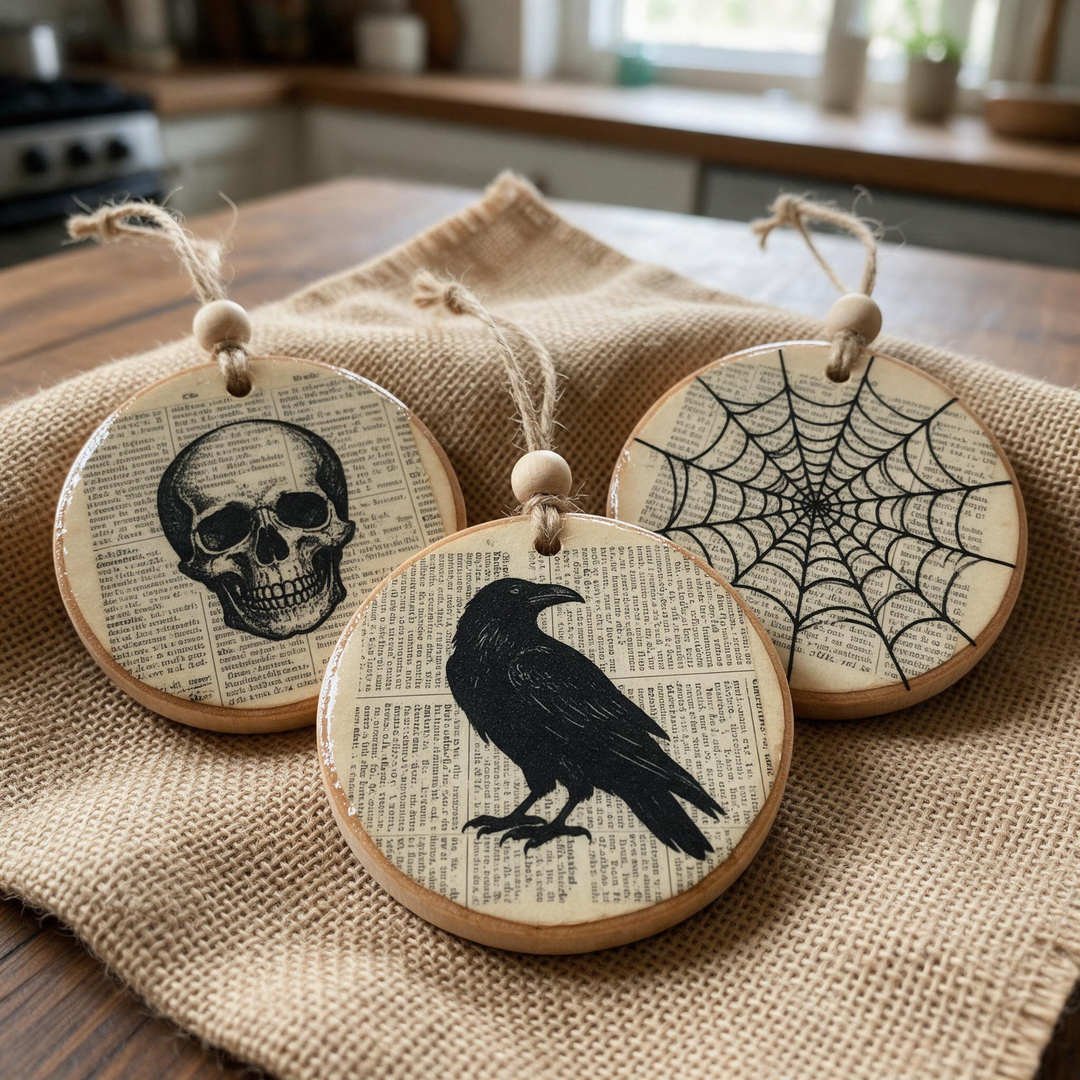
⏱️ Active & Dry Time: 15 mins active, 25 mins dry | 🧼 Mess Level: 2/5 | 👶 Age Adaptation: Ages 8+ (brushing Mod Podge over paper) | 💰 Est. Cost: ~$0.55/ornament | 💵 Sells For: $6.50 (91% Profit)
💬 Real Mom Question (from Reddit’s r/Crafts): “Do people really buy Halloween ornaments, or is ornament buying just a Christmas thing?”
Nancy’s Fix: Halloween trees and spooky branch displays are huge trend right now! Shoppers love buying flat wooden ornaments because they also double as luxury gift tags tied onto Halloween treat boxes and wine bottles.
Vintage gothic dictionary art is timelessly popular. Combining aged book pages with stark black raven, skull, and spider silhouettes gives these birchwood ornaments an authentic Edgar Allan Poe vibe.
They are feather-light, flat to pack, and virtually indestructible in transit, making them fantastic for Etsy shipping as well!
How to Craft It:
- Cut yellowed dictionary pages or vintage sheet music into circles matching 3-inch birchwood discs.
- Brush a smooth layer of Mod Podge Waterbase Sealer, Glue & Finish across the wood disc and adhere the paper, smoothing out air bubbles.
- Stamp a black silhouette of a raven, bat, or spider onto the center using permanent waterproof ink.
- Seal with a topcoat of Mod Podge to protect against moisture and give a silky satin finish.
- Loop a 7-inch length of KINGLAKE Natural Jute Twine Cord through the pre-drilled hole and string a small wooden bead.
Amazon Craft Materials You Should Buy:
| Material | Purpose & Recommendation |
|---|---|
| Mod Podge Sealer | Mod Podge Waterbase Sealer, Glue & Finish – The gold standard craft decoupage sealer for paper and wood. |
| Jute Twine Cord | KINGLAKE Natural Jute Twine Cord – Clean natural string for hanging loops and rustic packaging. |
👉 Watch the Decoupage Halloween Decor Tutorial on YouTube
9. Jumbo Ghost & Monster Paperclip Bookmarks
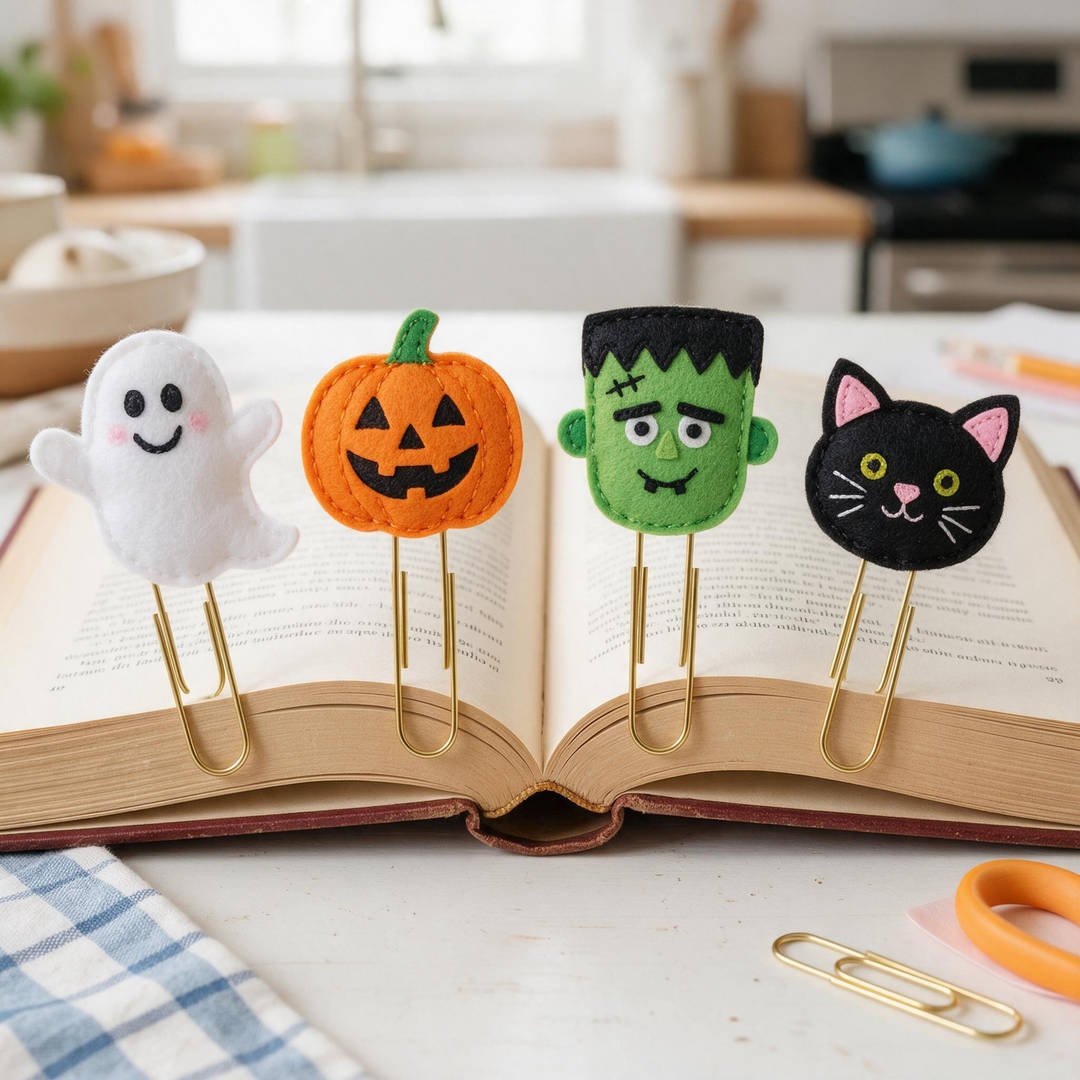
⏱️ Active & Dry Time: 8 mins active, 10 mins dry | 🧼 Mess Level: 1/5 | 👶 Age Adaptation: Ages 5+ (gluing felt toppers to clips) | 💰 Est. Cost: ~$0.45/clip | 💵 Sells For: $5.00 (91% Profit)
💬 Real Mom Question (from Reddit’s r/Craftfairs): “What is the ultimate sub-$5 craft for moms looking for quick stocking stuffers or student gifts?”
Nancy’s Fix: Jumbo decorative planner paperclips are an absolute smash hit! Readers, students, and planner lovers buy them in sets of 2 or 3, making them the easiest $5 add-on sale at your register.
These jumbo 4-inch gold paperclips feel substantial and luxurious in hand. Topped with smiling felt ghosts, cheerful pumpkins, or quirky Frankenstein heads, they peek adorably out of novels and planners.
Display them clipped onto the edges of open vintage books on your table so customers can immediately visualize how to use them!
How to Craft It:
- Cut matching front and back silhouette shapes from stiff craft felt (white ghosts, orange pumpkins, green monsters).
- Draw cute facial expressions using fine-tip permanent markers or stitch with embroidery floss.
- Sandwich the top loop of a 4-inch gold jumbo paperclip between the two felt cutout pieces.
- Bond firmly using quick-grab craft glue or hot glue, pressing edges together until set.
- Slide onto a branded backing card from Kraft Brown Earring Display Cards and seal inside Small Clear Cellophane Cookie Craft Bags.
Amazon Craft Materials You Should Buy:
| Material | Purpose & Recommendation |
|---|---|
| Kraft Display Cards | Kraft Brown Earring Display Cards 100-Pack – Heavy cardstock backing for retail presentation. |
| Clear Cellophane Bags | Small Clear Self-Adhesive Cellophane Cookie Craft Bags – Self-sealing cellophane pouches to protect felt from dust. |
👉 Watch the Jumbo Paperclip Bookmark Tutorial on YouTube
10. Halloween Party Favor Goodie Box Bundles
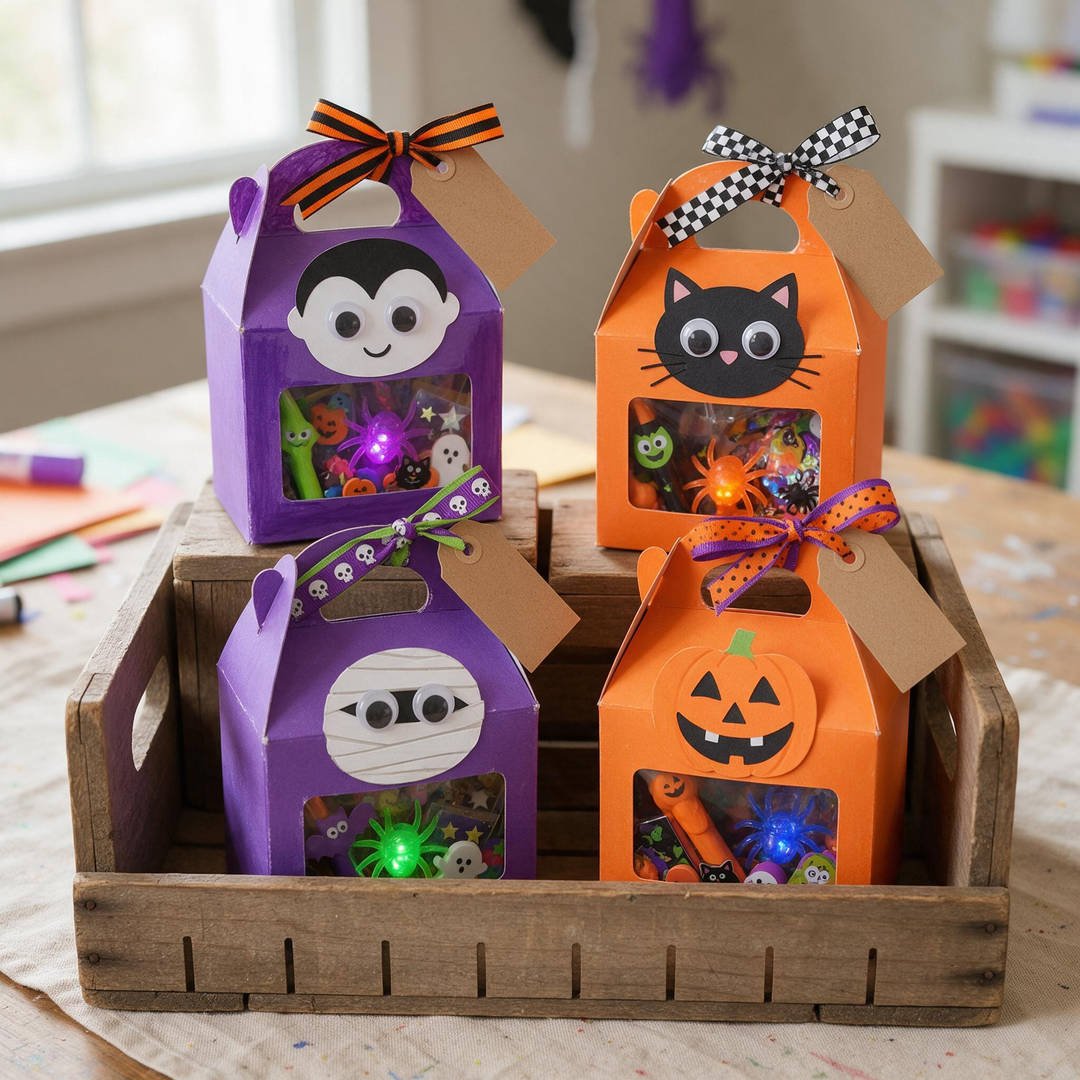
⏱️ Active & Dry Time: 10 mins active, 0 mins dry | 🧼 Mess Level: 0/5 | 👶 Age Adaptation: Ages 3+ (fun family assembly line) | 💰 Est. Cost: ~$1.15/box | 💵 Sells For: $6.00 each / 4 for $20 (81% Profit)
💬 Real Mom Question (from Reddit’s r/Mommit): “What can I sell to desperate room moms who walk past my craft booth looking stressed about upcoming school parties?”
Nancy’s Fix: Sell ‘Ready-to-Go Classroom Favor Packs’! Busy parents and room moms will happily pay $20 for a set of 4 or 5 pre-assembled, allergy-safe goodie boxes that save them hours of late-night party prep.
Never underestimate the power of selling convenience to busy parents. Pre-assembled, beautifully curated Halloween favor boxes save room moms hours of driving to party supply stores and stuffing bags the night before school events!
Price them at $6 individually or offer a 4-pack bundle for $20 to encourage immediate multi-unit sales.
How to Craft It:
- Pop open colorful mini cardstock gable boxes and reinforce the bottom seams with tape.
- Fill with a curated mix of non-food Halloween novelties: a spider ring, temporary tattoo sheet, Halloween pencil, and glow bracelet.
- Fold the top gable roof closed and thread festive orange or purple ribbon through the handle loop.
- Attach a stamped kraft tag reading ‘Happy Halloween’ or ‘Spooky Treats’.
- Arrange inside a stepped wooden crate beside a UNOMOR Mini Chalkboard Sign advertising the ‘$6 Each / 4 for $20’ party pack bundle.
Amazon Craft Materials You Should Buy:
| Material | Purpose & Recommendation |
|---|---|
| Chalkboard Table Signs | UNOMOR Mini Chalkboard Signs with Easel Stands – Professional tabletop signs for pricing tiers and package deals. |
| Square Card Reader | Square Contactless Chip Bluetooth Card Reader – Accepts credit cards and mobile taps seamlessly at crowded fairs. |
👉 Watch the Halloween Treat Box Bundle Tutorial on YouTube
❓ Real Mom Questions Answered (From Reddit & Parenting Forums)
How much cash float should I bring to an autumn craft bazaar?
💬 Reddit Vendor Question (from r/Craftfairs): “This is my first time selling crafts in person. How much physical change should I keep in my cash box?”
Nancy’s Answer: Always bring exactly $100 in cash float, broken down into small denominations: two $20 bills, four $10 bills, three $5 bills, and twenty-five $1 bills.
Avoid accepting $50 or $100 bills for small $6 purchases early in the morning, as it will instantly wipe out your single-dollar change. Keep your cash box concealed under your table skirt or wear a hands-free vendor fanny pack for peace of mind!
How do I price my handmade Halloween crafts so I actually make a profit?
💬 Reddit Vendor Question (from r/EtsySellers): “I always feel guilty charging more than $5 for things I made at home. How do I stop underpricing myself?”
Nancy’s Answer: Use the non-negotiable “Rule of Threes”: Raw Materials Cost + Your Labor Time x 3 = Minimum Retail Price.
If supplies for a pair of clay earrings cost $1.50 and take 5 minutes to assemble, pricing them at $12 is completely fair, market-standard, and gives you the margins necessary to cover your booth registration fees. Remember: shoppers are paying for your artistic skill, curated supplies, and the convenience of a finished handmade gift!
What permits or licenses do I need to sell crafts at school or church fairs?
💬 Reddit Vendor Question (from r/smallbusiness): “Do I need an LLC or business license just to sell crafts at a two-day church holiday bazaar?”
Nancy’s Answer: For one-off school, church, or community bazaar tables, most organizers operate under their own general event umbrella permit and do not require individual vendor business licenses.
However, if you plan to sell continuously throughout autumn at city farmers markets or online via Etsy, registering a basic DBA (Doing Business As) and obtaining a state sales tax permit takes less than 30 minutes online and keeps your side-income completely above-board!
🧹 Real-Mom Cleanup & Storage Checklist
- The Rolling Clear Bin Strategy: Pack all your inventory into clear plastic storage totes with latching lids sorted by price point ($5 bin, $8 bin, $12 bin). This speeds up booth setup to under twenty minutes.
- Wrinkle-Free Fitted Table Cover: Invest in a 6-foot black spandex fitted table cover. It never requires ironing, won’t blow away in outdoor autumn wind, and creates hidden storage beneath your table for extra inventory boxes.
- Battery-Operated Mobile Hotspot: Don’t rely on spotty municipal park Wi-Fi for your credit card reader. Test your phone’s personal hotspot before arriving at the venue so your card reader never experiences processing delays.
- The “Emergency Vendor Kit” Pouch: Keep a zippered pouch stocked with extra price tags, zip ties, a black Sharpie, masking tape, scissors, wet wipes, and pain reliever for stress-free market days!