10 Easy DIY Halloween Treat Boxes for Kids to Make

Discover 10 easy DIY halloween treat boxes for kids with sturdy bottoms, candy-safe liners, and quick assembly for classroom parties! 🎃
💬 The Real Mom Question (from Reddit’s r/Parenting):
“I made paper treat boxes for my son’s kindergarten class last year and half the bottoms fell out on the playground asphalt. How do you reinforce them without making them look like a roll of duct tape exploded?”
Nancy’s Fix: Here is my golden classroom survival rule: always stick two heavy-duty glue dots or double-sided mounting tape on the bottom interlocking flaps before packing. It takes five seconds per box and holds up to a dozen fun-size candy bars without bowing!
As a mom who has spent one too many late October nights frantically assembling 24 classroom favor containers, I know that handmade treat boxes can either be a total triumph or an absolute tearful disaster. Between flimsy cardstock tabs that rip under the weight of three miniature chocolate bars and intricate folding tutorials that require an engineering degree, moms need quick, fail-proof solutions that kids can actually help build.
Whether you are prepping for a kindergarten Halloween bash, setting up a neighborhood trunk-or-treat station, or filling fun gift boxes for your trick-or-treaters, these 10 hands-on projects use budget-friendly materials and smart structural reinforcements. Pair them with our favorite halloween treat holders and easy halloween treat bags to create an unforgettable spooky season!
⚡ The Quick Mom Skim (TL;DR)
- The Double-Lock Bottom Hack: Never rely solely on pre-cut interlocking paper tabs for heavy candy. Reinforce the bottom seam inside with two Glue Dots Extra Strength or heavy-duty tape to prevent sidewalk candy spills.
- Pre-Scored Boxes Save Sanity: When making 20+ favors, buy bulk pre-scored Halloween Gable Treat Boxes and let your kids handle the decorating rather than measuring and scoring 3D boxes from scratch.
- Grease-Proof Barrier Rule: If you are packing fresh baked cookies or buttery popcorn, line the cardstock base with a small square of parchment paper or use food-safe Clear Window Bakery Favor Boxes.
- Toddler-Friendly Fasteners: Swap fiddly paper tuck-in tabs for mini wooden clothespins or adhesive velcro coins so little fingers can peek inside without tearing the box to shreds.
🏆 Nancy’s Top 3 Quick Picks for Halloween Treat Boxes
| Category | Product Name | Why Busy Moms Love It |
|---|---|---|
| Best Bulk Classroom Value | Halloween Gable Treat Boxes Bulk Pack | Pre-folded gable boxes that pop open in 3 seconds flat, complete with sturdy carry handles. |
| Best Structural Reinforcement | Glue Dots Craft Extra Strength Adhesive | Instant-bonding adhesive dots that permanently secure bottom flaps with zero drying time or glue mess. |
| Best Cardstock for Origami | Heavyweight Colored Cardstock 100 Sheets | 65 lb premium cardstock that holds crisp, clean fold creases without cracking at the edges. |
🧺 Nancy’s Real-Mom Supply Swap Table
| Craft Supply Needed | Real-Mom Pantry / Household Swap | What to Buy if Starting Fresh |
|---|---|---|
| Cardstock Treat Box Base | Recycled clean cardboard pasta or snack boxes cut down | Heavyweight Colored Cardstock 100 Sheets |
| Heavy-Duty Bottom Tape | Masking tape or standard clear packaging tape | Gorilla Heavy Duty Double Sided Mounting Tape |
| Mummy Box Wrappings | Torn strips of white toilet paper or paper towels | CURAD Rolled Gauze Bandages |
| Monster Eye Accents | White bottle caps with black sharpie pupils | Febsnow 200pcs Self-Adhesive Googly Wiggle Eyes |
| Box Handles & Ties | Recycled yarn scraps or twist ties from bread loaves | KINGLAKE Natural Jute Twine Cord |
1. Haunted House Gable Treat Box
⏱️ Active & Dry Time: 15 mins active, 5 mins dry | 🧼 Mess Level: 1/5 | 👶 Age Adaptation: Ages 4+ (younger kids stick yellow windows) | 💰 Est. Cost: ~$0.38/box
💬 Real Mom Question (from Reddit’s r/kindergarten): “Our school requires everything to be individually packaged with a handle so kindergarteners can carry their treats out to the bus. How do I make these durable?”
Nancy’s Fix: Pre-assembled gable boxes are a lifesaver for school buses because the handle is built directly into the die-cut top. Reinforce the inner handle loop with a strip of clear packing tape so even eager little tuggers won’t rip it!
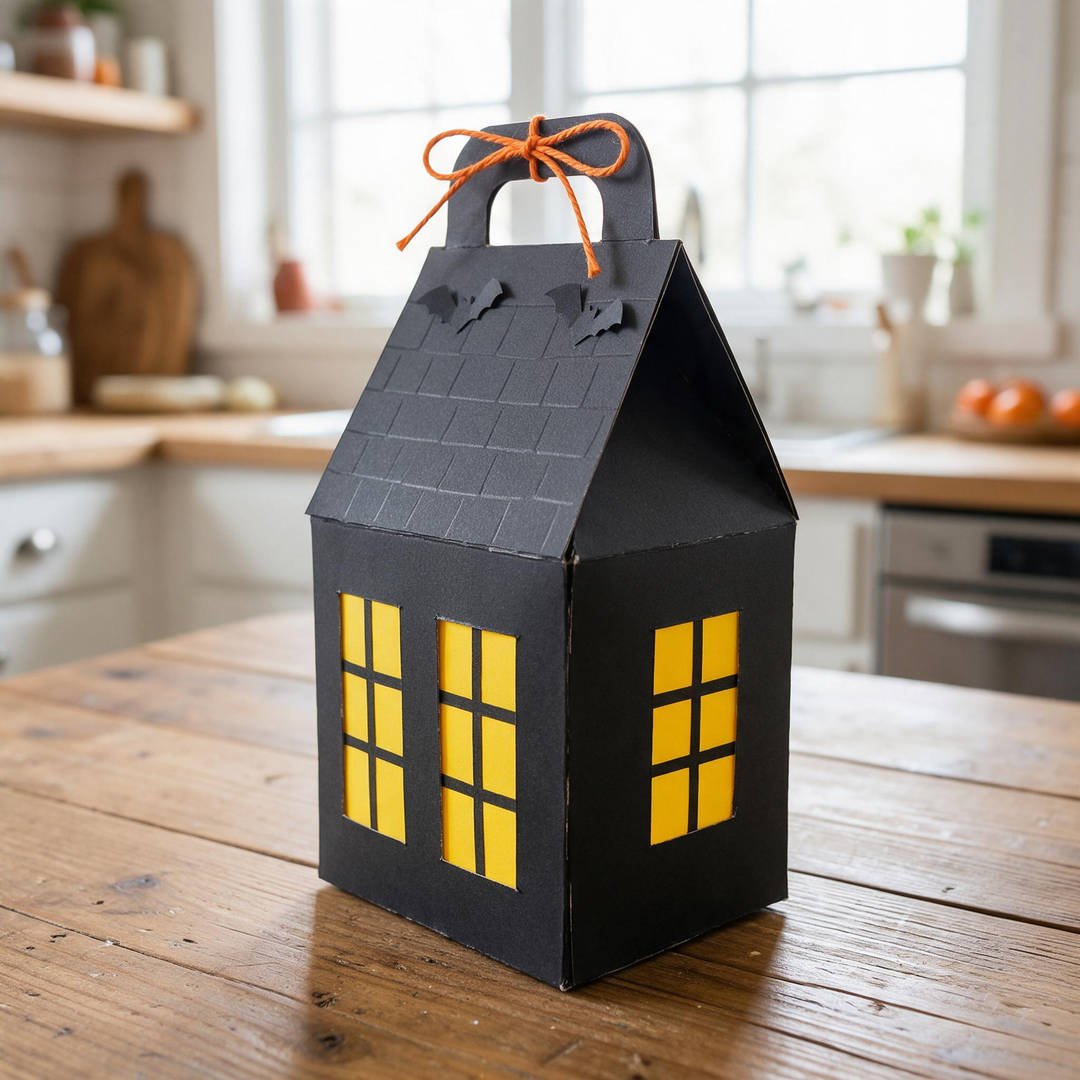
This spooky little manor is my absolute go-to whenever I need to impress a classroom full of excited elementary schoolers. It looks like a high-end specialty boutique gift box, but it comes together in minutes using basic paper cutouts.
Kids love playing architect by placing spooky glowing yellow windows and tiny flying bats across the black gabled rooftop. If you want more school-friendly projects, check out our halloween crafts for school roundup.
How to Craft It:
- Pop open a black gable box base from your Halloween Gable Treat Boxes Bulk Pack and fold the bottom tabs until they lock.
- Place a strip of Gorilla Heavy Duty Double Sided Mounting Tape across the bottom inside seam for maximum candy weight capacity.
- Cut out 1-inch squares of yellow cardstock from Heavyweight Colored Cardstock and draw window pane grids using a black marker.
- Have your child use an Elmer’s Disappearing Purple School Glue Stick to glue four glowing windows and tiny bat cutouts onto the front and sides.
- Fill with goodies, fold the top gable roof closed, and secure the handle with a loop of orange twine.
Amazon Craft Materials You Should Buy:
| Material | Purpose & Recommendation |
|---|---|
| Gable Boxes | Halloween Gable Treat Boxes Bulk Pack – Sturdy pre-creased cardstock boxes with built-in carry handles. |
| Mounting Tape | Gorilla Heavy Duty Double Sided Mounting Tape – Extreme-hold tape that locks cardboard bottoms permanently. |
👉 Watch the Haunted House Gable Treat Box Tutorial on YouTube
2. Mummy Wrapped Candy Gable Box
⏱️ Active & Dry Time: 10 mins active, 0 mins dry | 🧼 Mess Level: 0/5 | 👶 Age Adaptation: Ages 2+ (toddlers love winding gauze wrap) | 💰 Est. Cost: ~$0.32/box
💬 Real Mom Question (from Reddit’s r/toddlers): “What is a Halloween treat box craft that an energetic 2-year-old can do without eating wet glue or smearing paint everywhere?”
Nancy’s Fix: Mummy wrapping is completely glue-free if you use self-adhesive gauze bandages! Toddlers can spin the box round and round while winding the tape, and you finish it with peel-and-stick googly eyes.
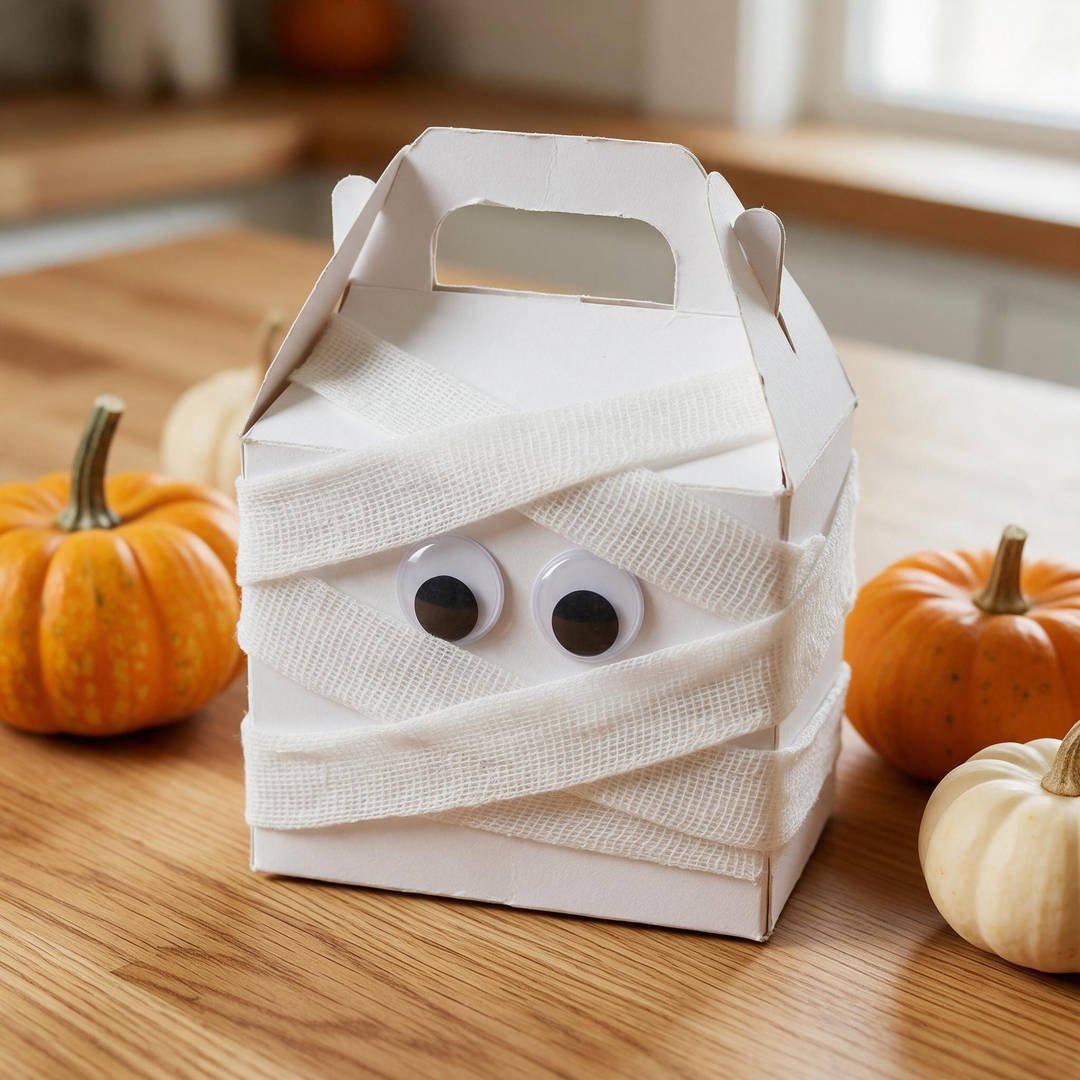
This mummy box is pure magic for toddlers and preschoolers who crave tactile, sensory crafting. There is zero wet paint, zero sticky glue spillover, and zero drying time.
You can assemble a dozen of these while dinner is simmering on the stove. Don’t worry if your little one wraps the bandage in lopsided bunches—mummies are supposed to look ancient and messy!
How to Craft It:
- Assemble a small white cardstock treat box or fold a recycled snack carton.
- Peel the backing off a roll of CURAD Rolled Gauze Bandages or use self-clinging medical wrap.
- Anchor one end of the gauze to the box base using a Glue Dots Extra Strength.
- Let your toddler rotate the box, wrapping the bandage criss-cross around the exterior while leaving a 1-inch peek-a-boo slit near the top.
- Press two oversized peel-and-stick eyes from your Febsnow 200pcs Self-Adhesive Googly Wiggle Eyes directly into the peek-a-boo slit.
Amazon Craft Materials You Should Buy:
| Material | Purpose & Recommendation |
|---|---|
| Gauze Bandages | CURAD Rolled Gauze Bandages – Soft, breathable textured gauze that wraps easily around paper boxes. |
| Googly Eyes | Febsnow 200pcs Self-Adhesive Googly Wiggle Eyes – Peel-and-stick wiggle eyes that adhere firmly to fabric wrap without glue. |
👉 Watch the Mummy Wrapped Candy Box Tutorial on YouTube
3. Frank-in-a-Box Frankenstein Treat Box
⏱️ Active & Dry Time: 12 mins active, 5 mins dry | 🧼 Mess Level: 1/5 | 👶 Age Adaptation: Ages 3+ (fun hair cutting and gluing) | 💰 Est. Cost: ~$0.28/box
💬 Real Mom Question (from Reddit’s r/Parenting): “My preschooler loves cutting paper with blunt safety scissors. Is there a craft where uneven cuts actually look intentional?”
Nancy’s Fix: Frankenstein hair is made for crooked scissor cuts! Let your child snip jagged zig-zags into black construction paper. The wilder and more uneven the bangs, the cuter Frankenstein looks!
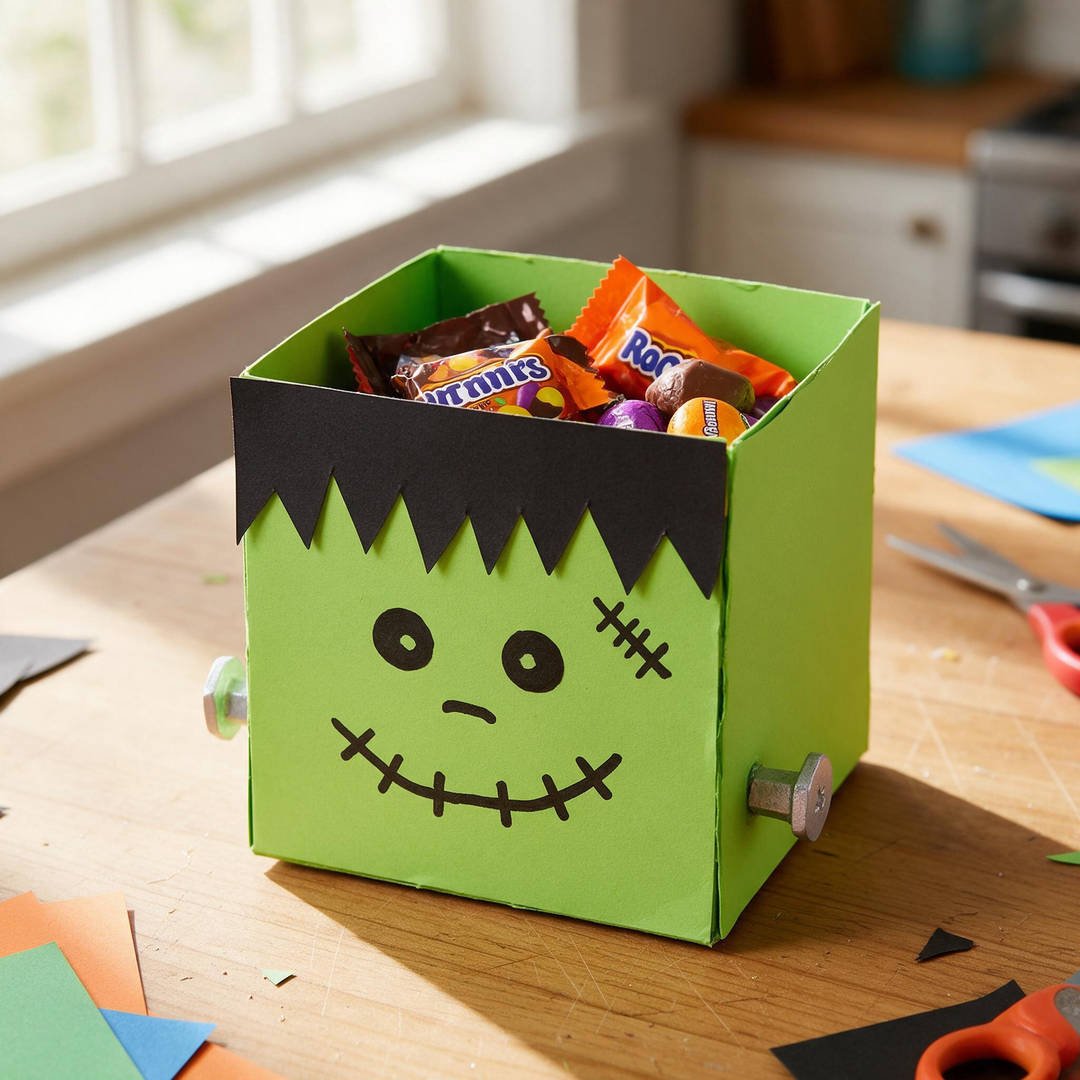
Frankenstein is one of the most forgiving Halloween characters for little crafters because perfection is the enemy here! A goofy grin and crooked stitches make each box completely one-of-a-kind.
This project is fantastic for developing fine motor skills and grip control with safety scissors. If you love upcycling packaging, see how we reuse household cartons in our recycled halloween crafts guide.
How to Craft It:
- Fold a square lime-green cardstock treat box from Heavyweight Colored Cardstock.
- Cut a 1.5-inch wide strip of black cardstock and have your child snip jagged hair points using BURVAGY Kids Safety Scissors.
- Adhere the jagged hair strip along the top front rim with an Elmer’s Disappearing Purple School Glue Stick.
- Stick two googly eyes below the hair and use Crayola Ultra Clean Washable Markers to draw a stitched scar and a goofy zigzag mouth.
- Cut two small silver neck bolts from scrap paper and attach them to the lower sides using Glue Dots Extra Strength.
Amazon Craft Materials You Should Buy:
| Material | Purpose & Recommendation |
|---|---|
| Colored Cardstock | Heavyweight Colored Cardstock 100 Sheets – Vibrant neon green and deep black sheets for box construction. |
| Safety Scissors | BURVAGY 12-Pack 5-Inch Kids Safety Scissors – Blunt-tip ergonomic craft scissors designed for small hands. |
👉 Watch the Frank-in-a-Box Frankenstein Treat Box Tutorial on YouTube
4. Jack-O’-Lantern Origami Pumpkin Box
⏱️ Active & Dry Time: 10 mins active, 0 mins dry | 🧼 Mess Level: 0/5 | 👶 Age Adaptation: Ages 5+ (or adults fold and kids draw faces) | 💰 Est. Cost: ~$0.15/box
💬 Real Mom Question (from Reddit’s r/Crafts): “Every origami box tutorial I try collapses when I crease cardstock. How do I get sharp folds without tearing the paper?”
Nancy’s Fix: Cardstock fibers are thick, so you should always score your fold lines first! Run the edge of a butter knife or a clean plastic ruler along your fold marks before bending. You will get razor-sharp folds that lock firmly into place!
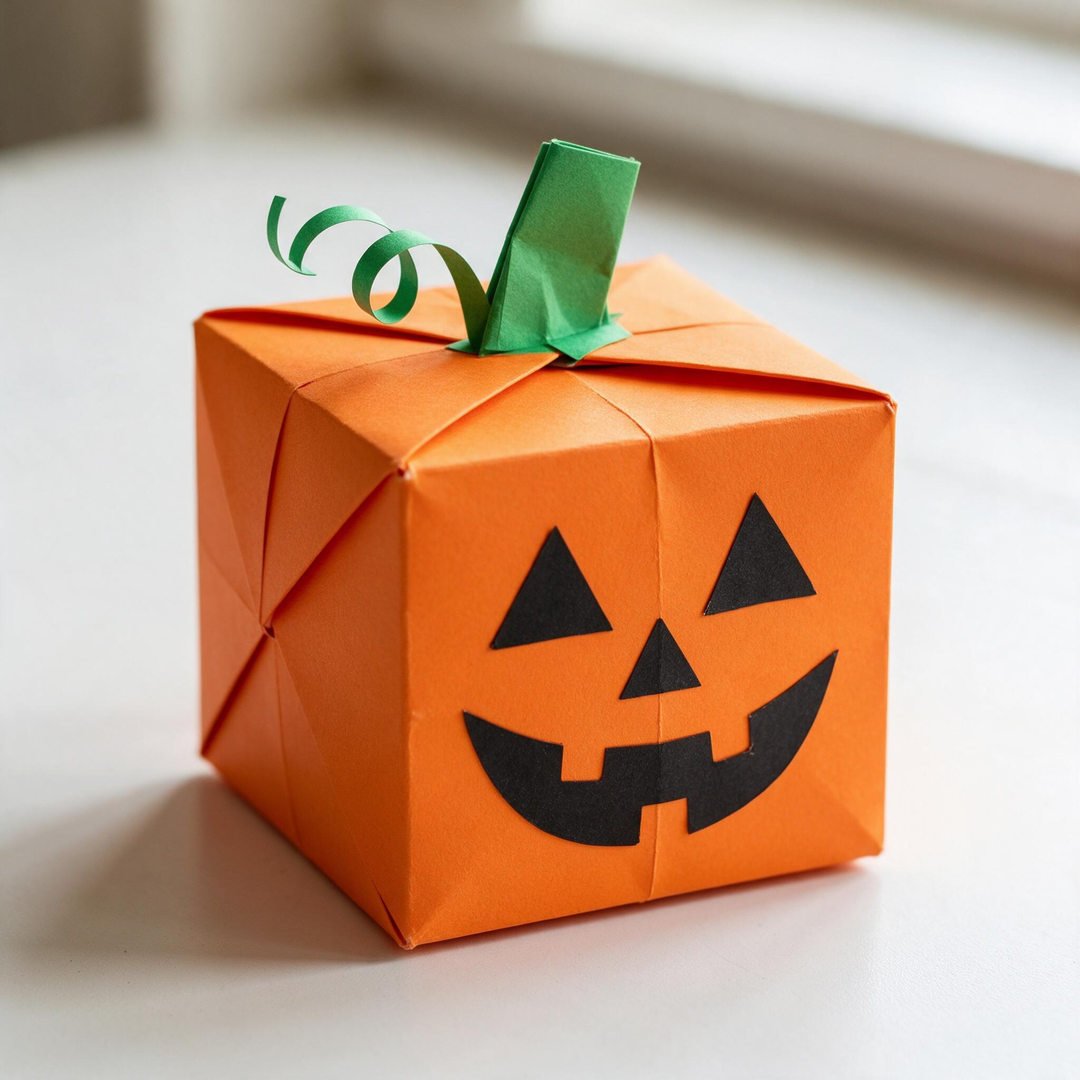
If you love clean, geometry-inspired papercrafts that require zero tape or glue, this traditional origami treat box is an absolute crowd-pleaser. It holds a surprising amount of candy corn, mini chocolate bites, or Halloween pretzels.
For younger kids who aren’t quite ready for multi-step origami folds, you can pre-fold the pumpkin boxes yourself while relaxing on the couch and let them design the funny jack-o’-lantern faces!
How to Craft It:
- Cut an 8.5 x 8.5-inch square from bright orange sheet in Heavyweight Colored Cardstock.
- Fold diagonally corner to corner in both directions, crease firmly, and unfold to reveal an ‘X’ center crease.
- Fold all four outer corners inward so their points meet at the exact center point (blintz fold).
- Fold opposite side edges inward to the center line to create side box walls, then raise the edges and tuck the corner flaps inward to form a sturdy cube.
- Draw expressive triangular pumpkin eyes and a wide smiling mouth using Crayola Ultra Clean Washable Markers.
Amazon Craft Materials You Should Buy:
| Material | Purpose & Recommendation |
|---|---|
| Heavyweight Cardstock | Heavyweight Colored Cardstock 100 Sheets – Durable paper that keeps its shape under candy weight. |
| Washable Markers | Crayola Ultra Clean Washable Markers – Deep, rich pigment that washes off tables and little hands effortlessly. |
👉 Watch the Jack-O’-Lantern Origami Pumpkin Box Tutorial on YouTube
5. Wicked Witch Hat Hexagon Treat Box
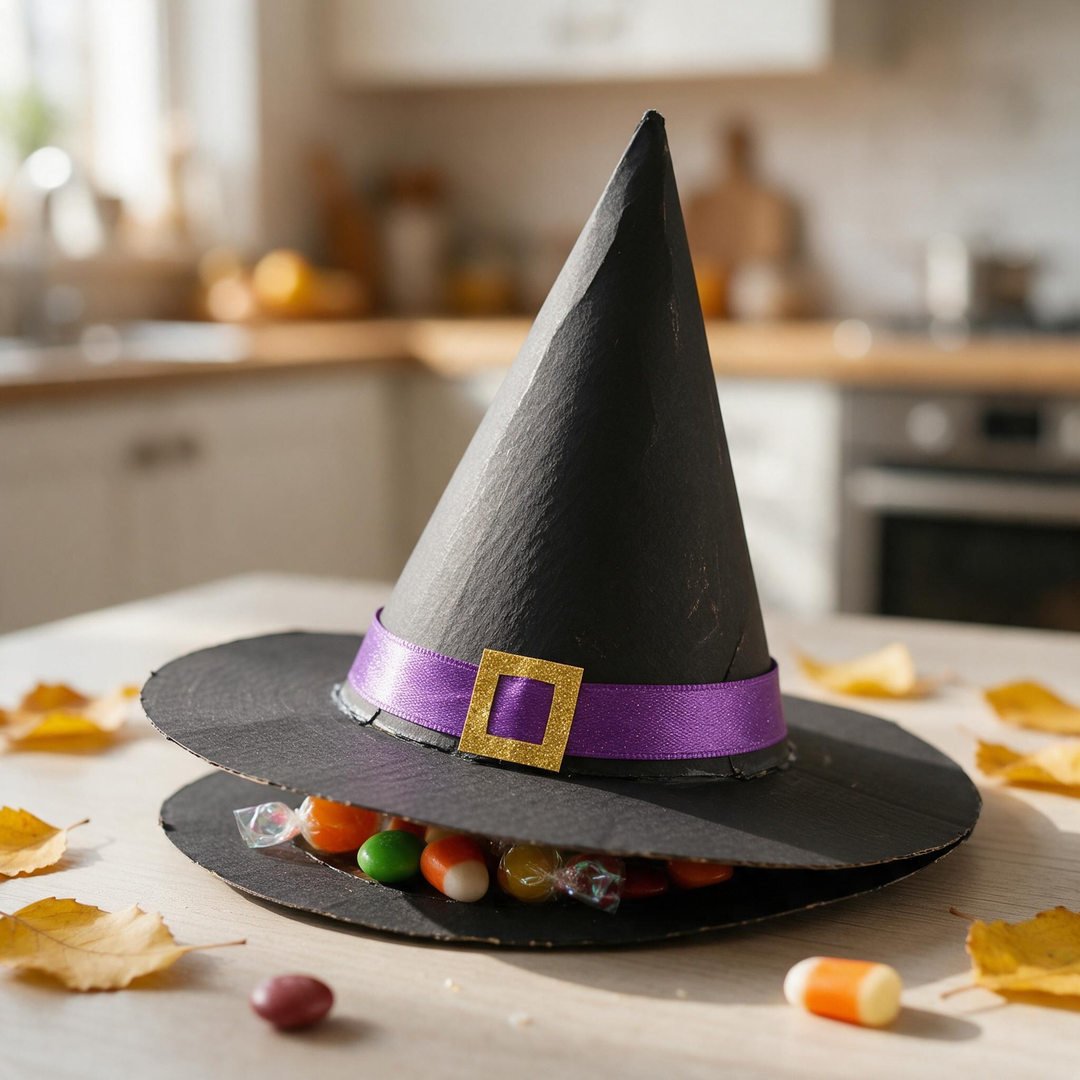
⏱️ Active & Dry Time: 15 mins active, 5 mins dry | 🧼 Mess Level: 1/5 | 👶 Age Adaptation: Ages 4 to 8 (tape cone to hexagon brim) | 💰 Est. Cost: ~$0.30/box
💬 Real Mom Question (from Reddit’s r/Mommit): “What is a Halloween favor box idea that doubles as tabletop party decor before the kids take them home?”
Nancy’s Fix: These witch hat boxes look stunning lined down the center of a dining table or party buffet! The secret is creating a secret compartment underneath the hat cone where the candy hides until party time.
These enchanting witch hat favor boxes add instant drama and whimsy to any Halloween spread. Kids are mesmerized when they discover that lifting the pointy hat cone reveals a hidden stash of chocolate coins and gummy worms!
They look elaborate and expensive, but you can build them using simple paper cones and circular cardstock cutouts.
How to Craft It:
- Cut a semi-circle from black cardstock and roll it into a cone, securing the side seam with Gorilla Heavy Duty Double Sided Mounting Tape.
- Cut a 4-inch black cardstock circle to serve as the wide hat brim base.
- Snip small 1/4-inch vertical slits along the bottom rim of the cone and fold them inward.
- Fill the cone with treats, align over the brim, and secure the flaps to the base using Glue Dots Extra Strength.
- Wrap a strip of purple ribbon or purple paper around the base of the cone and glue a square gold cardstock buckle to the front.
Amazon Craft Materials You Should Buy:
| Material | Purpose & Recommendation |
|---|---|
| Mounting Tape | Gorilla Heavy Duty Double Sided Mounting Tape – Instant adhesion for curved cardstock seams. |
| Craft Glue Dots | Glue Dots Craft Extra Strength Adhesive – Clean, mess-free bonding between hat brim and cone base. |
👉 Watch the Wicked Witch Hat Treat Box Tutorial on YouTube
6. Vampire Coffin Peek-a-Boo Treat Box
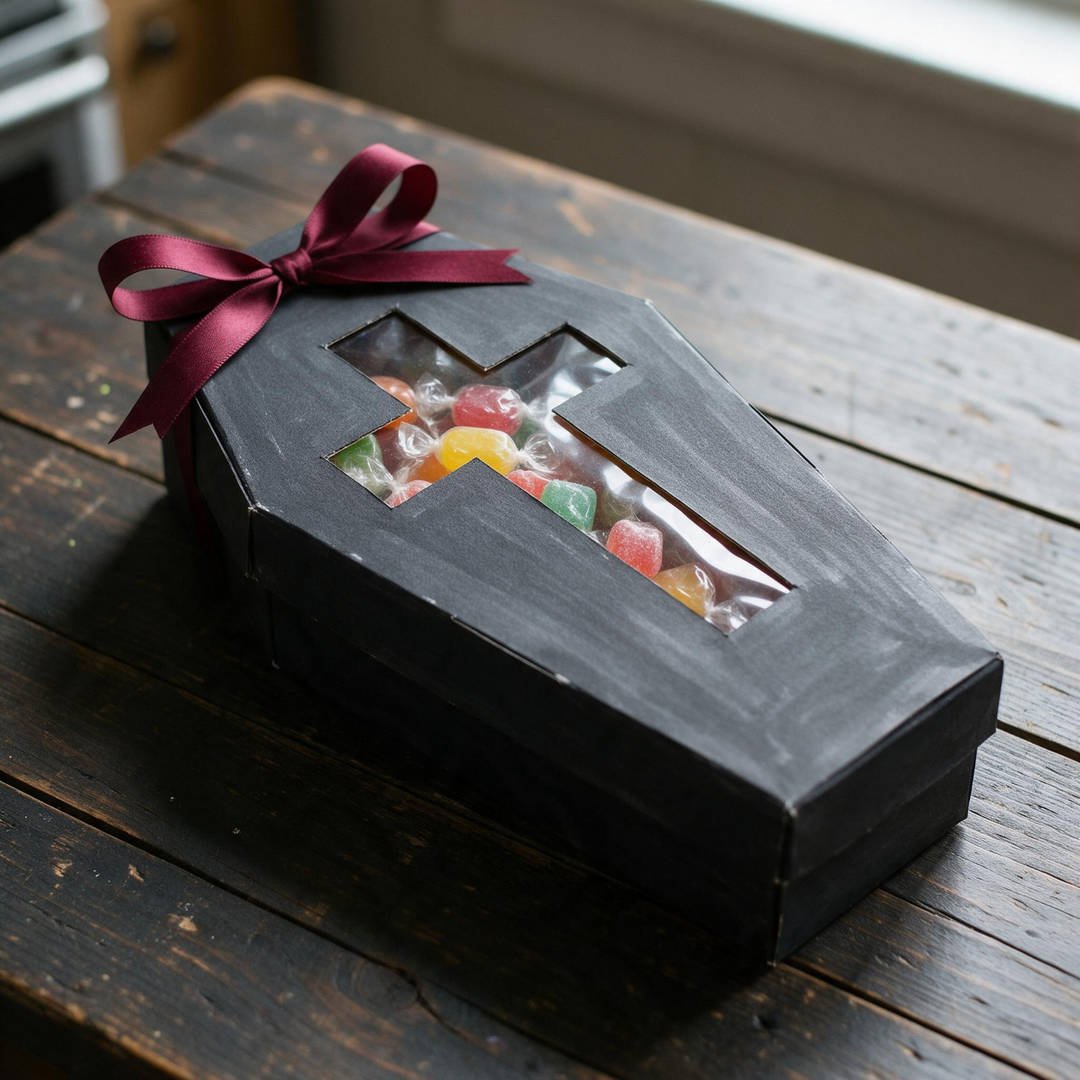
⏱️ Active & Dry Time: 15 mins active, 5 mins dry | 🧼 Mess Level: 1/5 | 👶 Age Adaptation: Ages 5+ (careful scissor scoring required) | 💰 Est. Cost: ~$0.35/box
💬 Real Mom Question (from Reddit’s r/Baking): “I made festive Halloween iced sugar cookies to gift to teachers, but normal boxes let the frosting smear against the lid. Any recommendations?”
Nancy’s Fix: Use pre-assembled bakery boxes with built-in clear display windows! You get that bakery-grade presentation, the frosting stays pristine, and you can decorate the box frame like a spooky gothic coffin.
There is nothing cooler for elementary kids than a mysterious gothic coffin treat box with a see-through peek-a-boo window. Seeing the brightly colored gummy body parts or decorated cookies resting inside builds so much anticipation!
Using clear-window bakery favor boxes as your structural base saves you twenty minutes of tedious paper carving and acetate gluing.
How to Craft It:
- Take a base box from Clear Window Bakery Favor Boxes Bulk and pop it into shape.
- Cut two triangular notches from the top corners of the box lid using BURVAGY Kids Safety Scissors to taper it into an authentic coffin silhouette.
- Edge the coffin frame with black cardstock trim using Elmer’s Disappearing Purple School Glue Sticks.
- Lay a piece of food-grade parchment paper inside the base to protect against cookie butter bleed.
- Fill with cookies or candies, close the lid, and tie a deep crimson or purple ribbon around the box.
Amazon Craft Materials You Should Buy:
| Material | Purpose & Recommendation |
|---|---|
| Window Bakery Boxes | Clear Window Bakery Favor Boxes Bulk – Food-safe kraft paperboard boxes with crystal-clear view windows. |
| Kids Safety Scissors | BURVAGY 12-Pack 5-Inch Kids Safety Scissors – Precision blunt-tip blades safe for cardboard trimming. |
👉 Watch the Vampire Coffin Peek-a-Boo Treat Box Tutorial on YouTube
7. Cute Pastel Ghost Surprise Box
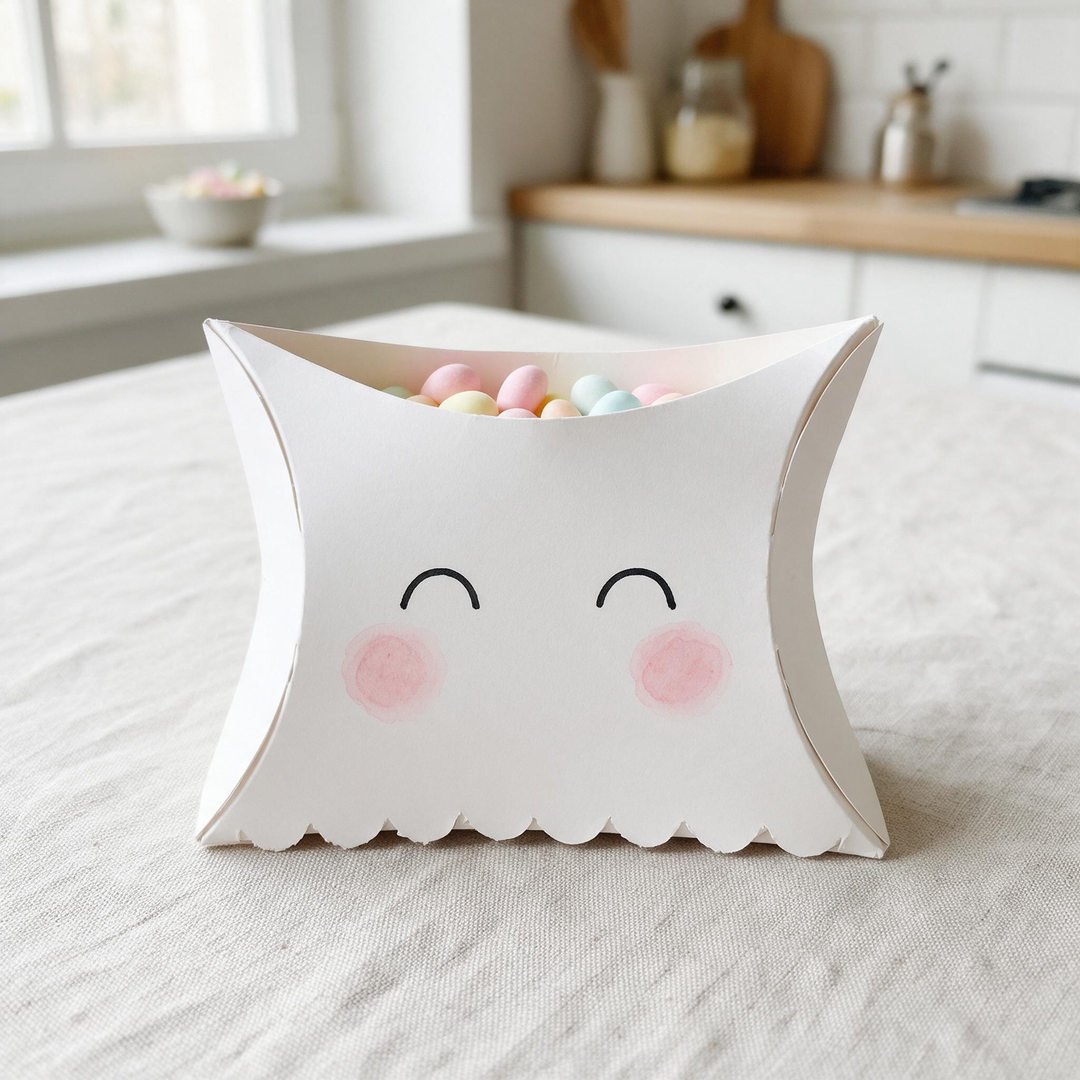
⏱️ Active & Dry Time: 8 mins active, 0 mins dry | 🧼 Mess Level: 0/5 | 👶 Age Adaptation: Ages 2+ (toddlers draw pink cheeks and eyes) | 💰 Est. Cost: ~$0.22/box
💬 Real Mom Question (from Reddit’s r/Mommit): “My daughter hates spooky, scary Halloween stuff like zombies and gory vampires. How do we make cute Halloween party favors?”
Nancy’s Fix: Pastel ‘kawaii’ Halloween is huge right now and perfect for sensitive kids! Swap gloomy black and orange for soft pastel pinks, mints, and friendly smiling ghost faces with rosy cheeks.
Not every Halloween party needs to be spine-chilling and terrifying! This sweet little ghost pillow box brings cheerful smiles to toddlers and preschoolers who prefer gentle, friendly autumn themes.
Pillow boxes are naturally curved and soft to hold, making them ideal for small hands to carry without poking corners.
How to Craft It:
- Cut an elongated oval from heavyweight white cardstock from Heavyweight Colored Cardstock.
- Score curved crease lines on both ends using the edge of a clean plastic cup or roll of tape.
- Fold the curved ends inward to create the self-locking pillow box shape.
- Let your toddler draw happy arching closed eyes with a black marker from Crayola Ultra Clean Washable Markers.
- Dab a tiny dot of pink marker or pastel chalk under the eyes for rosy blushing cheeks, then pop in non-candy trinkets or pastel marshmallows.
Amazon Craft Materials You Should Buy:
| Material | Purpose & Recommendation |
|---|---|
| White Cardstock | Heavyweight Colored Cardstock 100 Sheets – Smooth, bright white cardstock that takes marker and ink beautifully. |
| Washable Markers | Crayola Ultra Clean Washable Markers – Smudge-free markers with ultra-washable pigments. |
👉 Watch the Cute Pastel Ghost Surprise Box Tutorial on YouTube
8. Black Cat Milk Carton Treat Box
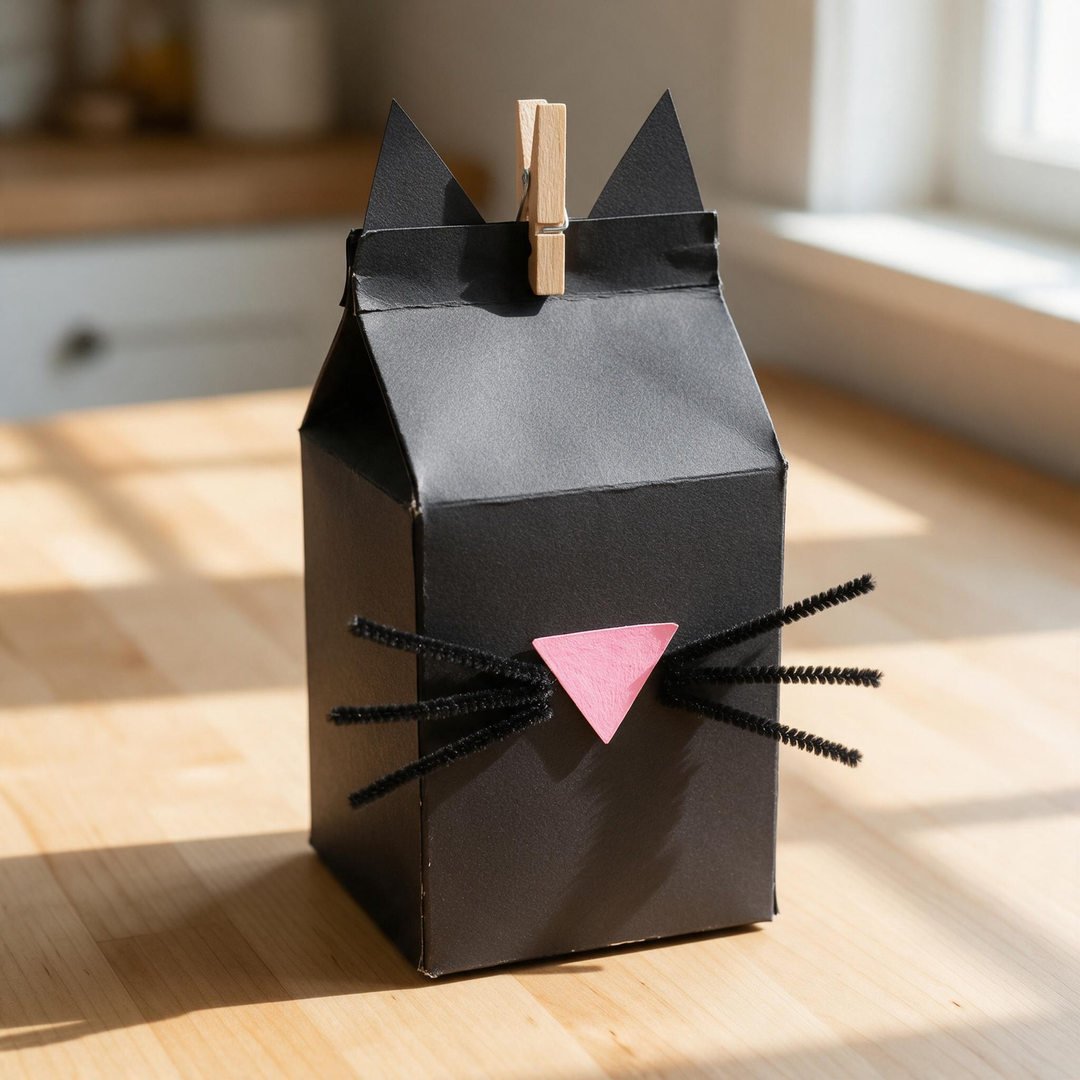
⏱️ Active & Dry Time: 12 mins active, 5 mins dry | 🧼 Mess Level: 1/5 | 👶 Age Adaptation: Ages 3+ (fun whisker attaching with glue dots) | 💰 Est. Cost: ~$0.26/box
💬 Real Mom Question (from Reddit’s r/Parenting): “How do I seal paper treat boxes so curious toddlers don’t spill the candy all over the living room carpet before the party even starts?”
Nancy’s Fix: Use mini wooden clothespins or decorative binder clips at the pinched milk carton spout! They hold the box tightly closed during transport, but kids can easily unclip them when it’s treat time.
Milk carton treat boxes are an absolute staple in our house because the pinched gable spout makes them feel just like a real little carton of chocolate milk!
Turning the pinch spout into a pair of black cat ears is a stroke of pure crafting genius. Check out our quick halloween crafts for busy moms for more 10-minute party ideas.
How to Craft It:
- Fold a piece of black cardstock into a 4-sided tube and secure the side seam with glue.
- Fold the bottom flaps inward and seal securely with Glue Dots Extra Strength.
- Pinch the top edges inward to form a classic milk carton triangular spout.
- Cut two small black triangles for cat ears and glue them to the front fold using an Elmer’s Disappearing Purple School Glue Stick.
- Cut 1-inch pieces from Black Chenille Stems Pipe Cleaners for whiskers, attach beside a pink paper nose, and pinch the top spout closed with a mini clip.
Amazon Craft Materials You Should Buy:
| Material | Purpose & Recommendation |
|---|---|
| Black Pipe Cleaners | Black Chenille Stems Pipe Cleaners – Bendable, fuzzy craft stems perfect for whiskers and tails. |
| Adhesive Glue Dots | Glue Dots Craft Extra Strength Adhesive – Instant hold for textured pipe cleaners on paper. |
👉 Watch the Black Cat Milk Carton Treat Box Tutorial on YouTube
9. Spider Web Clear Window Gable Box
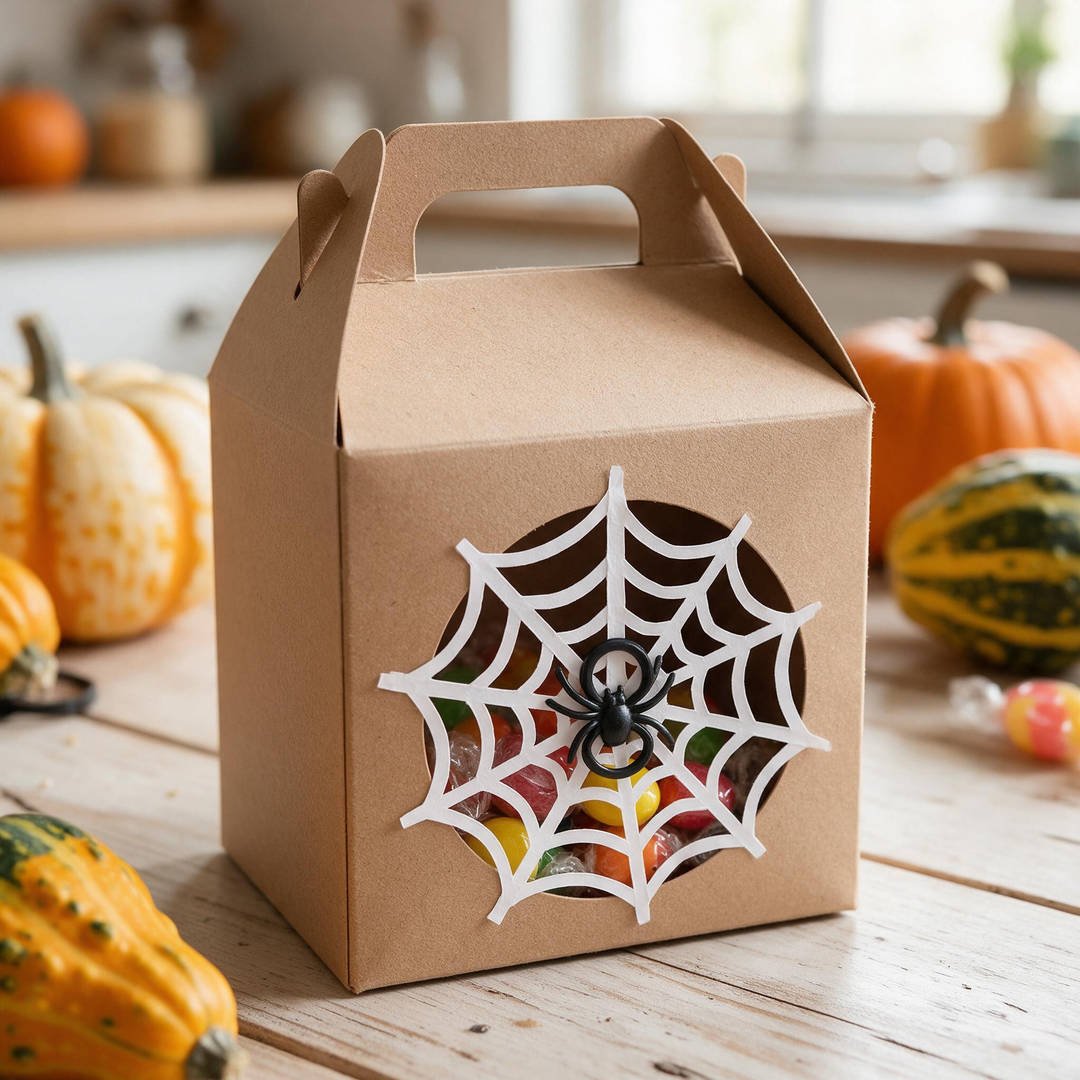
⏱️ Active & Dry Time: 14 mins active, 5 mins dry | 🧼 Mess Level: 1/5 | 👶 Age Adaptation: Ages 4+ (attaching 3D spider rings to cutouts) | 💰 Est. Cost: ~$0.40/box
💬 Real Mom Question (from Reddit’s r/Crafts): “I want to give treat boxes that include a wear-and-play toy so kids aren’t just getting sugar. Any ideas?”
Nancy’s Fix: Clip a plastic spider ring directly into the cut-out window of the box! It acts as both 3D decorative flair and a fun toy ring your little guests can wear immediately.
This craft combines rustic kraft paper charm with creepy-crawly Halloween fun. The peek-a-boo spiderweb window lets kids see colorful wrapped treats inside while keeping everything securely contained.
It is especially popular with elementary schoolers who love the novelty of pulling off the spider ring to wear during recess!
How to Craft It:
- Take a natural kraft or white box from your Halloween Gable Treat Boxes Bulk Pack before folding.
- Cut a 2.5-inch circle from the front center face using BURVAGY Kids Safety Scissors.
- Tape a square of clear cellophane behind the circular hole on the inside of the box.
- Draw delicate radial spiderweb lines across the window opening using a white or black gel marker.
- Slit a tiny notch in the center of the web, slide a plastic spider ring through the opening, and lock the box bottom using Gorilla Heavy Duty Double Sided Mounting Tape.
Amazon Craft Materials You Should Buy:
| Material | Purpose & Recommendation |
|---|---|
| Gable Treat Boxes | Halloween Gable Treat Boxes Bulk Pack – Pre-creased kraft cardstock boxes ideal for custom window cutouts. |
| Heavy-Duty Tape | Gorilla Heavy Duty Double Sided Mounting Tape – Crystal-clear double-sided tape that holds cellophane windows tight. |
👉 Watch the Spider Web Treat Box Tutorial on YouTube
10. Candy Corn Chipboard Pyramid Treat Box
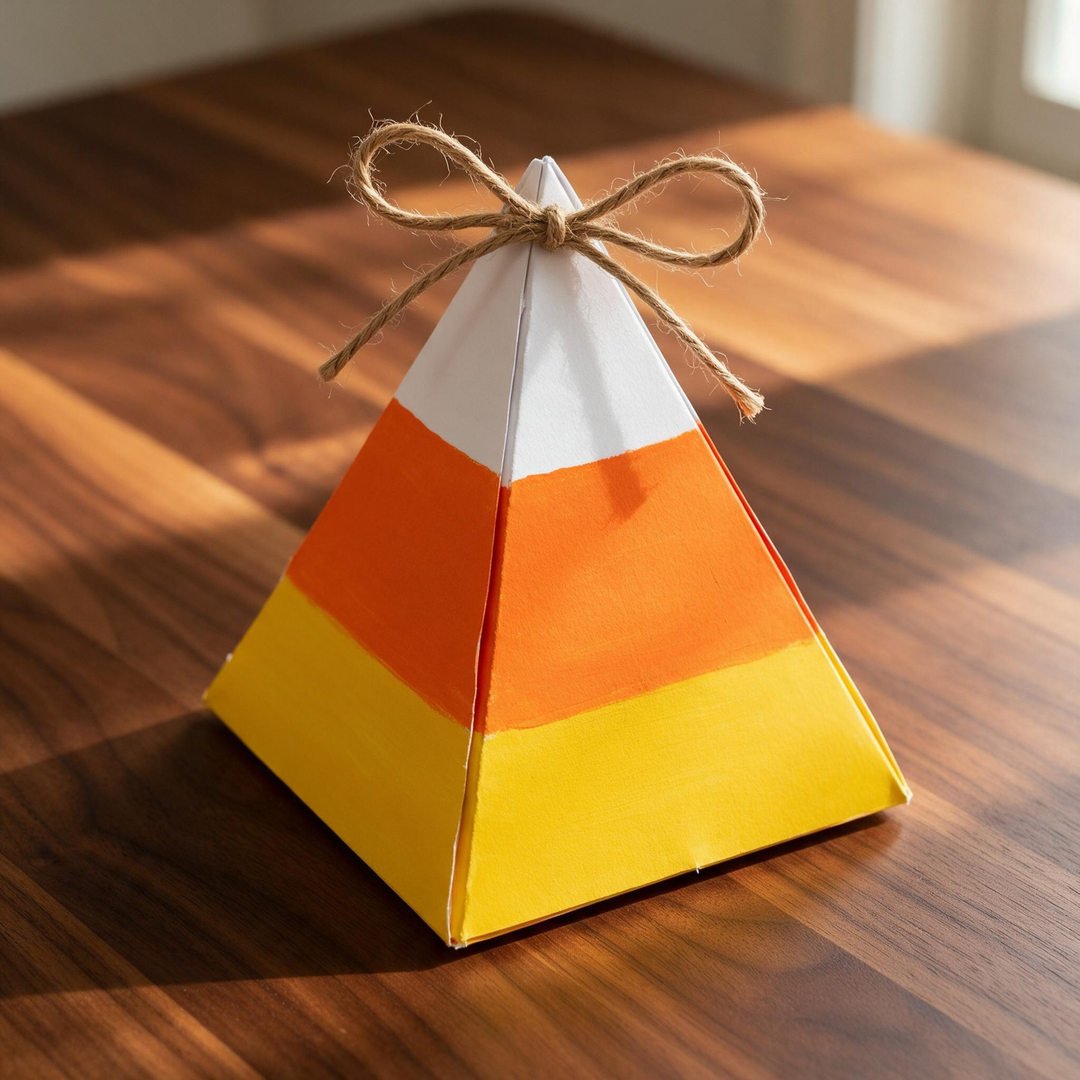
⏱️ Active & Dry Time: 12 mins active, 5 mins dry | 🧼 Mess Level: 1/5 | 👶 Age Adaptation: Ages 3+ (tiering colored paper bands) | 💰 Est. Cost: ~$0.25/box
💬 Real Mom Question (from Reddit’s r/Parenting): “What is an unusual treat box shape that stands out from standard square bags and boxes?”
Nancy’s Fix: Triangular pyramid boxes look like miniature candy corn kernels standing upright! They only require three score folds, and tying the top point with twine creates an instant handle.
There is no iconic autumn visual quite like the classic white, orange, and yellow bands of candy corn. This three-sided pyramid box stands firmly on its wide yellow base and tapers up to a sharp white point.
Tying the top with rustic natural jute cord gives it a cozy farmhouse fall aesthetic that adults and kids love equally.
How to Craft It:
- Cut a triangular template from heavy cardstock from Heavyweight Colored Cardstock with three equilateral side triangles connecting to a central triangle base.
- Glue horizontal bands of yellow paper at the bottom, orange in the center, and white at the top tips.
- Punch a single hole at the apex tip of each side triangle.
- Fold the side walls upward, place treats inside the central base, and pull the three apex tips together.
- Thread an 8-inch piece of KINGLAKE Natural Jute Twine Cord through the punched holes and tie a snug bow at the top.
Amazon Craft Materials You Should Buy:
| Material | Purpose & Recommendation |
|---|---|
| Multi-Color Cardstock | Heavyweight Colored Cardstock 100 Sheets – Vivid yellow, orange, and white sheets for candy corn layering. |
| Natural Jute Twine | KINGLAKE Natural Jute Twine Cord – 100% natural biodegradable jute string for charming rustic ties. |
👉 Watch the Candy Corn Chipboard Pyramid Treat Box Tutorial on YouTube
❓ Real Mom Questions Answered (From Reddit & Parenting Forums)
How many days in advance can I assemble DIY Halloween treat boxes?
💬 Reddit Mom Question (from r/Parenting): “I work full-time and have two kids under 6. Can I build and pack paper treat boxes a week before Halloween, or will things get stale and crushed?”
Nancy’s Answer: You can safely build and pack your paper treat boxes up to two full weeks in advance if you stick to factory-sealed candies, chocolates, pretzels, or non-food party favors.
Store the completed boxes upright inside a clean plastic storage tote with a snap-on lid in a cool, dry closet. Avoid hot attics or humid basements, which can soften chocolate bars or weaken paper glue bonds. If you are packing fresh home-baked cookies or cupcakes, build the boxes early, but wait until the morning of the event to slide the baked goods inside!
What are the best non-candy fillers for school Halloween treat boxes?
💬 Reddit Mom Question (from r/kindergarten): “Our school district has a strict 100% sugar-free, allergy-safe party policy this year. What actually fits inside small 3×3 treat boxes that kids won’t immediately toss in the trash?”
Nancy’s Answer: Mini 3x3x3 inch treat boxes are the ideal size for high-value sensory and stationery prizes that feel special without sugar.
My top classroom hits are Halloween character stampers, glow-in-the-dark stretchy skeletons, temporary tattoo sheets cut into singles, spider rings, mini monster erasers, and novelty shaped slap bracelets. Kids genuinely love trading different stamp colors and wearing glow rings during daytime school parties!
How do I stop greasy cookies or brownies from staining paper treat boxes?
💬 Reddit Mom Question (from r/Baking): “I baked mini ghost brownies for our neighborhood trunk-or-treat, but butter soaked through my cute cardstock boxes and left disgusting oil spots within an hour. How do I prevent this?”
Nancy’s Answer: Cardstock paper is naturally porous, so butter and baking oils will soak through paper fibers in minutes if placed in direct contact.
Always line the bottom and lower walls of your treat box with a pre-cut square of grease-proof parchment paper or silicone-treated baking paper. For frosted treats, slide each brownie into an individual self-sealing cellophane cookie pouch before placing it inside the decorative cardstock box.
🧹 Real-Mom Cleanup & Storage Checklist
- The Tray-Based Assembly Station: Line your crafting table with a non-slip silicone mat or large baking sheet. This keeps stray glue dots, paper scraps, and loose candy contained in one zone so cleanup takes thirty seconds.
- Pre-Cut Supplies in Muffin Tins: Before calling the kids to the table, portion out pre-cut cardstock windows, googly eyes, and ribbon ties into a 6-cup muffin tin so little hands aren’t fighting over one shared box.
- Damp Washcloth at the Station: Keep a damp microfiber washcloth folded beside each child’s seat to wipe sticky glue fingers immediately before they touch clean cardstock or box handles.
- Egg Carton Drying Rack: If using wet craft glue or washable markers, rest decorated box lids upside-down across an open cardboard egg carton so they dry flat without sticking to craft table surfaces.