10 Quick Halloween Crafts for Busy Moms (Under 10 Mins)

Looking for easy, stress-free quick halloween crafts for busy moms that take ten minutes or less using pantry supplies you already have? Here are 10 mom-tested, low-mess projects that keep your kids happily entertained while dinner is simmering on the stove. 🎃
💬 Real Mom Question (from Reddit’s r/Mommit):
“Are there any 5-minute Halloween crafts I can pull together on a rainy Tuesday evening using stuff I already have in my kitchen?”
If you’ve ever felt that exact holiday stress, take a deep breath mama: you are in the right place! 🎃
Between soccer practice, homework help, and work deadlines, most moms do not have two hours to spend prepping elaborate holiday crafts.
We want fast, adorable activities that let our children feel the spooky holiday excitement without leaving a disaster zone across our kitchen counters.
That is why every single project in this guide is specifically calibrated for the realistic, messy, beautiful chaos of real mom life. ✨
You do not need specialty craft store gadgets, hot glue guns, or artistic training to make these darling holiday memories today.
Pour yourself a fresh mug of tea ☕, grab a glue stick, and let’s pull off Halloween magic in under ten minutes flat!
⚡ The Quick Mom Skim (TL;DR)
- 10-Minute Maximum Clock: Every single craft is tested and proven to assemble in ten minutes or less with zero wait time.
- 100% Everyday Pantry Staples: Uses kitchen items like paper cups, facial tissues, egg cartons, and toilet paper tubes.
- Fast Clean-Up Promise: Designed with zero loose glitter, no staining dyes, and minimal table surface wiping.
- Instant Kid Pride: Simple enough that toddlers, preschoolers, and elementary kids can do most of the assembly independently.
🏆 Nancy’s Top 3 Quick Picks for Busy Moms
When the clock is ticking and you need an activity right now, here are our three absolute fastest lifesavers:
| Category Award | Quick Craft Idea | Why It Won |
|---|---|---|
| 🥇 Fastest Overall (60 Seconds) | Tissue Wrapped Lollipop Ghost | Takes literally one minute with a box of Kleenex and a sucker. |
| 🥈 Best Cozy Decor | Paper Cup Ghost Luminary | Glows beautifully on your dinner table using a simple battery tealight. |
| 🥉 Best Zero-Waste Upcycle | Egg Carton Spooky Spider | Reuses cardboard egg cups that kids can paint in three minutes. |
👀 People Also Read
🧺 Nancy’s Real-Mom Household Supply Swap Table
Please never stress yourself out driving to a craft superstore at 7:00 PM on a school night! 💛
Here are the easy household swaps we rely on in our house, alongside our go-to budget Amazon staples:
| If You Don’t Have… | Swap It With This! | Recommended Amazon Staple |
|---|---|---|
| Battery Tealights | Use small battery fairy lights or place them on a sunny windowsill. | Homemory 24-Pack Realistic Battery Tea Lights |
| White Gauze Bandages | Use torn paper towels, strips of toilet paper, or white masking tape. | Curad Sterile Rolled Gauze Bandages (6-Pack) |
| Orange Construction Paper | Color plain white printer paper with orange crayons or washable markers. | SunWorks Heavyweight Construction Paper (50-Sheet Pack) |
| Googly Eyes | Draw expressive cartoon eyes with a black Sharpie or Crayola marker. | Self-Adhesive Googly Wiggle Eyes (200-Count Multi-Size) |
| Chenille Pipe Cleaners | Cut strips of black scrap paper into accordion folded zigzag legs. | Caydo 150 Pieces Chenille Pipe Cleaners (Halloween Multipack) |
⏱️ Quick 10-Minute Halloween Crafts with Household Items
These first three projects require virtually zero advance prep and use items already sitting in your kitchen cabinets.
They come together in under five minutes and bring immediate holiday joy. 🎃
1. Paper Cup Ghost Luminary
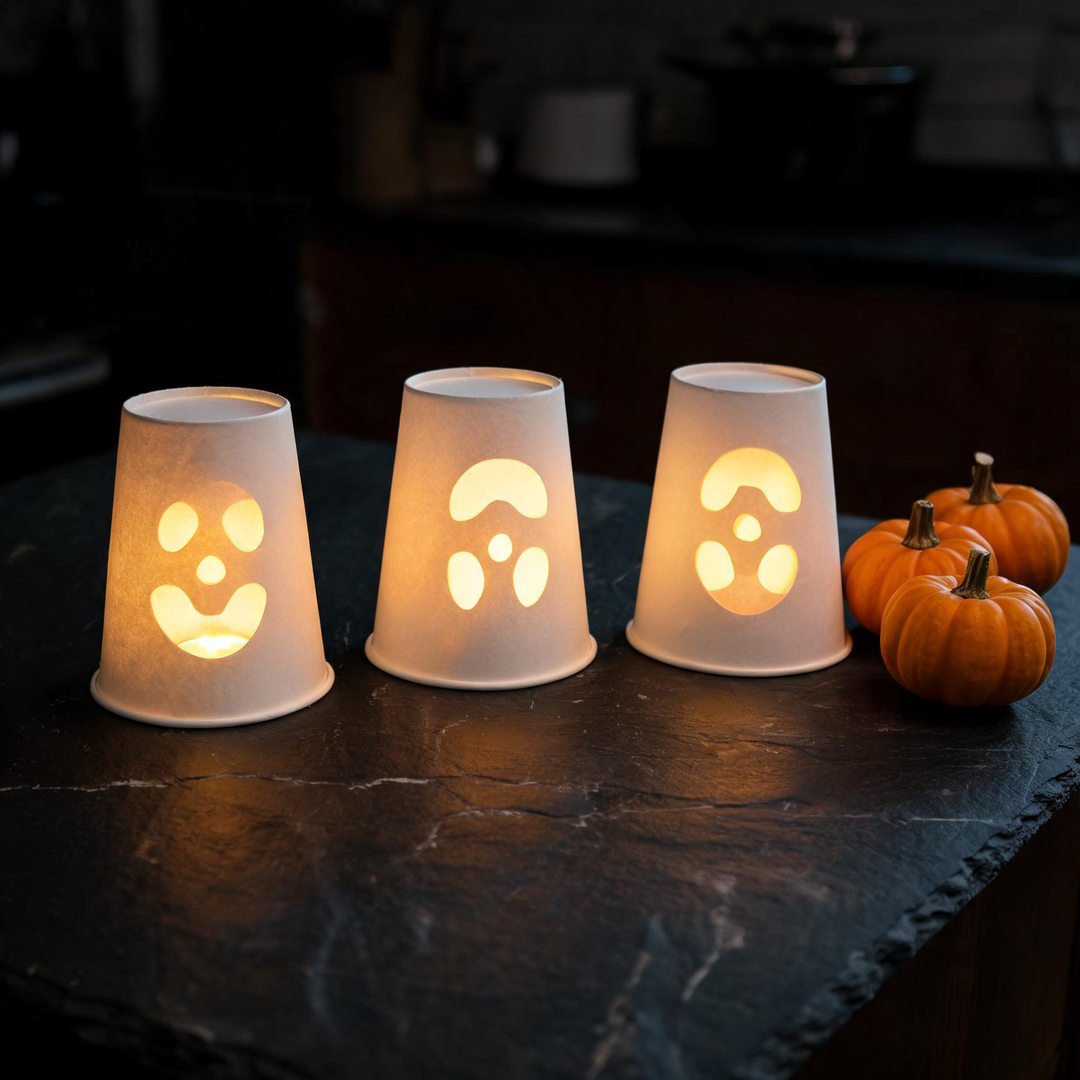
⏱️ Active & Dry Time: 10 mins | 🧼 Mess Level: 2/5 | 👶 Age Adaptation: Ages 2–6 | 💰 Est. Cost: ~$0.35/child
This little ghost luminary is one of our favorite after-dinner crafts because it takes only three minutes to make. 🕯️
Placing an inexpensive battery-operated tealight underneath turns a simple paper cup into a glowing Halloween centerpiece.
How to Craft It:
- Step 1: Turn an uncoated white paper cup upside down so the base faces the ceiling.
- Step 2: Hand your child a black marker and let them draw a big smiling or spooky ghost face on the cup wall.
- Step 3: Use a pencil point to poke a few tiny decorative holes in the top rim to let extra warm light escape.
- Step 4: Switch on a flameless battery tea light candle and place it flat on your dining table.
- Step 5: Set the decorated paper cup right over the glowing candle and dim the kitchen lights for instant magic.
Amazon Craft Materials You Should Buy:
| Material Name | Buy on Amazon |
|---|---|
| Dixie Everyday 9 oz Paper Cups (100-Pack) | Buy on Amazon → |
| Homemory 24-Pack Realistic Battery Tea Lights | Buy on Amazon → |
| Sharpie Fine Point Black Permanent Markers (12-Count) | Buy on Amazon → |
👉 Watch the Paper Cup Ghost Luminaries Tutorial on YouTube
2. Mason Jar Mummy Craft
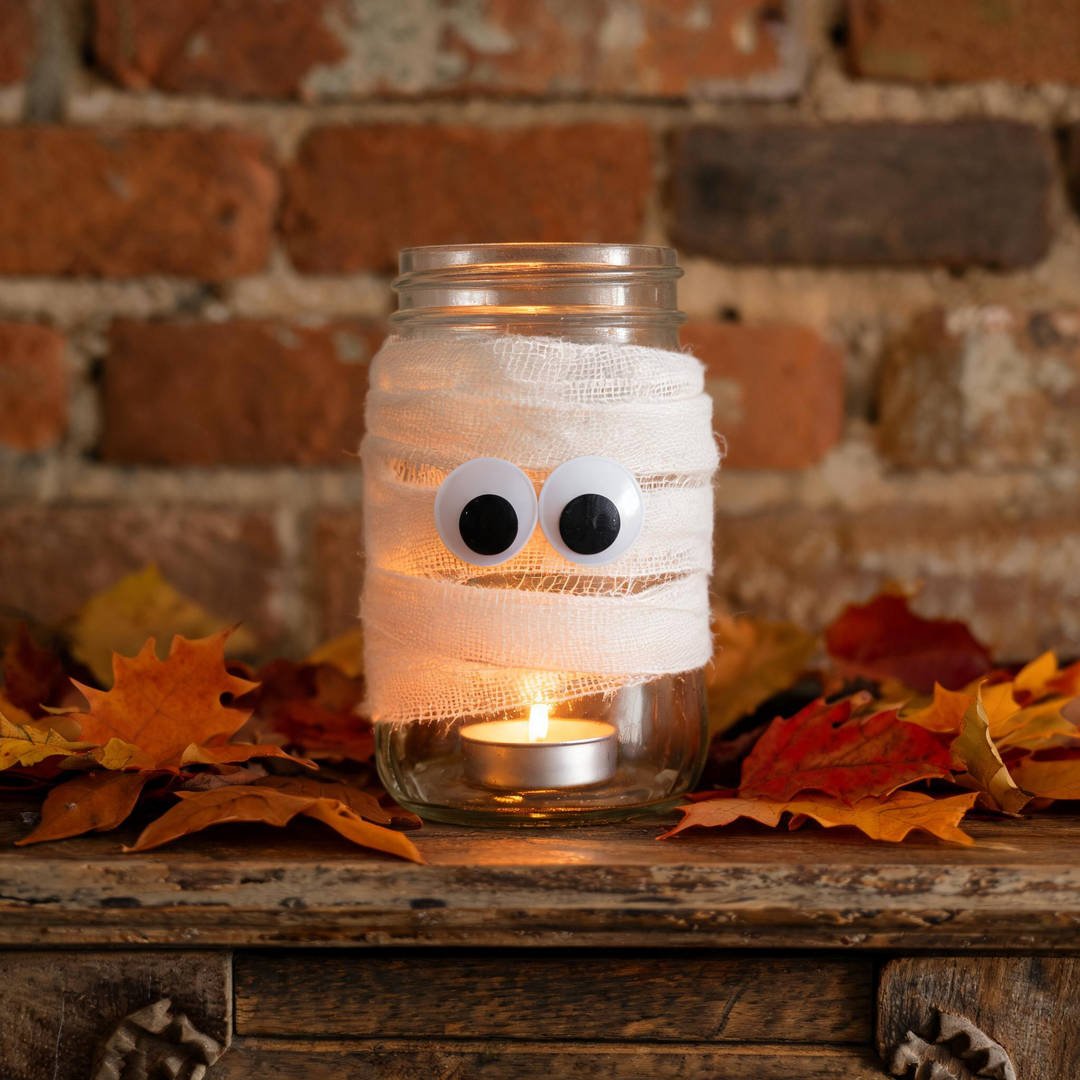
⏱️ Active & Dry Time: 10 mins | 🧼 Mess Level: 3/5 | 👶 Age Adaptation: Ages 2–6 | 💰 Est. Cost: ~$0.35/child
If you have empty pasta sauce jars or jelly jars in your recycling bin, do not throw them away! 🫙
Wrapping a glass jar with medical gauze transforms it into an adorable mummy lantern that looks expensive on your porch.
How to Craft It:
- Step 1: Clean and dry any recycled glass jar from your pantry.
- Step 2: Dab a dot of glue or tape at the base, then let your child wrap white gauze bandage crisscrossed around the jar.
- Step 3: Tuck the end of the gauze in at the top rim and secure it with a small glue dot.
- Step 4: Stick two large wiggle eyes peeking out from beneath a narrow slit in the gauze wrapping.
- Step 5: Drop a flickering LED candle inside to create an enchanting mummy lantern for your front walkway.
Amazon Craft Materials You Should Buy:
| Material Name | Buy on Amazon |
|---|---|
| Curad Sterile Rolled Gauze Bandages (6-Pack) | Buy on Amazon → |
| Self-Adhesive Googly Wiggle Eyes (200-Count Multi-Size) | Buy on Amazon → |
| Ball Regular Mouth Pint Glass Mason Jars (4-Pack) | Buy on Amazon → |
👉 Watch the Mason Jar Mummy Craft Tutorial on YouTube
3. Tissue Wrapped Lollipop Ghost
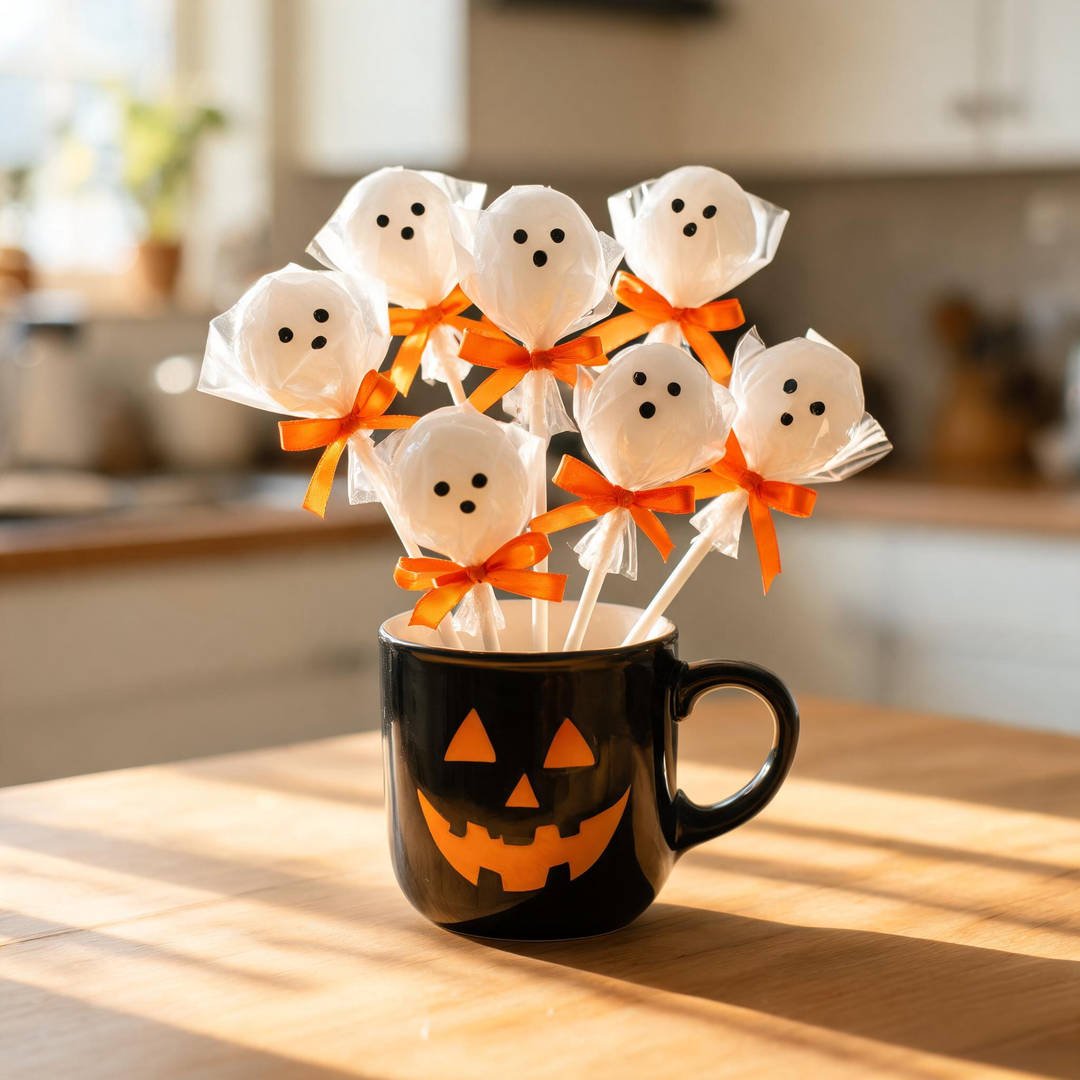
⏱️ Active & Dry Time: 10 mins | 🧼 Mess Level: 1/5 | 👶 Age Adaptation: Ages 2–6 | 💰 Est. Cost: ~$0.35/child
This is the ultimate 60-second craft that saved my sanity when my child announced they needed treats on five minutes’ notice! 🍭
Kids love pulling facial tissues from the box and wrapping their favorite Dum-Dums or Tootsie Pops.
How to Craft It:
- Step 1: Place a round lollipop directly in the center of two layered white facial tissues.
- Step 2: Fold the tissues smoothly downward over the lollipop sphere to form a rounded head.
- Step 3: Tie a piece of festive orange or black satin ribbon snugly around the stick right below the candy.
- Step 4: Let your child use a fine-tip black marker to draw two sleepy eyes and a little smiling mouth.
- Step 5: Pop them into a mason jar bouquet on your kitchen island for an instant grab-and-go sweet treat.
Amazon Craft Materials You Should Buy:
| Material Name | Buy on Amazon |
|---|---|
| Kleenex Ultra Soft Facial Tissues (4 Flat Boxes) | Buy on Amazon → |
| Dum-Dums Original Flavor Pops (300-Count Bag) | Buy on Amazon → |
| Morex Ribbon Double Face Satin Ribbon Roll (Orange) | Buy on Amazon → |
👉 Watch the Lollipop Ghost Tutorial on YouTube
🏃♀️ Last-Minute No-Prep Halloween Art for Busy Moms
These next three activities require zero paint drying time and can be completed while standing at the kitchen island.
They offer instant satisfaction with vibrant holiday colors. 🎃
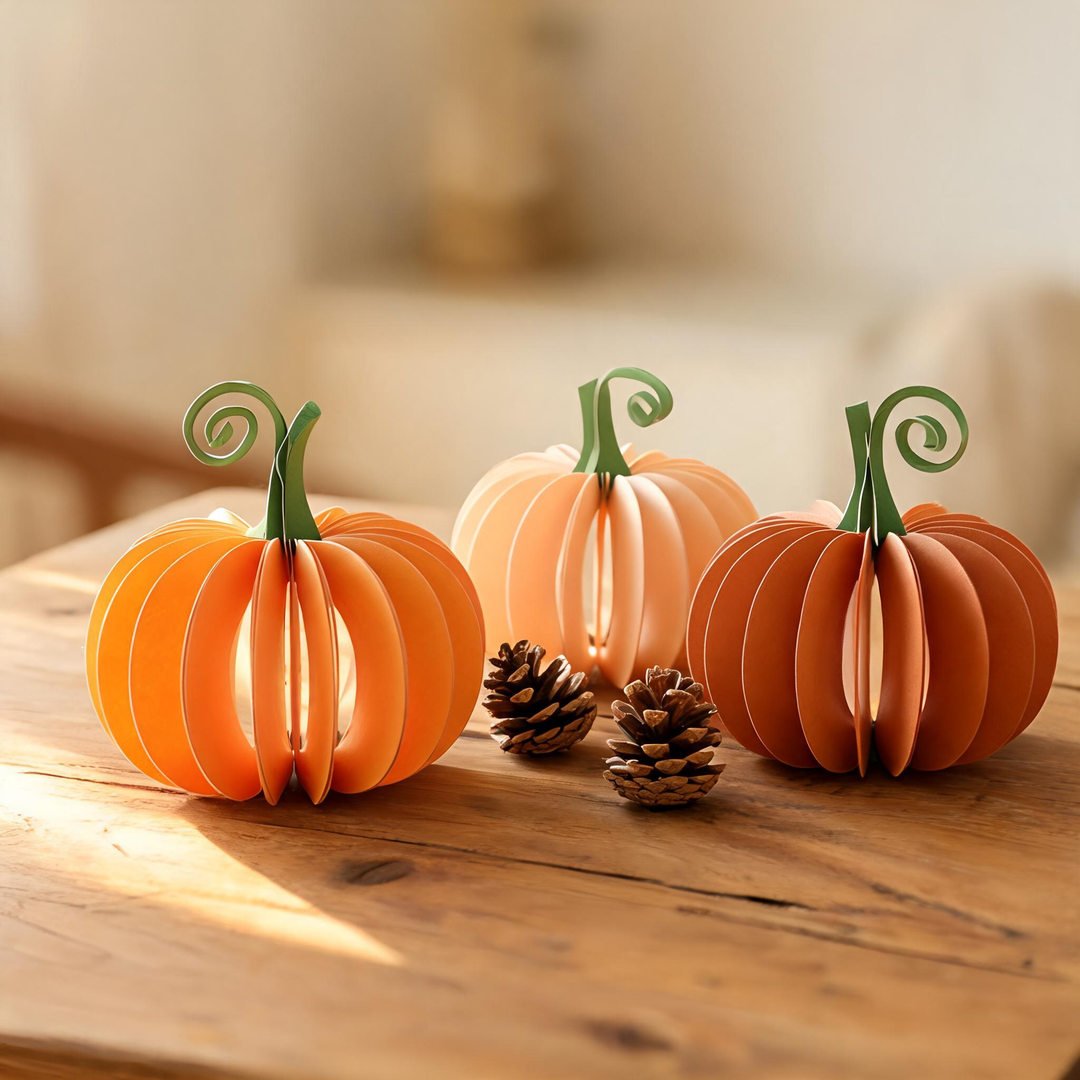
4. 3D Paper Strip Pumpkin
⏱️ Active & Dry Time: 10 mins | 🧼 Mess Level: 2/5 | 👶 Age Adaptation: Ages 2–6 | 💰 Est. Cost: ~$0.35/child
These dimensional paper strip pumpkins look like charming boutique autumn decor but take only six minutes to put together. 🎃
Curving the paper strips into a hollow globe is a wonderful visual exercise that preschoolers and older siblings love.
How to Craft It:
- Step 1: Cut orange construction paper into four 1-inch wide strips of equal length.
- Step 2: Lay the strips crisscrossing in a starburst pattern, overlapping at the exact center.
- Step 3: Fasten the center with a brass paper fastener (brad) or a small dab of glue stick.
- Step 4: Bring the outer ends together at the top in a curve and secure with a second fastener to form a round pumpkin globe.
- Step 5: Add a green paper leaf and spiral vine at the top stem for a festive table display.
Amazon Craft Materials You Should Buy:
| Material Name | Buy on Amazon |
|---|---|
| SunWorks Heavyweight Orange Construction Paper | Buy on Amazon → |
| Round Brass Paper Fasteners Brads (100-Pack) | Buy on Amazon → |
| Westcott 8-Inch All-Purpose Value Craft Scissors | Buy on Amazon → |
👉 Watch the Paper Strip Pumpkin Tutorial on YouTube
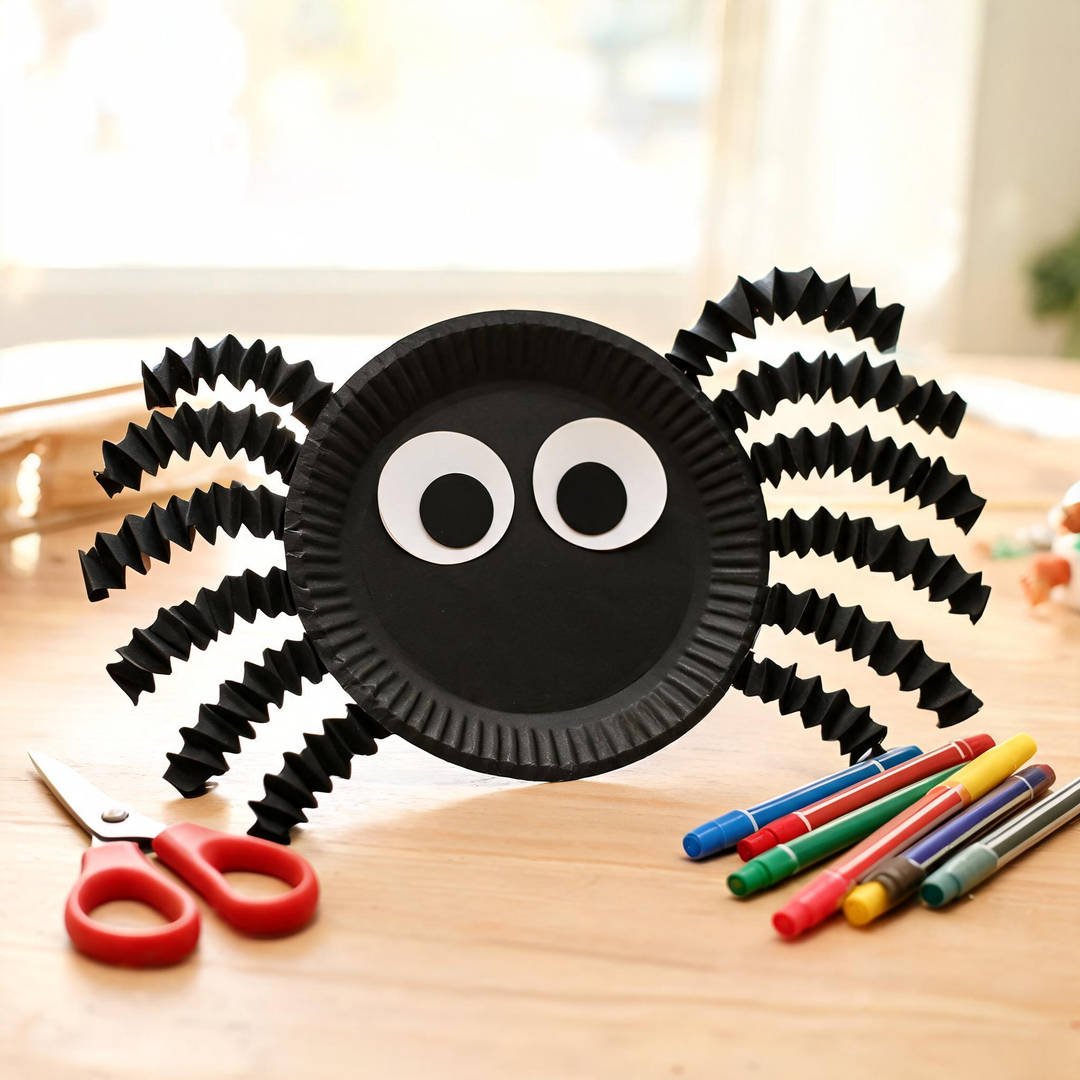
5. Paper Plate Wiggly Spider
⏱️ Active & Dry Time: 10 mins | 🧼 Mess Level: 3/5 | 👶 Age Adaptation: Ages 2–6 | 💰 Est. Cost: ~$0.35/child
Paper plates are our favorite budget craft staple because they give children a big, durable canvas to decorate. 🕷️
Accordion folding the paper legs makes the spider bounce and wobble whenever your child walks past.
How to Craft It:
- Step 1: Have your child color an uncoated paper plate black using quick-dry paint sticks or black markers.
- Step 2: Cut eight long strips of black construction paper for the spider legs.
- Step 3: Accordion fold each paper strip back and forth into springy zigzags.
- Step 4: Staple or glue four bouncy legs to each side of the paper plate body.
- Step 5: Stick on four or six giant googly eyes and draw a wide white crayon smile across the front.
Amazon Craft Materials You Should Buy:
| Material Name | Buy on Amazon |
|---|---|
| Amazon Basics 9-Inch Uncoated Everyday Paper Plates (100-Pack) | Buy on Amazon → |
| Crayola Quick Dry Paint Sticks for Kids (12-Count) | Buy on Amazon → |
| Bostitch In-Hand Heavy Duty Stapler with Staples | Buy on Amazon → |
👉 Watch the Paper Plate Spider Tutorial on YouTube
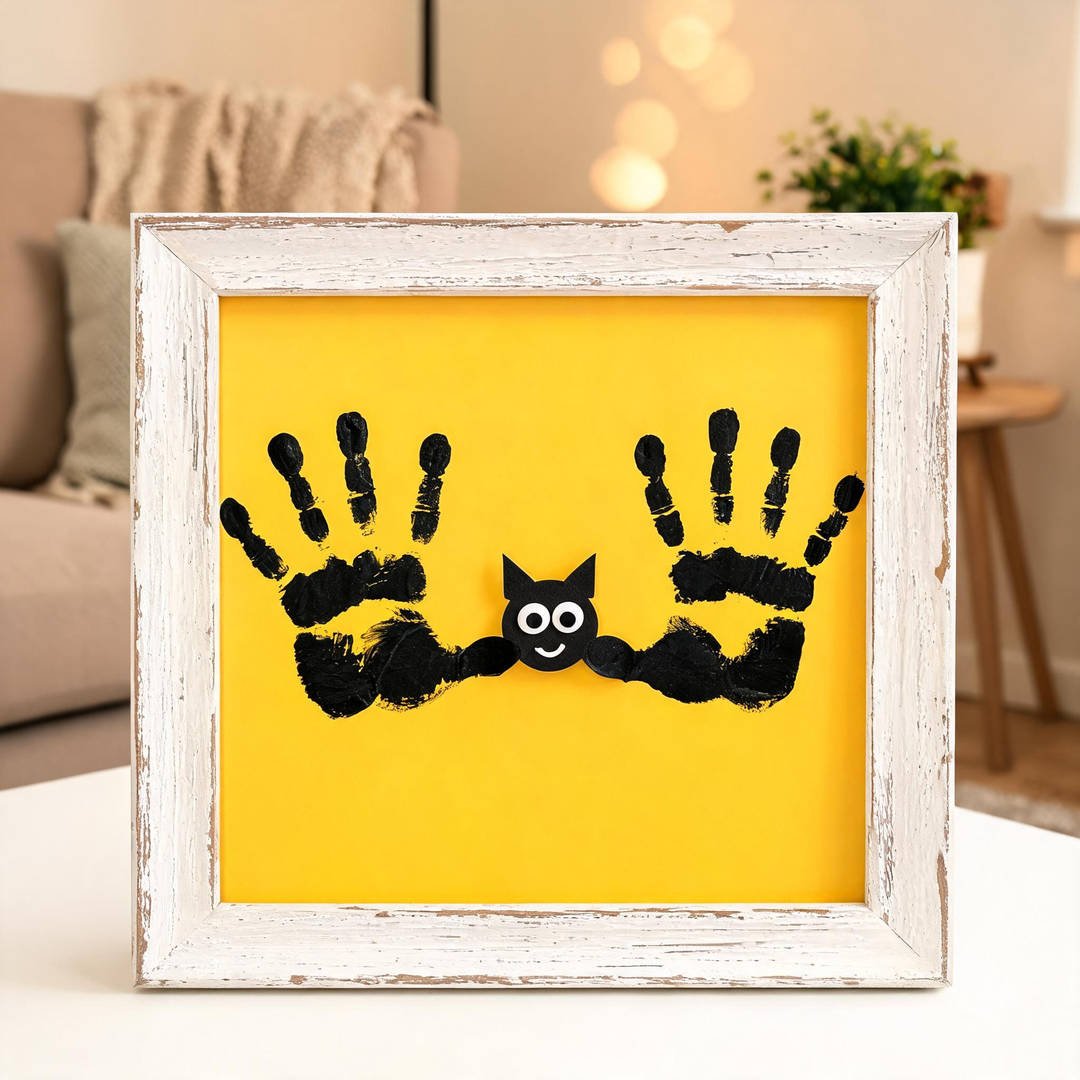
6. Handprint Bat Keepsake
⏱️ Active & Dry Time: 10 mins | 🧼 Mess Level: 1/5 | 👶 Age Adaptation: Ages 2–6 | 💰 Est. Cost: ~$0.35/child
Nothing freezes time faster than capturing your little one’s hand size on a sweet seasonal craft card. 🦇
Placing two handprints wrist-to-wrist instantly forms flying bat wings that make grandparents swoon.
How to Craft It:
- Step 1: Trace your child’s left and right hand onto a sheet of black cardstock with a white crayon.
- Step 2: Help your child cut out both hand shapes with safety scissors.
- Step 3: Glue the two paper handprints overlapping at the thumbs onto bright yellow or orange cardstock.
- Step 4: Glue a small oval bat head in the center with two tiny white triangle fangs and wiggle eyes.
- Step 5: Write your child’s name and the year on the bottom corner to preserve this memory forever.
Amazon Craft Materials You Should Buy:
| Material Name | Buy on Amazon |
|---|---|
| Neenah Premium Heavyweight Black Cardstock (50 Sheets) | Buy on Amazon → |
| Elmer’s Disappearing Purple School Glue Sticks (6-Pack) | Buy on Amazon → |
| Crayola Construction Paper Pad (96 Sheets) | Buy on Amazon → |
👉 Watch the Handprint Bat Craft Tutorial on YouTube
✂️ Easy 5-Minute Paper Crafts for Kids
When your kids need quick afternoon entertainment, these four fast projects turn recycled scrap paper into playful holiday characters.
They are mess-free, delightfully simple, and fast to put away. ✨
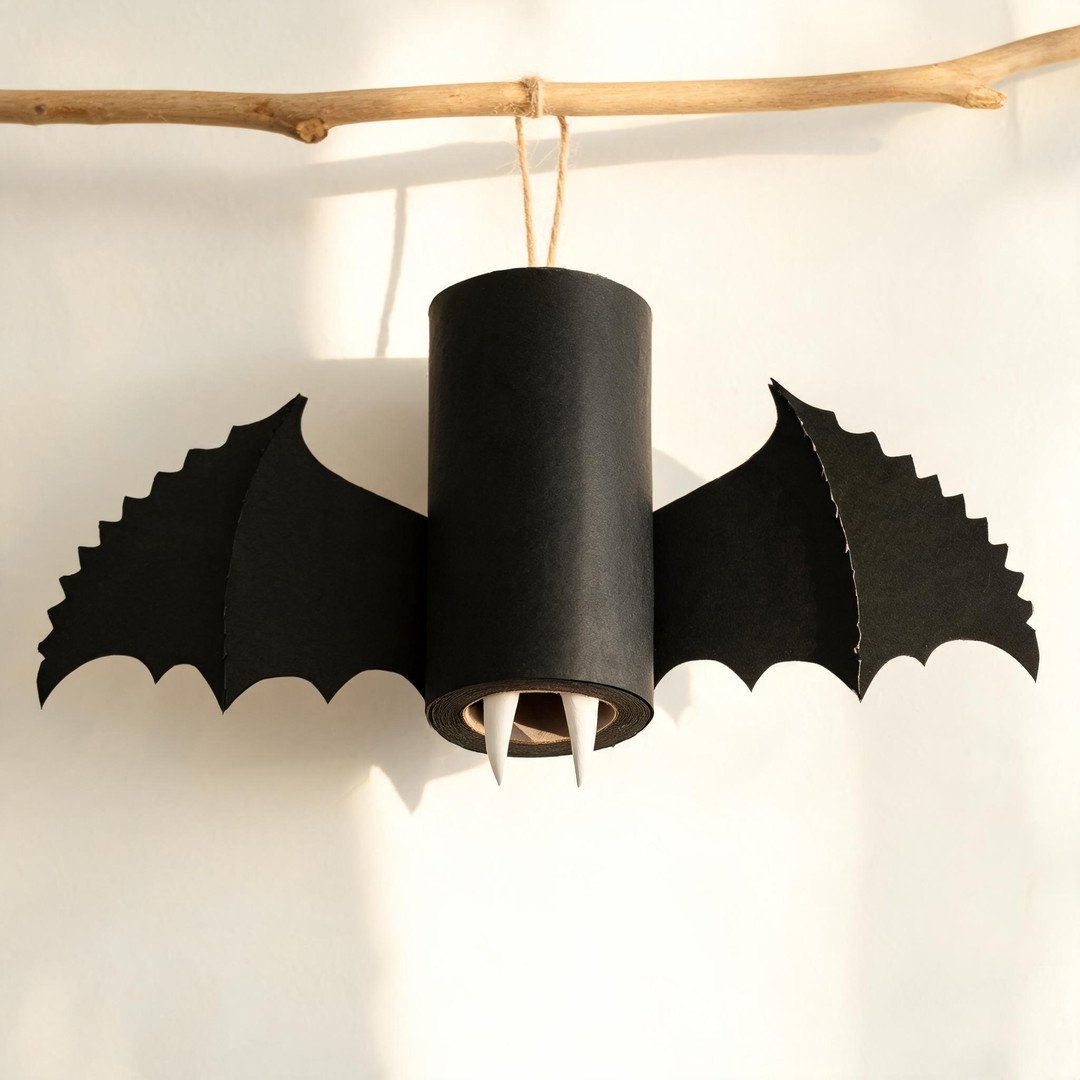
7. Cardboard Roll Hanging Bat
⏱️ Active & Dry Time: 10 mins | 🧼 Mess Level: 2/5 | 👶 Age Adaptation: Ages 2–6 | 💰 Est. Cost: ~$0.35/child
Cardboard tubes are so versatile because you can bend the top edges inward to create instant pointy bat ears! 🦇
Hanging them upside down from indoor houseplants or curtain rods delights kids for hours.
How to Craft It:
- Step 1: Color an empty cardboard toilet paper tube black using washable markers or paint sticks.
- Step 2: Press the top rim inward from both sides to form two sharp, pointy triangular bat ears.
- Step 3: Cut two curved scalloped wings out of black paper and glue them securely to the back of the tube.
- Step 4: Glue on two googly eyes and draw sharp little vampire fangs with a white gel pen.
- Step 5: Tape a loop of black baker’s twine inside the bottom so your bat hangs upside down like a real creature of the night.
Amazon Craft Materials You Should Buy:
| Material Name | Buy on Amazon |
|---|---|
| SunWorks Heavyweight Black Construction Paper | Buy on Amazon → |
| Black & White Baker’s Twine Cotton String Spool | Buy on Amazon → |
| Uni-Ball Signo Broad White Gel Pen for Cardstock | Buy on Amazon → |
👉 Watch the Cardboard Roll Bats Tutorial on YouTube
8. Popsicle Stick Frankenstein
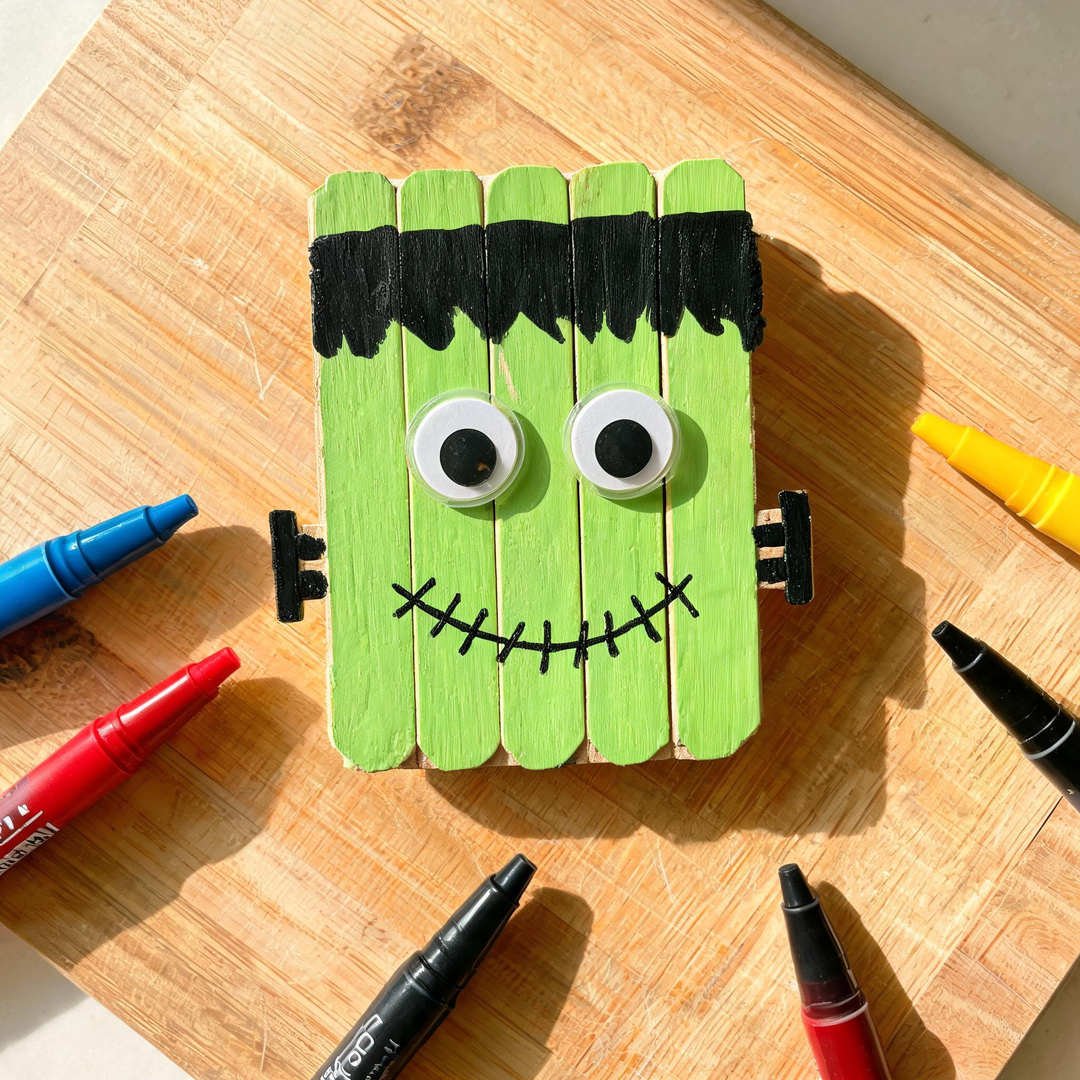
⏱️ Active & Dry Time: 10 mins | 🧼 Mess Level: 3/5 | 👶 Age Adaptation: Ages 2–6 | 💰 Est. Cost: ~$0.35/child
Craft sticks give children a satisfying wooden surface that takes crayon, marker, or paint stick color smoothly. 🧟♂️
This mini Frankenstein plaque fits in the palm of your hand and can be turned into a cute kitchen magnet.
How to Craft It:
- Step 1: Line up five jumbo popsicle sticks and secure them with two horizontal sticks glued across the back.
- Step 2: Color the top quarter black for monster hair and the bottom three quarters lime green for the face.
- Step 3: Stick two mismatching googly eyes in the middle of the green section.
- Step 4: Draw a stitched crooked smile and two little forehead scars with a black fine-tip marker.
- Step 5: Stick a self-adhesive magnet on the back so your child can proudly hang their monster on the fridge.
Amazon Craft Materials You Should Buy:
| Material Name | Buy on Amazon |
|---|---|
| Natural Jumbo Wood Craft Popsicle Sticks (200-Pack) | Buy on Amazon → |
| Self-Adhesive Magnetic Tape Strip Roll | Buy on Amazon → |
| Crayola Washable Kids Markers (12-Count) | Buy on Amazon → |
👉 Watch the Popsicle Stick Frankenstein Tutorial on YouTube
9. Egg Carton Spooky Spider
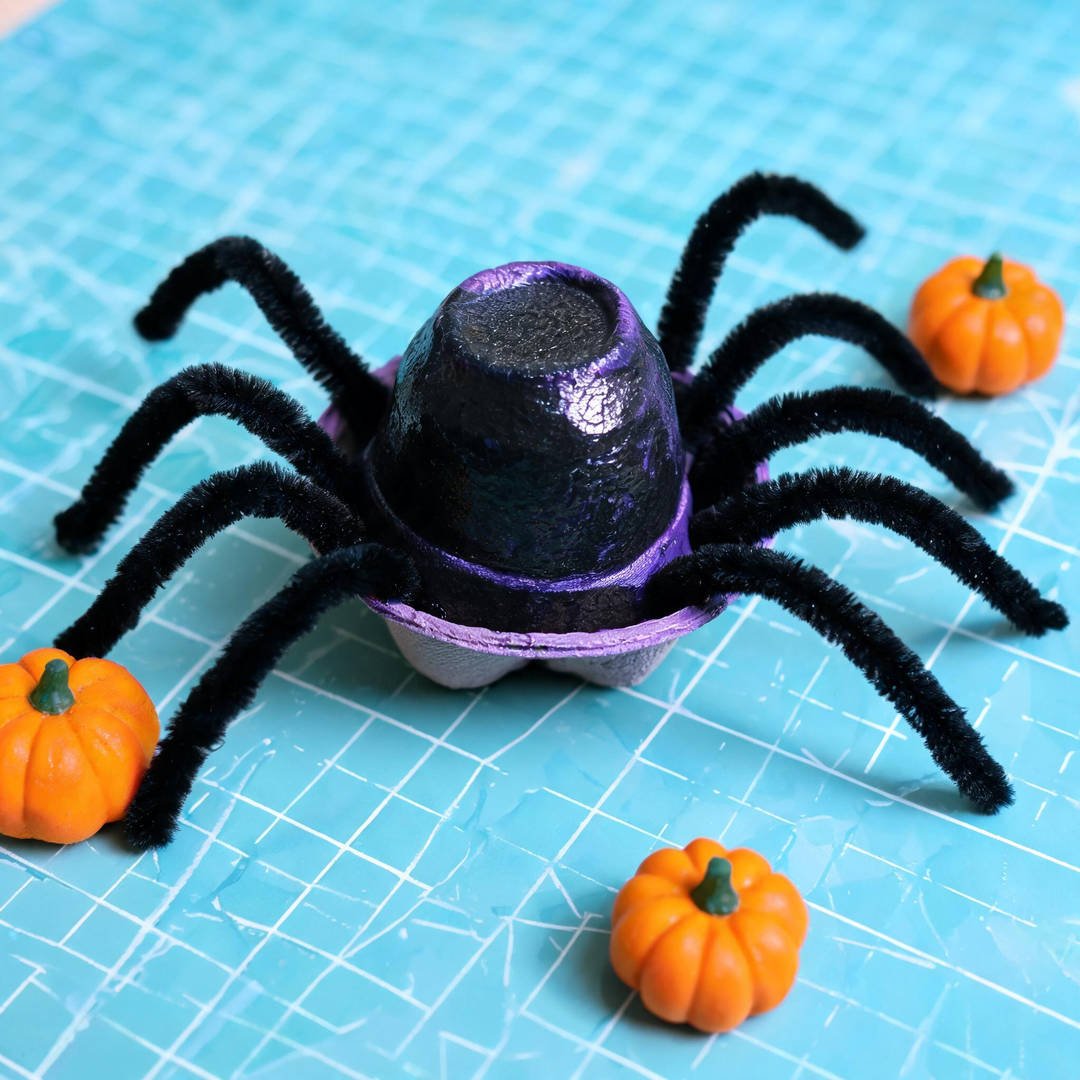
⏱️ Active & Dry Time: 10 mins | 🧼 Mess Level: 1/5 | 👶 Age Adaptation: Ages 2–6 | 💰 Est. Cost: ~$0.35/child
Before tossing out cardboard egg cartons, snip the little cups apart for the cutest five-minute spiders! 🕷️
The curved cardboard dome is already the perfect body shape, saving you tons of cutting time.
How to Craft It:
- Step 1: Snip a single cardboard cup from an everyday egg carton and trim the edges smooth.
- Step 2: Let your child color the dome purple, black, or orange using washable markers or quick-dry paint.
- Step 3: Poke four small pencil holes through each side of the cup base.
- Step 4: Slide four black chenille pipe cleaners through the holes and bend the ends to create eight creepy crawly legs.
- Step 5: Glue on big wiggle eyes and watch your new spider friend scuttle across the kitchen floor.
Amazon Craft Materials You Should Buy:
| Material Name | Buy on Amazon |
|---|---|
| Caydo Black Chenille Stems Pipe Cleaners (100-Pack) | Buy on Amazon → |
| Self-Adhesive Googly Wiggle Eyes (200-Count Multi-Size) | Buy on Amazon → |
| Westcott Pointed Tip Student Scissors (3-Pack) | Buy on Amazon → |
👉 Watch the Egg Carton Spiders Tutorial on YouTube
10. Kitchen Foil Spider Web
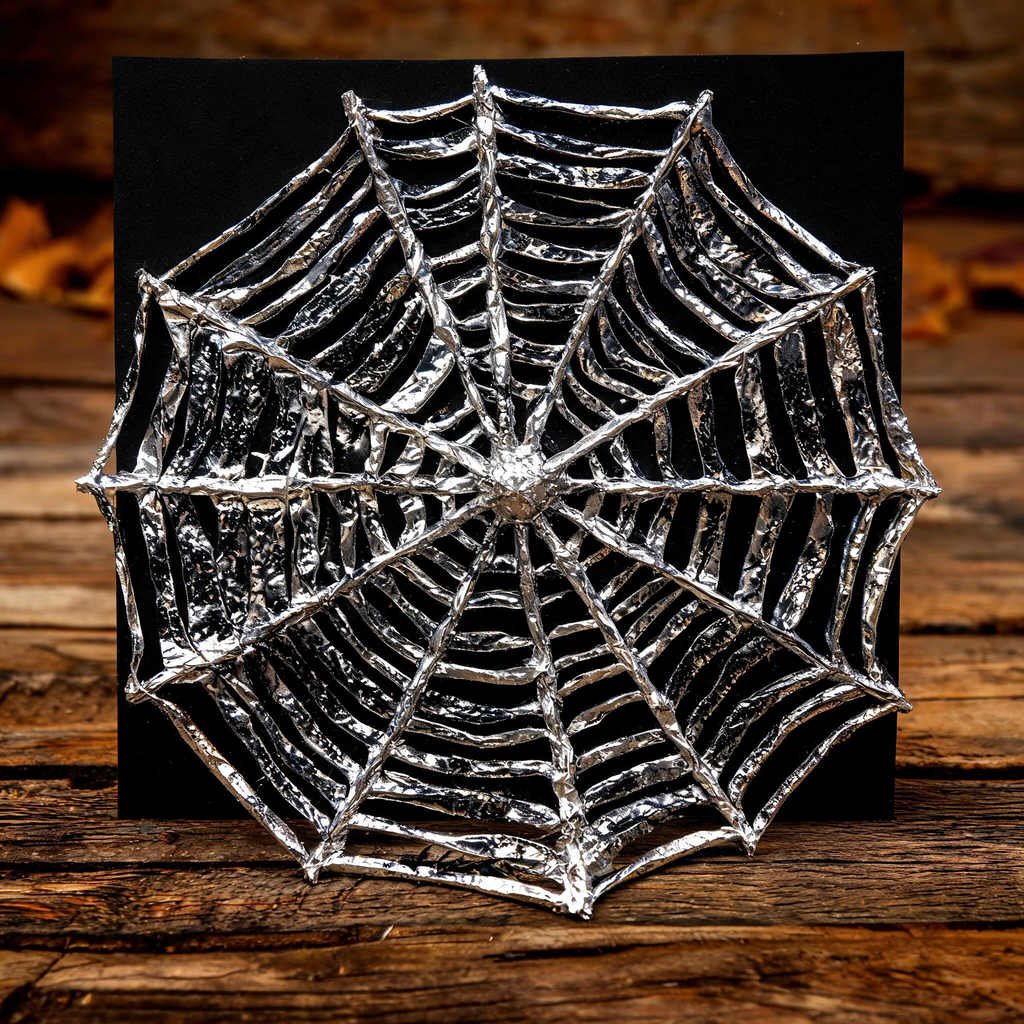
⏱️ Active & Dry Time: 10 mins | 🧼 Mess Level: 2/5 | 👶 Age Adaptation: Ages 2–6 | 💰 Est. Cost: ~$0.35/child
This embossed metal technique looks like expensive hammered pewter but uses simple kitchen aluminum foil! 🕸️
Children love smoothing the foil over yarn ridges to watch the shiny spider web pattern magically appear.
How to Craft It:
- Step 1: Squeeze thick lines of white glue in a spider web pattern on a piece of scrap cardboard.
- Step 2: Lay pieces of thick yarn directly into the glue lines to create raised dimensional ridges.
- Step 3: Tear a sheet of kitchen aluminum foil slightly larger than the cardboard and smooth it gently over the yarn web.
- Step 4: Use your fingertips to gently press the foil down around the yarn lines until the web design stands out in relief.
- Step 5: Glue a black plastic spider ring on top for a stunning shimmering centerpiece.
Amazon Craft Materials You Should Buy:
| Material Name | Buy on Amazon |
|---|---|
| Reynolds Wrap Heavy Duty Aluminum Foil Roll | Buy on Amazon → |
| Elmer’s Liquid Washable School Glue (4 oz Bottles) | Buy on Amazon → |
| Red Heart Super Saver White Acrylic Yarn Skein | Buy on Amazon → |
👉 Watch the Aluminum Foil Spider Tutorial on YouTube
❓ Real Mom Questions Answered (From Reddit & Parenting Forums)
Q1: What is the single fastest zero-prep Halloween craft?
As asked by parents on Reddit’s r/Mommit:
Nancy’s Answer:
The Lollipop Tissue Ghost! Wrap a facial tissue over a Dum-Dums sucker, tie a ribbon around the neck, and dot two black marker eyes. Takes 45 seconds, zero glue, and kids can make a dozen in 10 minutes.
Q2: How do I speed up dry time when kids want to hang their art immediately?
As discussed on Reddit’s r/Mommit:
Nancy’s Answer:
Hit wet tempera paint with a standard hair dryer on low-heat for 60 seconds, or stick to solid paint sticks and peel-and-stick googly eyes that require zero drying time.
💛 Nancy’s Sanity-Saving Tips for Quick Holiday Crafting
Here are three real-mom rules that ensure craft time stays relaxing instead of another chore on your to-do list: 💛
Keep a “Busy Box” of Essentials in the Pantry: Stash one plastic shoe box with glue sticks, scissors, wiggle eyes, and scrap paper. When you need ten quiet minutes, you pull out one box instead of digging through four different closets.
Embrace the Imperfect: If your child’s bat wings are crooked or their pumpkin has three eyes, resist the urge to fix it! The joy is in their creative independence, and those quirky little imperfections will make you smile when you find them years later. ✨
Use Baking Sheets for Instant Containment: Place your child’s project inside a metal rimmed cookie baking sheet. It acts as an instant boundary that keeps beads, marker caps, and glue sticks from rolling onto the floor.
📚 Child Safety & Stress-Free Crafting Guidelines for Parents
Because keeping home crafting safe and enjoyable is always our top focus:
According to the U.S. Consumer Product Safety Commission (CPSC), parents should always check that art supplies feature the AP (Approved Product) Non-Toxic seal, ensuring they are free of dangerous volatile compounds and heavy metals.
Additionally, pediatric wellness experts at the American Academy of Pediatrics (HealthyChildren.org) highlight that brief, positive crafting interactions between parents and children strengthen emotional security and relieve academic stress during busy school weeks.
More Inspiration
Frequently Asked Questions
What are the quickest Halloween crafts to make when you have zero craft supplies?
Tissue-wrapped lollipop ghosts and paper cup ghost luminaries are the fastest zero-prep crafts. Both use basic pantry essentials like paper cups, Kleenex, and suckers, coming together in less than two minutes. 🎃
How do I keep craft time under 10 minutes on busy weeknights?
Pre-select crafts that rely on purple glue sticks and quick-dry markers rather than wet paint. Using materials like toilet paper tubes or egg carton cups that are already pre-shaped eliminates cutting and drying delays entirely.
What is the best way to display quick Halloween crafts around the house?
Clip paper plate spiders, bats, and ghosts along a string of jute twine using wooden clothespins to make a quick holiday garland. You can also place paper cup luminaries on dining tables or windowsill ledges for evening ambiance!