10 Easy Brown Paper Bag Halloween Crafts for Kids

Craft with lunch sacks! Explore 10 brown paper bag halloween crafts with talking monster puppets, stuffed pumpkins, and glowing porch luminaries. 🎃
💬 The Real Mom Question (from Reddit’s r/preschoolers):
“My toddler glued the monster mouth completely over the paper bag flap, gluing the puppet shut so his hand couldn’t make it talk! How do you teach toddlers to make working paper bag puppets?”
Nancy’s Fix: Show them the ‘Puppet Hand Trick’ before gluing anything! Slide your hand inside the bag so your fingers rest under the bottom flap. The flap is the puppet’s head/upper jaw, and the space underneath is the inside of the mouth. Glue the teeth and red paper tongue under the flap so when your child opens and closes their fingers, the puppet talks and chomps naturally!
10 Fun Brown Paper Bag Halloween Crafts for Kids
There is an endearing, nostalgic charm in reaching for an ordinary bundle of brown paper lunch sacks on an October afternoon. Long before commercial craft kits filled megastore shelves, generations of children transformed simple kraft bags into roaring monsters, talking scarecrows, and rustic autumn harvest pumpkins.
Yet for parents, paper sack crafts often trigger unexpected frustration: liquid glue soaking through thin kraft fibers, marker ink bleeding onto dining tables, and confused toddlers gluing the puppet mouth flap shut. The wonderful truth is that with a few intentional mom hacks—like sliding a cereal box inside as a drawing shield and using dry newspaper stuffing—paper bag art becomes totally mess-free, sturdy, and endlessly entertaining.
Best of all, paper bag crafts bridge the gap between creative art making and imaginative storytelling. The moment that puppet mouth begins chomping and talking, your child is transported into an interactive world of holiday theatre. From flapping bats to glowing front-porch luminaries, these 10 brown paper bag halloween crafts cost pennies while delivering hours of joyful holiday memories. For more fast, sanity-saving ideas, explore our favorite quick halloween crafts for busy moms.
⚡ The Quick Mom Skim (TL;DR)
- The Flap Puppet Secret: The rectangular bottom flap is the puppet’s upper jaw; always glue fangs and tongues underneath the flap for talking action.
- The Cereal Box Shield: Slip a flat piece of recycled cardboard inside the bag before drawing to prevent marker bleed-through to tabletops.
- Dry Newspaper Stuffing: Ball up 3 or 4 sheets of dry newspaper to fill 3D pumpkins and scarecrows without soggy moisture or rot.
- Twisted Twine Stem: Twist the top of a stuffed kraft sack tightly and wrap with jute twine or green masking tape for an instant rustic farmhouse stem.
🏆 Nancy’s Top 3 Quick Picks for Brown Paper Bag Halloween Crafts
| Pick Category | Recommended Supply & Link | Real-Mom Why |
|---|---|---|
| Best Bulk Kraft Lunch Bags | Stock Your Home 4 Lb Kraft Brown Paper Lunch Bags (100 Count) | Heavy-duty recycled kraft paper with sturdy gusseted bottoms, ideal for interactive puppets and luminaries. |
| Best Peel-and-Stick Eyes | FEBSNOW 200Pcs Googly Wiggle Eyes (Self-Adhesive) | Adheres firmly to textured brown kraft paper without wet liquid glue sliding off. |
| Best Vivid Construction Paper | Crayola Construction Paper Bulk Pack (480 Sheets) | 10 classic high-pigment colors that contrast brilliantly against earthy brown paper sacks. |
🧺 Nancy’s Real-Mom Supply Swap Table
| Standard Craft Supply | Nancy’s Frugal Kitchen Swap | The Secret Mom Advantage |
|---|---|---|
| Runny Liquid School Glue | Elmer’s Purple Glue Sticks | Bonds paper cutouts to kraft bags instantly without wrinkling or gluing puppet flaps shut. |
| Wet Outdoor Leaves for Stuffing | Crumpled Newspaper or Packing Paper | Provides lightweight, dry, mold-free volume that keeps paper bag pumpkins plump all season. |
| Flammable Wax Candles for Luminaries | Flameless LED Battery Tea Lights | 100% fire-safe illumination that can be left glowing unattended on porches or walkways. |
| Store-Bought Plastic Trick-or-Treat Buckets | Custom Decorated Kraft Paper Sacks | Personalized, biodegradable, and lightweight for small toddler hands to carry door-to-door. |
10 Fun Brown Paper Bag Halloween Crafts
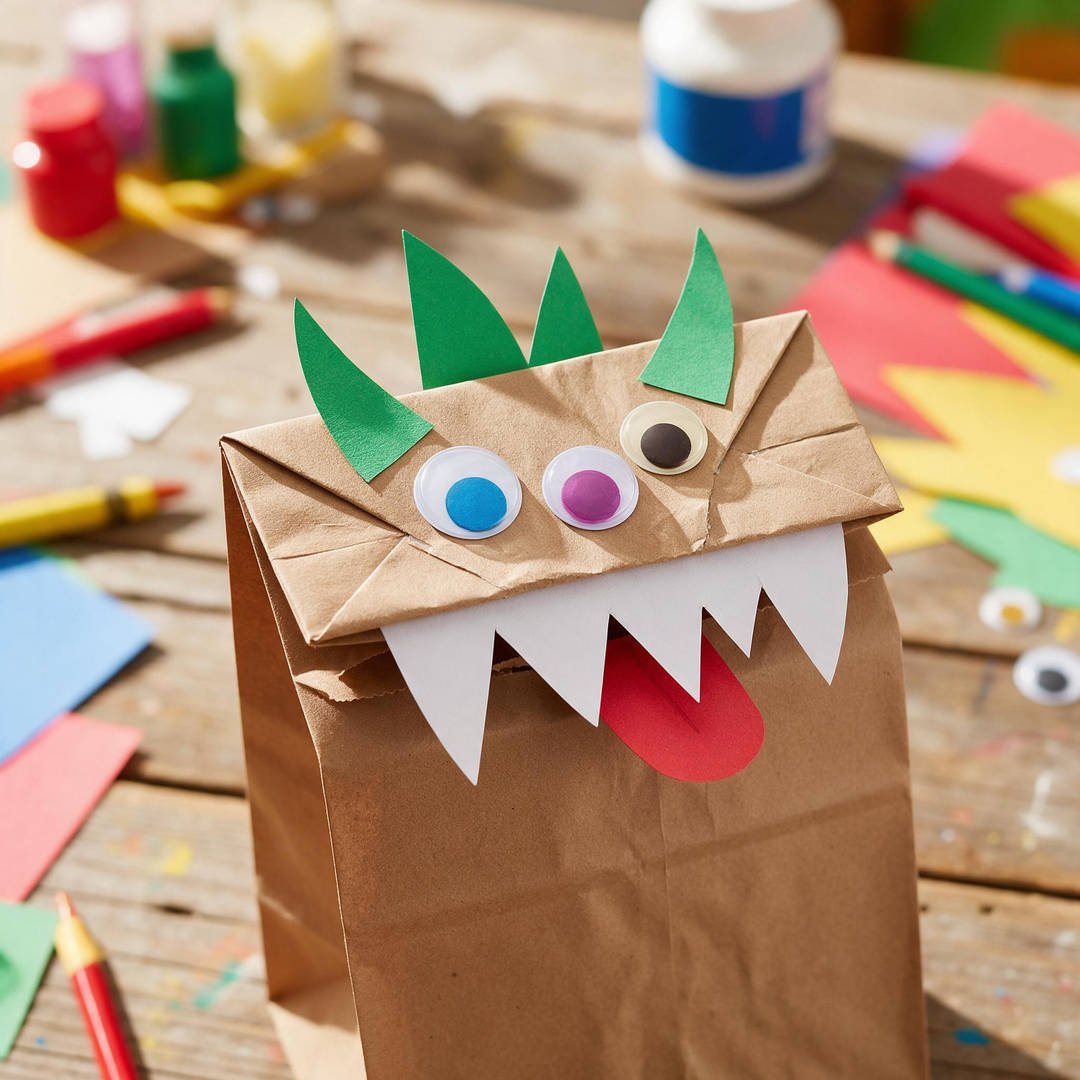
1. Talking Monster Paper Bag Hand Puppet
⏱️ Active & Dry Time: 15 mins prep, 0 mins dry | 🧼 Mess Level: 1/5 | 👶 Age Adaptation: Ages 2+ (Interactive puppetry and dramatic pretend play) | 💰 Est. Cost: ~$0.60 total
💬 Real Mom Question (from Reddit’s r/preschoolers): “How can kids make monster puppets that actually open their mouths?”
Nancy’s Fix: Glue big white paper fangs and a long red paper tongue directly underneath the folded bottom flap! When children slide their fingers inside, moving their hand makes the monster chomp and talk.
This is the ultimate classic paper bag craft! The natural flap of a folded lunch sack creates a hilarious hinged mouth that transforms into a talking, chomping monster puppet in minutes.
Kids love creating wild creature voices, putting on impromptu puppet shows behind the sofa, and chasing siblings with their friendly chomping beasts.
How to Craft It:
- Lay a brown paper bag flat with the folded rectangular bottom flap facing upward and pointing toward the top.
- Cut a strip of white construction paper zigzag fangs and glue along the underside rim of the folded flap.
- Cut a 4-inch curved red paper tongue and glue it onto the flat body directly under the flap.
- Cut colorful paper horns and glue them to the top edge of the flap head.
- Peel and stick three mismatched wiggle eyes on the front flap and slide your hand inside to make the monster talk!
Amazon Craft Materials You Should Buy:
| Material Name | Buy on Amazon |
|---|---|
| Stock Your Home 4 Lb Kraft Brown Paper Lunch Bags (100 Count) | Buy on Amazon ➔ |
| FEBSNOW 200Pcs Googly Wiggle Eyes (Self-Adhesive) | Buy on Amazon ➔ |
👉 Watch the Monster Paper Bag Puppet Tutorial on YouTube
2. Stuffed Brown Paper Bag Rustic Pumpkin
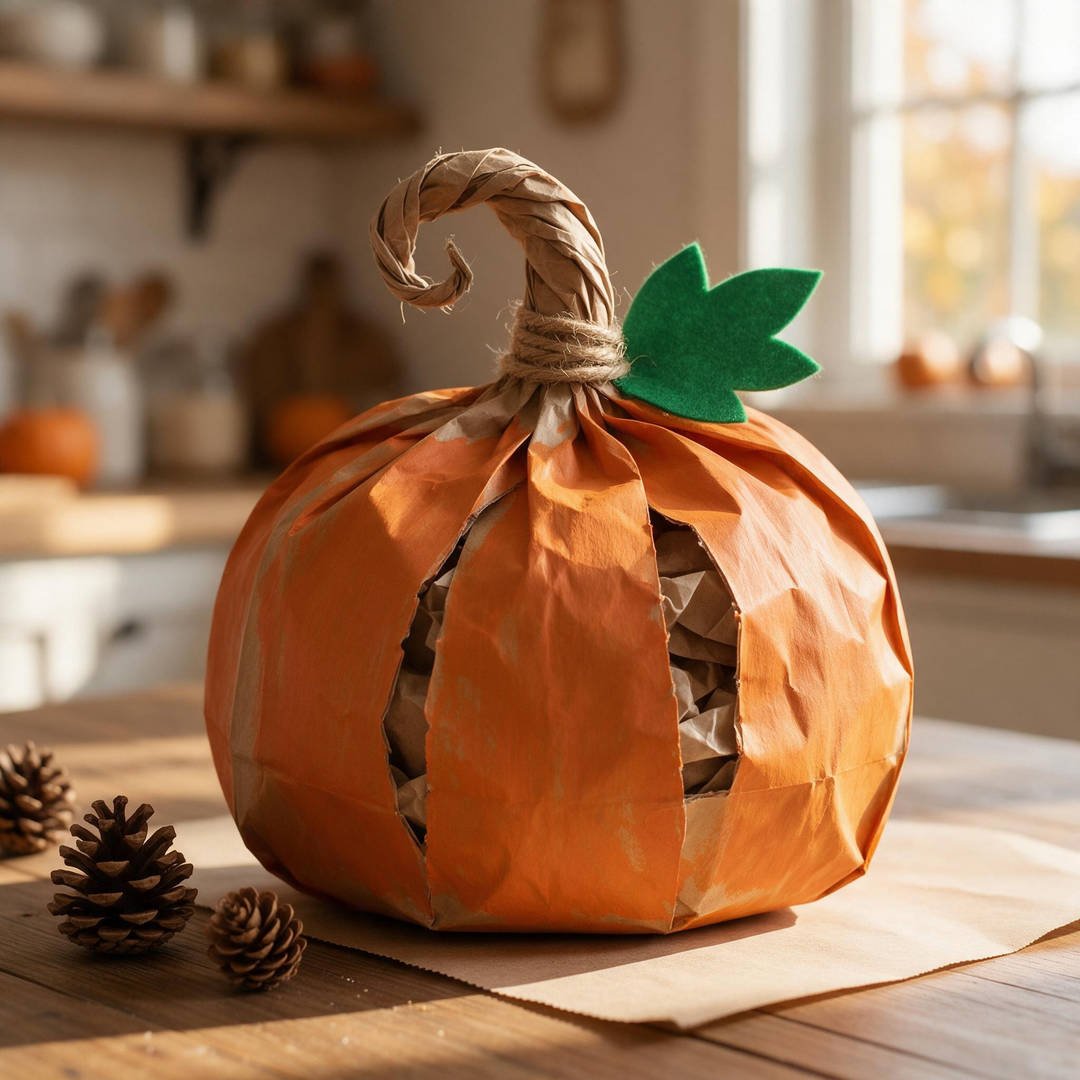
⏱️ Active & Dry Time: 15 mins prep, 15 mins dry | 🧼 Mess Level: 2/5 | 👶 Age Adaptation: Ages 2+ (Stuffing and twisting builds bilateral hand strength) | 💰 Est. Cost: ~$0.80 total
💬 Real Mom Question (from Reddit’s r/toddlers): “How do you make paper bag pumpkins look round and plump without tearing the seams?”
Nancy’s Fix: Paint the bag orange, stuff loosely with 3 crumpled newspaper balls, twist the top into a stem, and wrap with brown masking tape or green twine! The paper bows naturally into a plump farmhouse pumpkin.
Turning a flat grocery sack into a plump, freestanding 3D pumpkin is surprisingly easy and looks gorgeous on an autumn fireplace mantel or covered porch.
Toddlers love the full-body sensory experience of balling up newspaper sheets and stuffing them into the bag before twisting the stem.
How to Craft It:
- Open a brown paper lunch bag and have your child paint the exterior with orange washable tempera; let dry for 15 minutes.
- Scrunch three sheets of old newspaper or tissue paper into loose balls.
- Stuff the paper balls down into the bottom of the bag until the pumpkin belly is rounded.
- Gather the top opening of the bag in your fist and twist tightly into a 3-inch curled stem.
- Wrap brown masking tape or green jute twine around the twisted stem and glue a green paper leaf at the base.
Amazon Craft Materials You Should Buy:
| Material Name | Buy on Amazon |
|---|---|
| Stock Your Home 4 Lb Kraft Brown Paper Lunch Bags (100 Count) | Buy on Amazon ➔ |
| Crayola Washable Kids Paint Set (12ct) | Buy on Amazon ➔ |
👉 Watch the Paper Bag Pumpkin Craft Tutorial on YouTube
3. Friendly Paper Bag Scarecrow Puppet
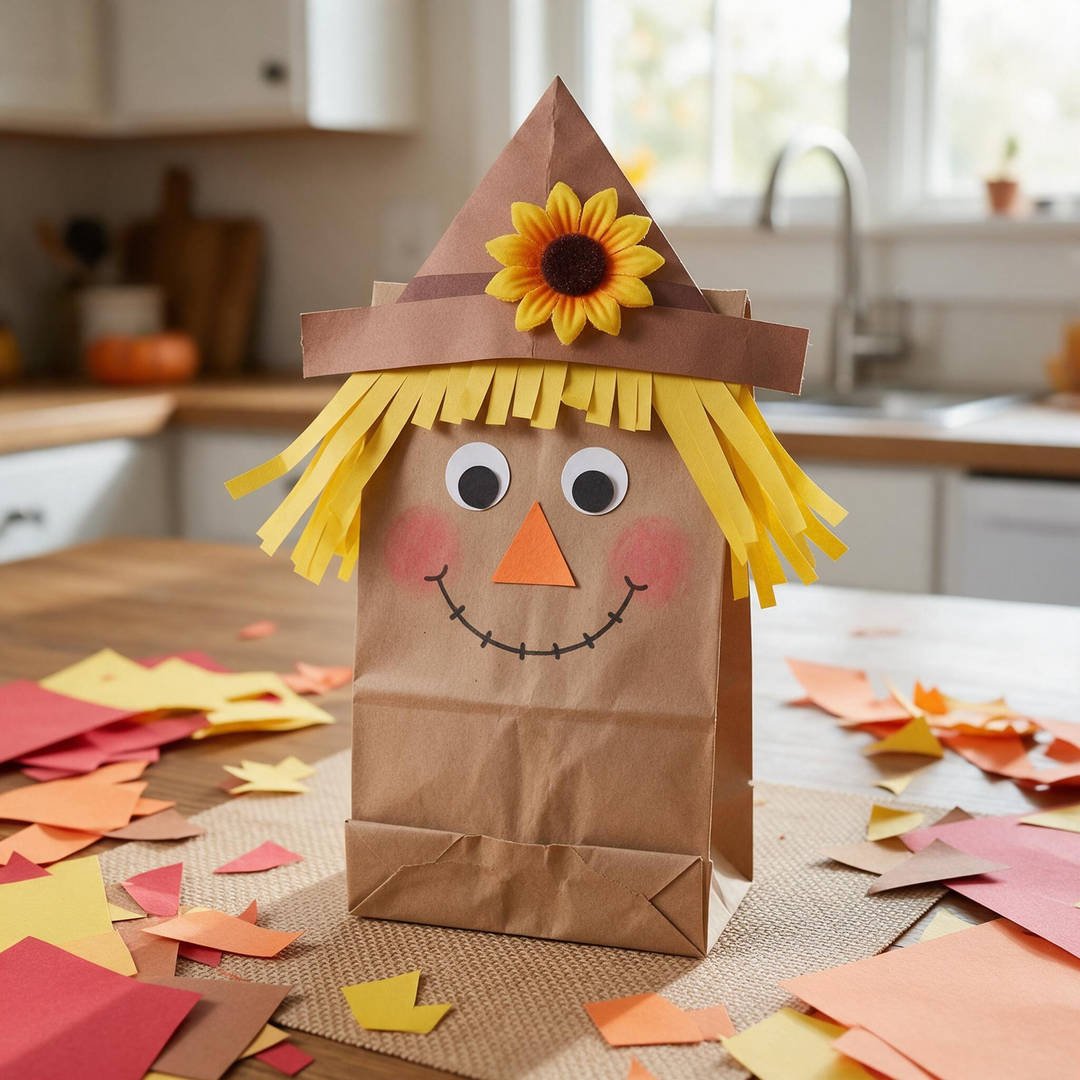
⏱️ Active & Dry Time: 15 mins prep, 0 mins dry | 🧼 Mess Level: 1/5 | 👶 Age Adaptation: Ages 3+ (Paper snipping and triangle nose assembly) | 💰 Est. Cost: ~$0.70 total
💬 Real Mom Question (from Reddit’s r/preschoolers): “How can we make paper bag scarecrows look authentic without buying real straw?”
Nancy’s Fix: Snip thin yellow construction paper fringe strips and glue them peeking out from under a brown paper hat! Draw stitched marker patches across the cheeks for a sweet storybook scarecrow look.
Scarecrows are an autumn classic that bridges Halloween and Thanksgiving beautifully. The earthy kraft paper provides the ideal natural burlap background for straw hair and stitched patches.
Children love drawing stitched smile lines and sticking fabric sunflowers onto the scarecrow’s floppy hat brim.
How to Craft It:
- Cut a 2×6-inch strip of yellow construction paper and snip vertical fringe cuts to mimic straw hair.
- Glue the yellow paper straw along the upper edge of the paper bag flap.
- Cut a triangle hat from brown or orange paper and glue it tilted over the straw roots.
- Snip an orange triangle paper nose and glue it in the center of the flap head with two wiggle eyes.
- Use a black marker to draw a wide stitched smile, rosy cheek circles, and square patchwork stitches on the shirt.
Amazon Craft Materials You Should Buy:
| Material Name | Buy on Amazon |
|---|---|
| Stock Your Home 4 Lb Kraft Brown Paper Lunch Bags (100 Count) | Buy on Amazon ➔ |
| Crayola Construction Paper Bulk Pack (480 Sheets) 10 Assorted Colors | Buy on Amazon ➔ |
👉 Watch the Brown Paper Bag Scarecrow Craft on YouTube
4. Jack-O’-Lantern Porch Luminary Paper Bag
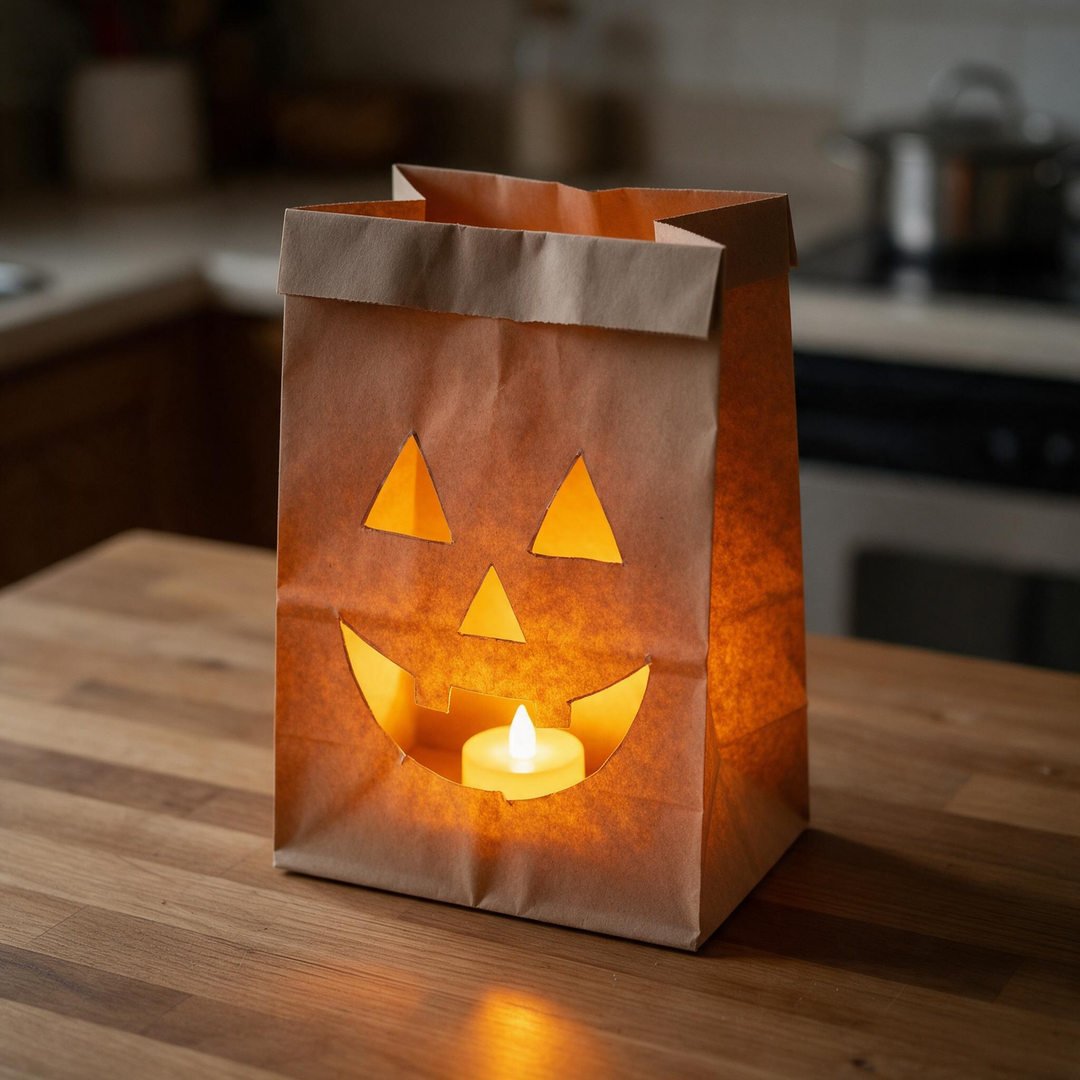
⏱️ Active & Dry Time: 12 mins prep, 0 mins dry | 🧼 Mess Level: 1/5 | 👶 Age Adaptation: Ages 4+ (Punched holes create glowing patterns with LED lights) | 💰 Est. Cost: ~$1.00 total
💬 Real Mom Question (from Reddit’s r/parenting): “How do you make paper bag luminaries safe for kids without real candles?”
Nancy’s Fix: Hole-punch or snip jack-o’-lantern shapes into the front of a brown bag, pour 1 cup of dry rice into the bottom to anchor it against autumn winds, and pop an amber LED battery tea light inside!
Luminaries add an undeniable touch of old-fashioned magic to Halloween walkways and porch steps. Because paper lunch bags are slightly translucent, candle light illuminates the cutout silhouettes with a welcoming amber glow.
Using a handful of dry rice or sand in the base keeps the bags from blowing over during blustery October nights.
How to Craft It:
- Fold the top rim of a brown paper bag down twice to create a crisp, reinforced 1-inch cuff.
- Use safety scissors to cut out classic jack-o’-lantern triangle eyes, nose, and smiling mouth on the front panel.
- Alternatively, use a single hole punch to punch dot patterns of stars, ghosts, or spiderwebs.
- Open the bag and pour 1/2 cup of dry rice or clean gravel into the bottom to weigh it down securely.
- Drop an amber flameless LED battery tea light in the center and line along your front pathway at dusk.
Amazon Craft Materials You Should Buy:
| Material Name | Buy on Amazon |
|---|---|
| Stock Your Home 4 Lb Kraft Brown Paper Lunch Bags (100 Count) | Buy on Amazon ➔ |
| Single Hole Punch 1/4 Paper Hole Puncher for Crafts | Buy on Amazon ➔ |
👉 Watch the DIY Halloween Decor & Luminaries Tutorial on YouTube
5. Flapping Wing Black Bat Paper Bag Puppet
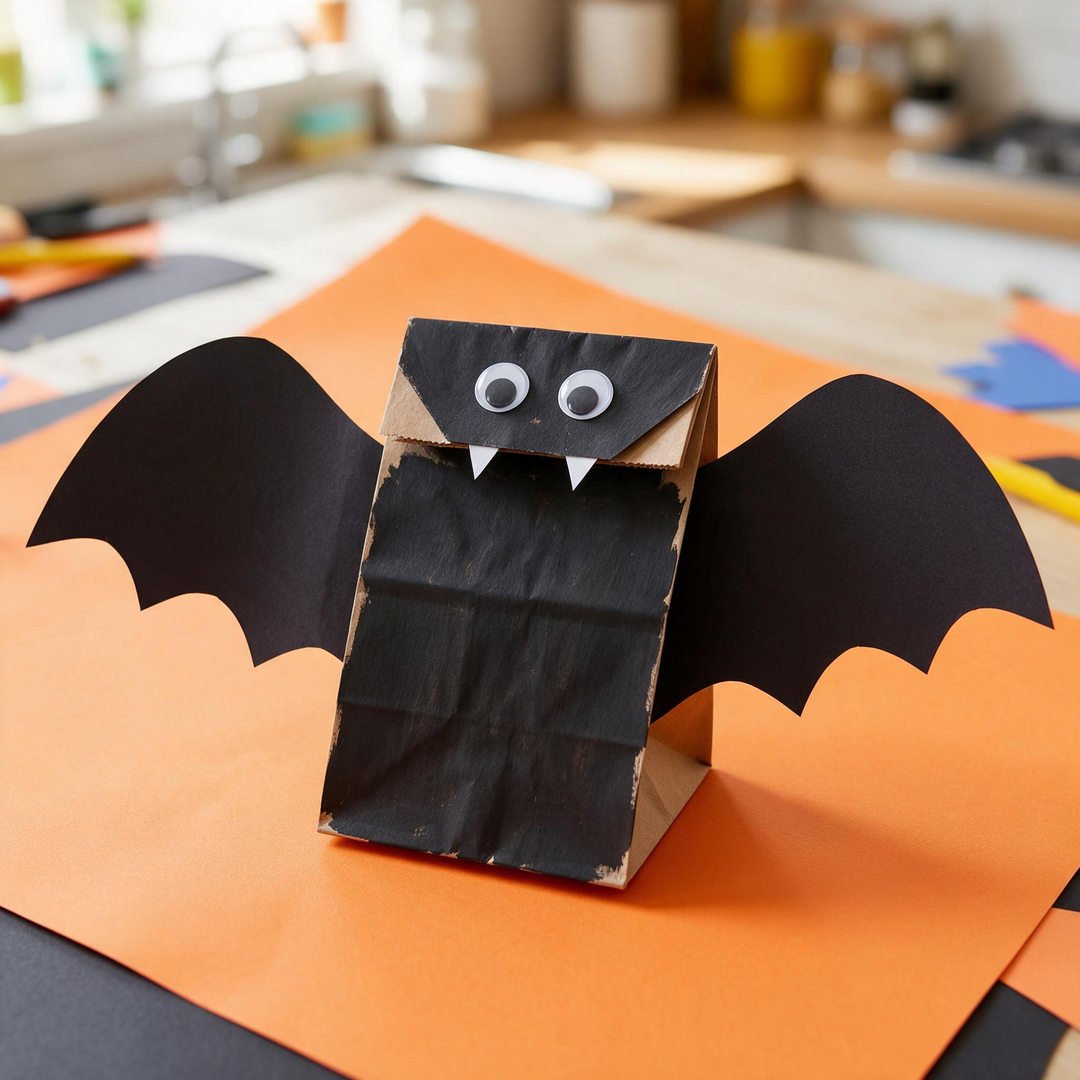
⏱️ Active & Dry Time: 15 mins prep, 0 mins dry | 🧼 Mess Level: 1/5 | 👶 Age Adaptation: Ages 3+ (Gluing side wings creates dramatic flapping action) | 💰 Est. Cost: ~$0.75 total
💬 Real Mom Question (from Reddit’s r/toddlers): “How do you make a paper bag bat that doesn’t look like a rectangle?”
Nancy’s Fix: Glue two large scalloped black paper wings to the side gussets of the bag! When your child slides their hand inside, moving their arm makes the wings flap dramatically across the room.
Adding wide wings to the side creases of a paper bag turns a rectangular sack into a dramatic, soaring creature of the night!
Children love running through hallways with their hand inside the bag, making their bat swoop down to catch imaginary paper moths.
How to Craft It:
- Paint a flat brown lunch bag matte black with washable tempera or black solid paint sticks.
- Cut two large 6-inch scalloped bat wings from sturdy black construction paper.
- Glue the base of each wing into the side accordion creases (gussets) of the bag using a purple glue stick.
- Cut two small triangle bat ears and glue them to the top corners of the flap head.
- Stick two self-adhesive googly eyes and two tiny white paper fangs onto the face flap.
Amazon Craft Materials You Should Buy:
| Material Name | Buy on Amazon |
|---|---|
| Stock Your Home 4 Lb Kraft Brown Paper Lunch Bags (100 Count) | Buy on Amazon ➔ |
| Crayola Construction Paper Bulk Pack (480 Sheets) 10 Assorted Colors | Buy on Amazon ➔ |
👉 Watch the DIY Halloween Paper Bat Tutorial on YouTube
6. DIY Monster Popcorn & Treat Snack Sack
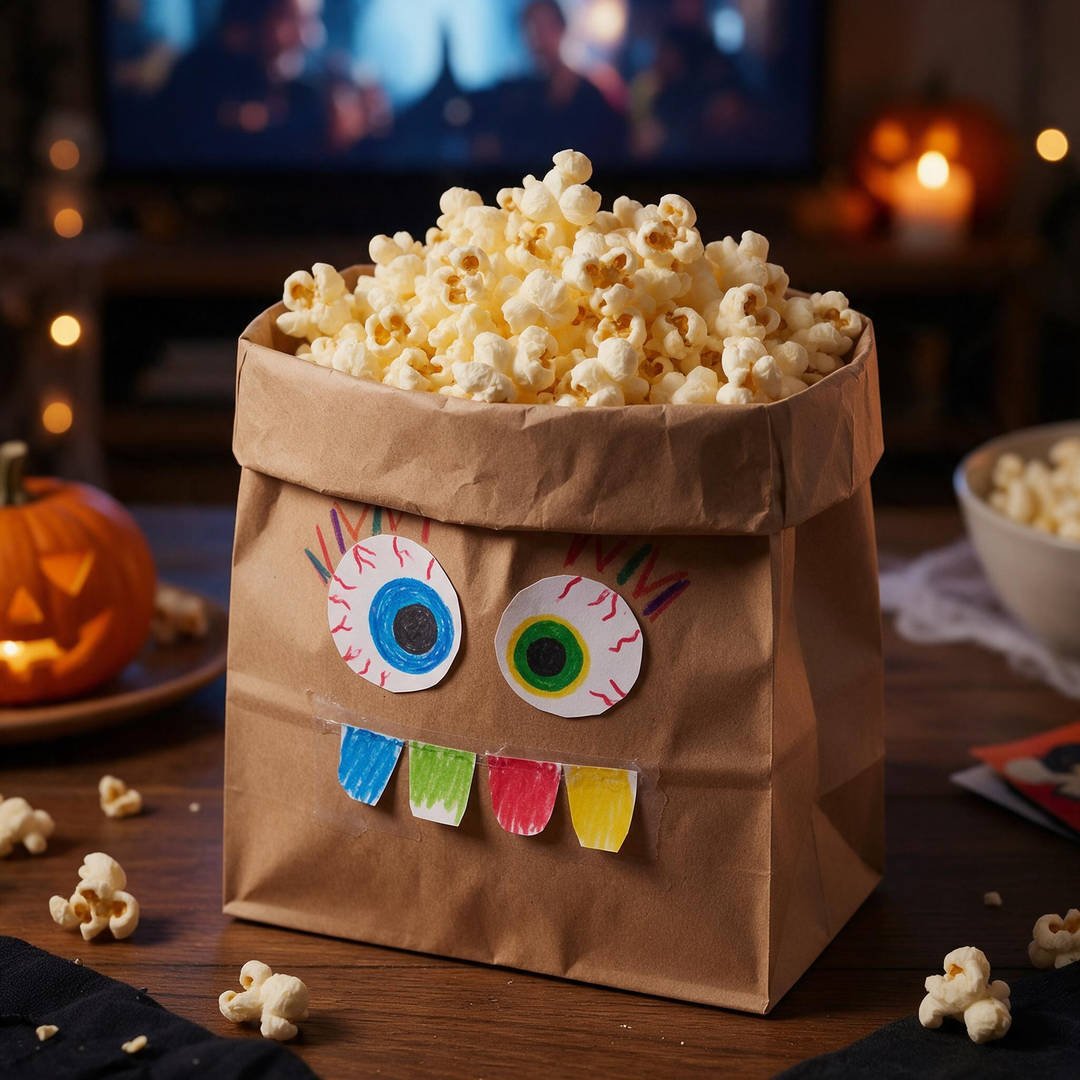
⏱️ Active & Dry Time: 10 mins prep, 0 mins dry | 🧼 Mess Level: 1/5 | 👶 Age Adaptation: Ages 2+ (Food-safe snack bag decorating) | 💰 Est. Cost: ~$0.50 total
💬 Real Mom Question (from Reddit’s r/parenting): “What cute party favor bags can kids decorate for family movie night?”
Nancy’s Fix: Use food-safe kraft lunch bags! Let kids decorate the outside with marker monster faces and googly eyes, fold down the top rim into a bowl shape, and fill with warm buttered Halloween popcorn.
Making custom popcorn sacks adds so much festivity to holiday family movie nights! Rolling down the top rim transforms a tall paper bag into a freestanding individual snack bowl.
Because Kraft lunch bags are food-safe, they hold buttery popcorn, pretzels, or Halloween trail mix without grease leaking onto laps.
How to Craft It:
- Keep the brown paper bag flat and slide a piece of cardboard inside to shield marker ink.
- Hand your child washable markers and let them draw crazy monster eyes, smiling fangs, and stitches on the front.
- Stick three or four self-adhesive wiggle eyes around the drawn monster features.
- Open the bag and carefully roll the top rim downward three times until a sturdy circular cuff forms.
- Fill the freestanding paper bowl to the brim with warm buttered popcorn and candy corn for a cozy movie night.
Amazon Craft Materials You Should Buy:
| Material Name | Buy on Amazon |
|---|---|
| Stock Your Home 4 Lb Kraft Brown Paper Lunch Bags (100 Count) | Buy on Amazon ➔ |
| Crayola Broad Line Markers (12 Count), Washable Markers for Kids | Buy on Amazon ➔ |
👉 Watch the Monster Popcorn Bags Craft on YouTube
7. Spooky Ancient Witch Spellbook Journal
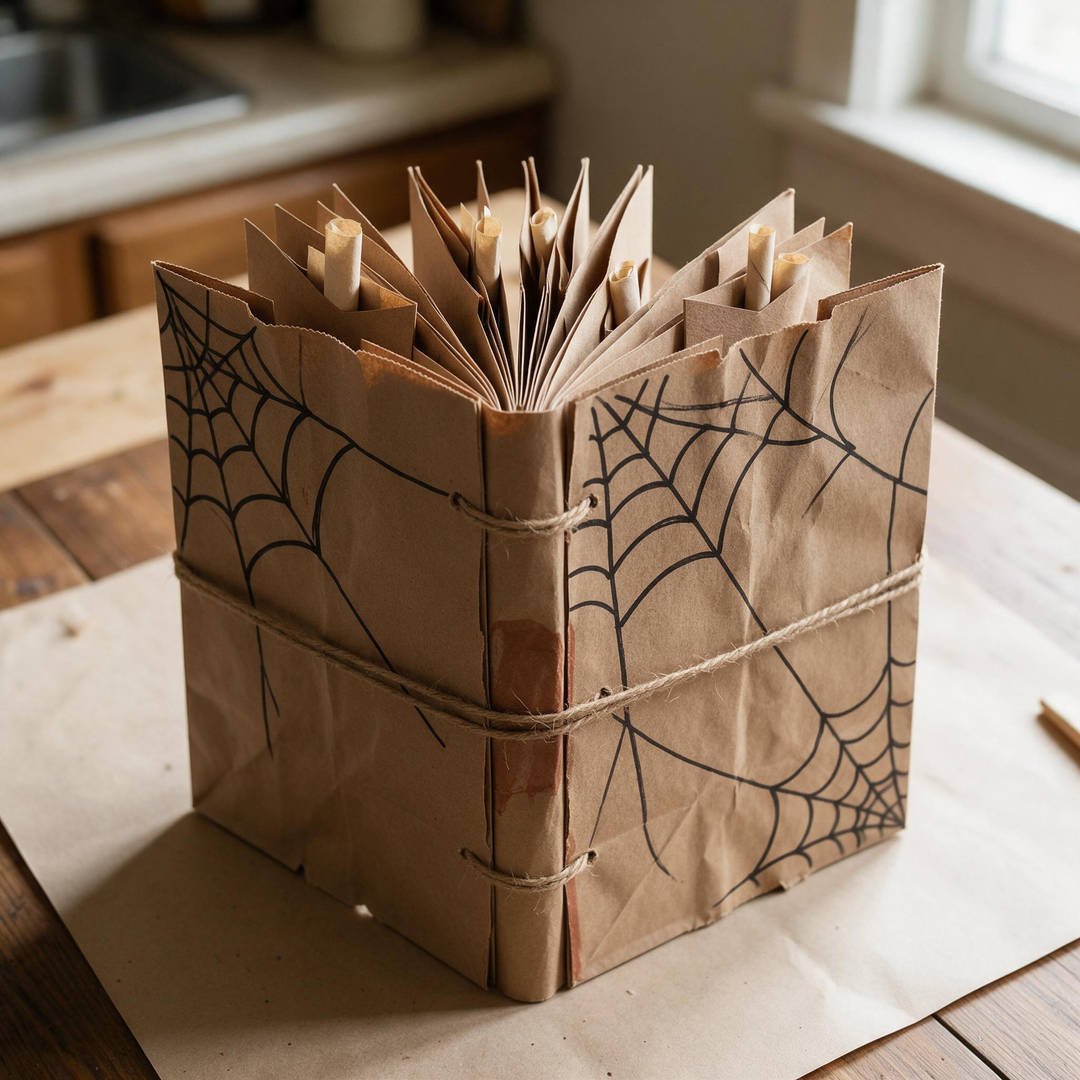
⏱️ Active & Dry Time: 20 mins prep, 0 mins dry | 🧼 Mess Level: 1/5 | 👶 Age Adaptation: Ages 5+ (Folding multiple bags creates an authentic book with pockets) | 💰 Est. Cost: ~$1.20 total
💬 Real Mom Question (from Reddit’s r/elementary): “How do you turn paper lunch bags into a real bound spellbook?”
Nancy’s Fix: Fold three paper bags in half together and staple or bind the spine with twine! The open sack ends naturally create secret pockets where kids can tuck paper spells and potion recipes.
Bookmaking is one of the most thrilling paper crafts for school-aged kids. By alternating the flap orientation of three paper bags, you create an interactive book full of fold-out pages and secret treasure pockets!
Children will spend days writing secret potion recipes, pressing autumn leaves inside, and casting pretend spells.
How to Craft It:
- Stack three brown paper lunch bags together, alternating the flap ends so the stack lies evenly.
- Fold the entire stack in half like a book to create a center spine crease.
- Punch two holes along the spine crease and thread rustic jute twine through, knotting tightly on the exterior.
- Let your child decorate the front cover with metallic markers, a spiderweb silhouette, and an ancient spell title.
- Tuck secret parchment notes, magic feather quills, or dried fall leaves into the natural open sack pockets inside.
Amazon Craft Materials You Should Buy:
| Material Name | Buy on Amazon |
|---|---|
| Stock Your Home 4 Lb Kraft Brown Paper Lunch Bags (100 Count) | Buy on Amazon ➔ |
| Crayola Broad Line Markers (12 Count), Washable Markers for Kids | Buy on Amazon ➔ |
👉 Watch the Paper Bag Spellbook Journal Tutorial on YouTube
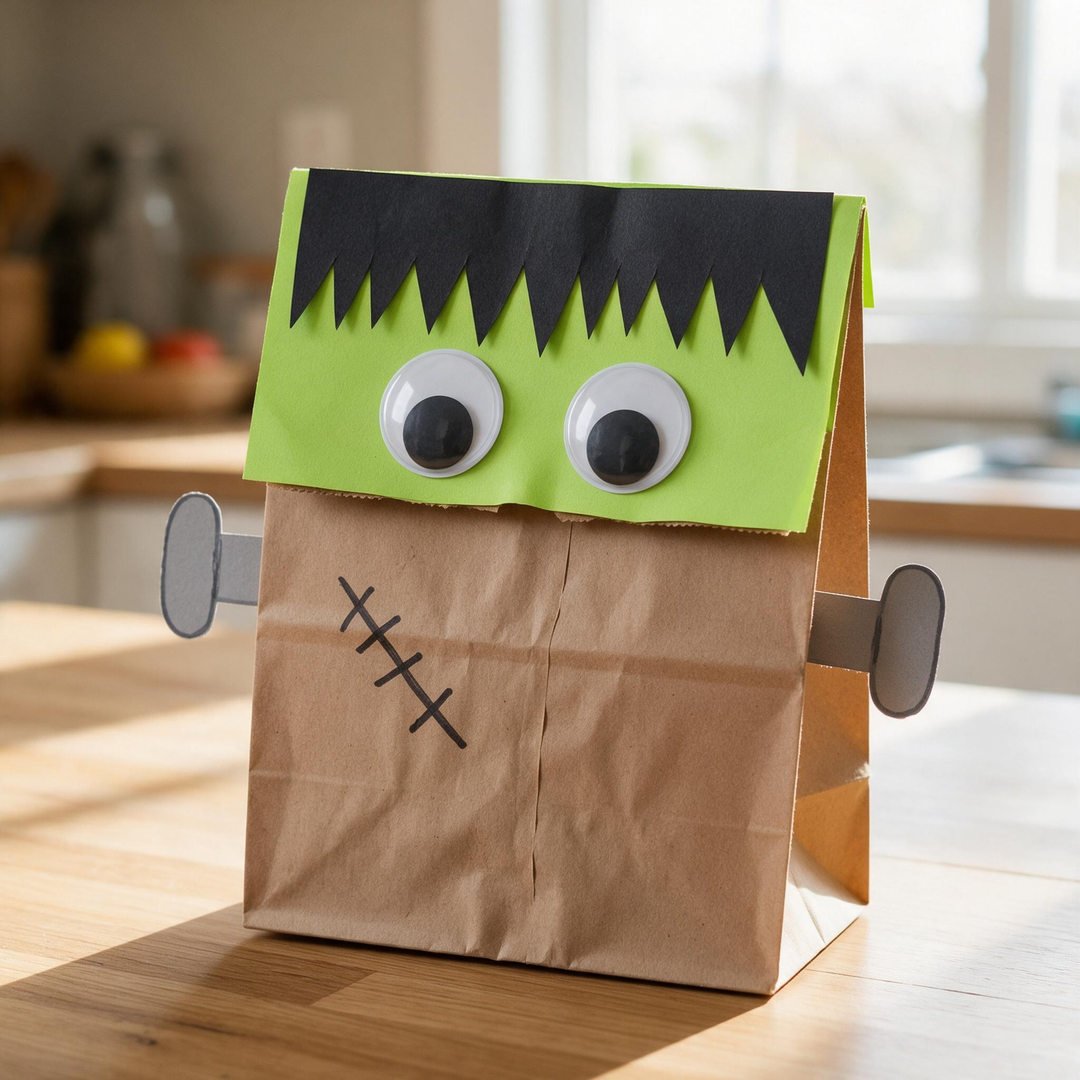
8. Green Frankenstein Paper Bag Talking Puppet
⏱️ Active & Dry Time: 15 mins prep, 0 mins dry | 🧼 Mess Level: 1/5 | 👶 Age Adaptation: Ages 3+ (Blocky bag flap makes a perfect square monster head) | 💰 Est. Cost: ~$0.65 total
💬 Real Mom Question (from Reddit’s r/toddlers): “What’s the best way to turn a kraft bag into Frankenstein without painting the whole thing?”
Nancy’s Fix: Glue a green construction paper rectangle over the flap face and snip a spiky black paper crewcut for the top! Draw stitches on the neck and glue two paper bolts to the side folds.
Frankenstein’s blocky square head aligns perfectly with the square flap of a brown paper bag! You don’t even have to paint the whole bag green; simply gluing green cardstock onto the face flap does the trick.
When children move the flap, Frankenstein’s jaw drops open to reveal a funny green tongue and stitched cheeks.
How to Craft It:
- Cut a green construction paper rectangle to match the dimensions of the folded flap and glue it down.
- Cut a strip of black paper and snip vertical spiky fringe for Frankenstein’s signature haircut.
- Glue the black hair across the top rim of the green flap.
- Cut two small gray paper neck bolts and glue them extending horizontally from the sides of the head.
- Stick two large wiggle eyes on the green face, draw a crooked stitched scar, and slide your hand inside to make him stomp!
Amazon Craft Materials You Should Buy:
| Material Name | Buy on Amazon |
|---|---|
| Stock Your Home 4 Lb Kraft Brown Paper Lunch Bags (100 Count) | Buy on Amazon ➔ |
| Crayola Construction Paper Bulk Pack (480 Sheets) 10 Assorted Colors | Buy on Amazon ➔ |
👉 Watch the Halloween Craft Ideas & Frankenstein Bag on YouTube
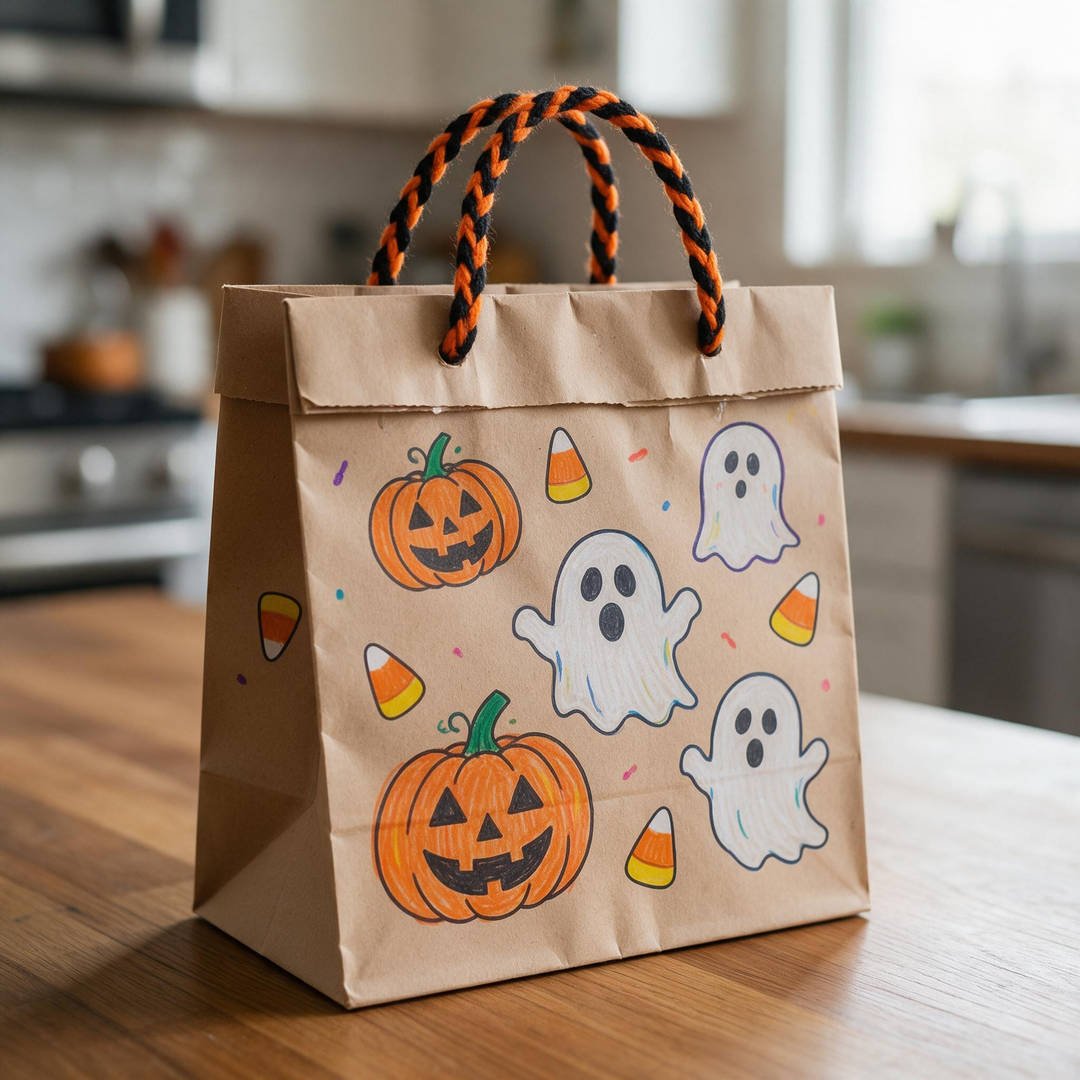
9. Custom Trick-or-Treat Handled Treat Sack
⏱️ Active & Dry Time: 15 mins prep, 0 mins dry | 🧼 Mess Level: 1/5 | 👶 Age Adaptation: Ages 2+ (Personalized candy bag with yarn handles) | 💰 Est. Cost: ~$0.85 total
💬 Real Mom Question (from Reddit’s r/toddlers): “How do you attach strong handles to paper lunch sacks for trick-or-treating?”
Nancy’s Fix: Fold the top rim inward 1 inch to reinforce the paper strength. Punch two holes on each side, thread sturdy braided yarn through, and knot the ends inside! It holds pounds of candy securely.
Toddlers love having their very own personalized trick-or-treat bag that isn’t too heavy or bulky for small hands to carry down the sidewalk.
Folding the top rim over double-reinforces the paper fibers so the yarn handles never rip through under the weight of mini chocolate bars.
How to Craft It:
- Fold the top 1.5 inches of a brown paper bag inward toward the interior to reinforce the rim.
- Let your child customize both sides of the sack with colorful markers, Halloween stickers, and their name.
- Punch two holes 3 inches apart on the front rim and two matching holes on the back rim using a hole punch.
- Cut two 12-inch lengths of thick orange or black yarn.
- Thread the yarn through the holes from the outside and tie large double knots on the inside to form sturdy tote handles.
Amazon Craft Materials You Should Buy:
| Material Name | Buy on Amazon |
|---|---|
| Stock Your Home 4 Lb Kraft Brown Paper Lunch Bags (100 Count) | Buy on Amazon ➔ |
| Single Hole Punch 1/4 Paper Hole Puncher for Crafts | Buy on Amazon ➔ |
👉 Watch the DIY Halloween Candy Bag Ideas on YouTube
10. Floating Paper Bag White Ghost Windsock
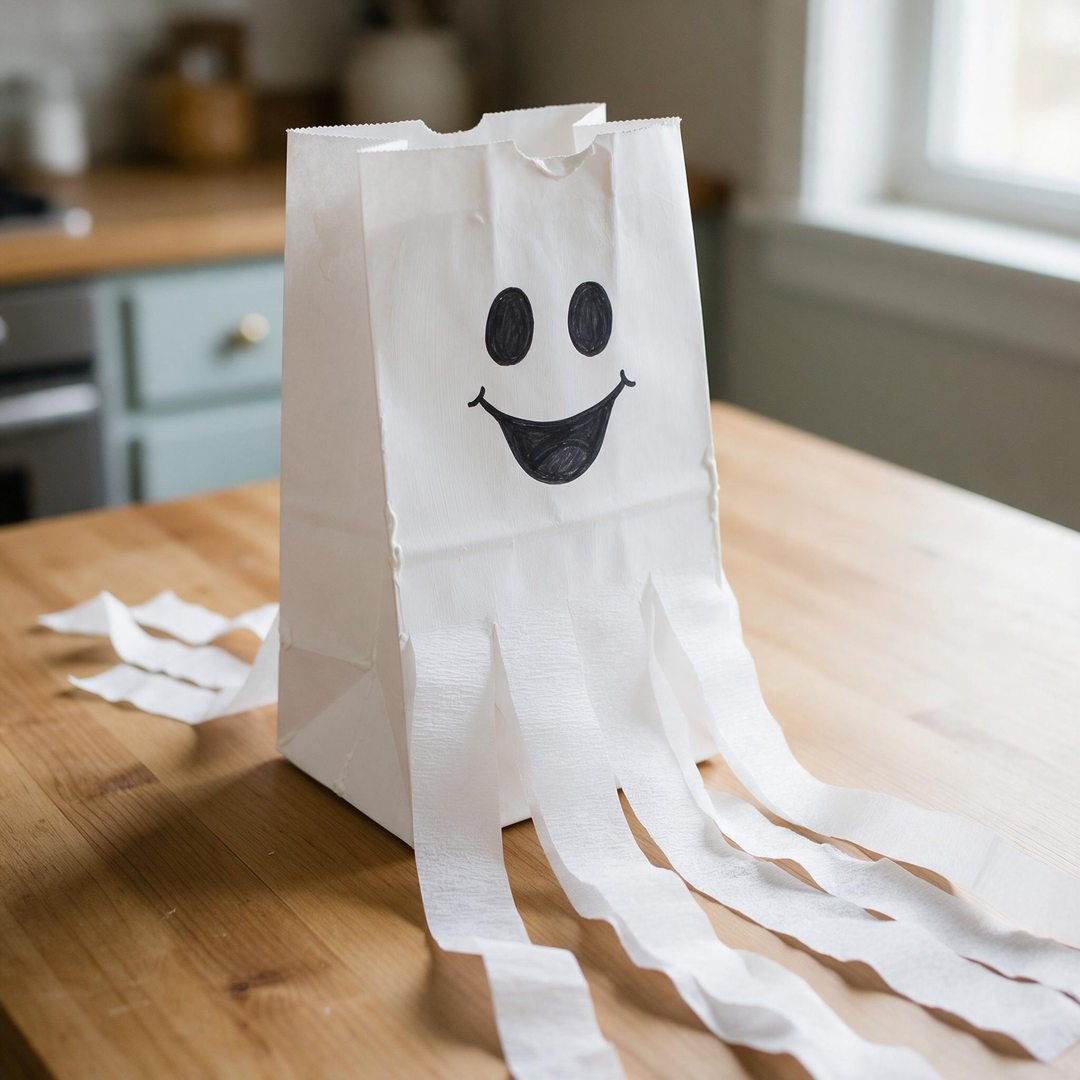
⏱️ Active & Dry Time: 12 mins prep, 0 mins dry | 🧼 Mess Level: 1/5 | 👶 Age Adaptation: Ages 2+ (Trailing crepe streamers catch autumn breeze) | 💰 Est. Cost: ~$0.70 total
💬 Real Mom Question (from Reddit’s r/parenting): “How can toddlers make paper bag ghosts that look good hanging outside?”
Nancy’s Fix: Paint an inverted paper bag white or cover with white chalk, draw big black marker eyes on the square bottom, and glue 2-foot crepe paper streamer ribbons all around the open bottom rim!
Hanging windsocks bring delightful kinetic movement to front porches, tree branches, or child bedroom doorways. Turning the bag upside down gives you a square, flat head that catches the light cleanly.
Whenever a breeze blows, the long white crepe paper ribbons ripple and dance like a friendly ghost soaring through the night air.
How to Craft It:
- Turn a paper lunch sack upside down so the rectangular bottom forms the flat top of the ghost head.
- Paint the exterior white with washable tempera or solid paint sticks; let dry.
- Draw large oval black marker eyes and a sweet smiling open mouth on the front panel.
- Cut six 2-foot strips of white crepe paper party streamers.
- Glue the top ends of the crepe streamers around the interior lower rim of the bag, and punch a hole at the top to hang with twine.
Amazon Craft Materials You Should Buy:
| Material Name | Buy on Amazon |
|---|---|
| Stock Your Home 4 Lb Kraft Brown Paper Lunch Bags (100 Count) | Buy on Amazon ➔ |
| White Crepe Paper Streamers – 4 Rolls for Weddings & DIY Crafts | Buy on Amazon ➔ |
👉 Watch the DIY Halloween Candy Box & Ghost Craft on YouTube
❓ Real Mom Questions Answered (From Reddit & Parenting Forums)
How do I stop paper bag puppets from tearing when energetic kids play with them?
The Real Mom Question (from Reddit’s r/preschoolers): “My 4-year-old gets so animated doing puppet shows that the side seams of the paper bag rip open after 10 minutes!”
Nancy’s Strategic Fix: Reinforce the side seams before crafting! Run a strip of clear packing tape or painter’s tape along the interior side folds of the bag. The tape adds flexible plastic reinforcement that moves naturally with your child’s hand while preventing paper blowouts during high-energy puppet battles!
Can you paint brown paper bags without making them wrinkle?
The Real Mom Question (from Reddit’s r/toddlers): “Whenever my kids use wet tempera paint on brown lunch sacks, the paper curls and wrinkles like an old accordion. How do we keep it flat?”
Nancy’s Strategic Fix: Don’t use watery paint brushes! Instead, use solid tempera paint sticks (like Kwik Stix). They glide onto kraft paper with the opacity of acrylic paint, use zero water, and dry 100% flat in 90 seconds without a single wrinkle. If using liquid tempera, use dense foam sponge daubers and apply the paint in thin, light stippling motions.
How do I store paper bag puppets so they don’t get squished?
The Real Mom Question (from Reddit’s r/parenting): “We made six cute paper bag puppets, but they got crushed into flat crumpled balls in the toy bin. What’s a better storage idea?”
Nancy’s Strategic Fix: Hang them with clothespins along a ribbon line on your playroom wall! Or, stand them upright over clean empty cardboard cereal boxes or paper towel tubes inside a shallow storage bin. Standing them vertically keeps the 3D horns, ears, and googly eyes in pristine condition for future puppet shows!
🧹 Real-Mom Cleanup & Storage Checklist
- The Cereal Box Insert: Always slide a flat cereal box inside the bag before drawing to keep markers from bleeding through.
- Save Newspaper Bags: Keep clean packing paper and newspapers in a tote so you have free stuffing ready for 3D pumpkins and scarecrows.
- Pre-Cut Paper Shapes: Spend 5 minutes pre-cutting triangles, tongues, and fangs so toddlers can focus on assembly and pretend play.
- Label with Month & Year: Write your child’s name and October year inside the bag opening so you can look back on their tiny hand size years from now.
🛡️ Healthy Play & Child Safety Guidelines
All paper sack crafting activities should be conducted with attentive adult supervision. Ensure all scissors, markers, and adhesives feature AP / ASTM D-4236 non-toxic certifications by the Art and Creative Materials Institute.
Never use real wax candles with open flames inside paper bag luminaries. Always use cool-to-the-touch, battery-operated flameless LED tea lights with screw-secured battery compartments, as mandated by the American Academy of Pediatrics (AAP) and U.S. Consumer Product Safety Commission (CPSC) child fire safety standards. Keep small googly eyes and plastic spiders away from infants under 3 years old.