10 Easy Halloween Crafts for School (Grades 1-5)

Looking for budget-friendly, mess-free halloween crafts for school that 25 excited elementary students can complete in a 45-minute period? Here are 10 engaging, teacher-tested projects designed for Grades 1 through 5 that spark creativity without overwhelming classroom cleanup. 🎃
💬 Real Mom Question (from Reddit’s r/Teachers):
“What Halloween crafts can a classroom of 25 energetic kids finish in a 40-minute art block with zero drying-rack disasters?”
If you’ve ever felt that exact holiday stress, take a deep breath mama: you are in the right place! 🎃
As a mom who has volunteered for dozens of October classroom parties, I know firsthand the sheer chaos of glitter and dripping paint.
Elementary teachers need projects that dry fast, use affordable pantry supplies, and keep every child proudly focused at their desk.
Whether you are planning an art center rotation, a whole-class Friday activity, or a seasonal party station, these crafts hit the sweet spot. ✨
Every project featured here costs pennies per student, requires minimal adult prep, and guarantees a stunning keepsake to send home in backpacks.
Grab a fresh cup of coffee ☕, pull out your glue sticks, and let’s make your October classroom celebration an absolute breeze!
⚡ The Quick Mom Skim (TL;DR)
- Zero-Glitter Guarantee: Designed with zero loose glitter or messy liquid spills, saving custodial staff hours of cleanup.
- Bulk Classroom Budget Friendly: Most supplies come from bulk paper packs, recycled tubes, paper plates, and pantry items under \$0.20 per student.
- Dries Before the Dismissal Bell: Uses glue sticks and quick-dry markers so students can pack their artwork safely into backpacks at 3:00 PM.
- Grade-Leveled Adaptability: Includes simple cut-and-paste activities for 1st graders and intricate origami folds for 5th graders.
🏆 Nancy’s Top 3 Quick Picks for Classroom Teachers & Room Parents
If you are running short on planning time for this Friday’s class party, here are our three top lifesavers:
| Category Award | Classroom Craft Idea | Why Teachers Love It |
|---|---|---|
| 🥇 Best Low-Mess (Zero Paint) | Origami Bat Corner Bookmark | Requires only black paper and a ruler, encouraging independent reading skills. |
| 🥈 Best STEM Cross-Curricular | Q-Tip Cotton Skeleton Anatomy | Combines science human body lessons with fine-motor bone placement. |
| 🥉 Best Bulk Budget (Pantry Staples) | Coffee Filter Fluffy Ghost | Costs under 5 cents per student using standard cafeteria coffee filters. |
🧺 Nancy’s Real-Mom Classroom Supply Swap Table
Please never feel like room parents must spend their own hard-earned paycheck at specialty craft stores! 💛
Here are the smart classroom swaps we use for large groups, alongside our favorite bulk Amazon staples:
| If You Don’t Have… | Swap It With This! | Recommended Amazon Staple |
|---|---|---|
| Black Origami Paper | Cut standard black construction paper into 6×6-inch squares. | SunWorks Heavyweight Construction Paper (50-Sheet Pack) |
| Cotton Swabs (Q-Tips) | Cut white paper drinking straws into one-inch bone segments. | Amazon Basics Cotton Swabs (500-Count) |
| Googly Eyes | Have students draw expressive cartoon eyes with black Sharpies or gel pens. | Self-Adhesive Googly Wiggle Eyes (200-Count Multi-Size) |
| Uncoated Paper Plates | Use sturdy cardboard circles cut from recycled cereal or shipping boxes. | Amazon Basics 9-Inch Uncoated Everyday Paper Plates (100-Pack) |
| Chenille Pipe Cleaners | Cut strips of black cardstock into accordion folded zigzag spider legs. | Caydo 150 Pieces Chenille Pipe Cleaners (Halloween Multipack) |
🏫 Low-Mess Halloween Crafts for Elementary School (Grades 1-5)
These first three projects are designed specifically for classroom desks where liquid mess must be kept strictly to zero.
They allow elementary students to work independently while building hand-eye coordination. 🎃
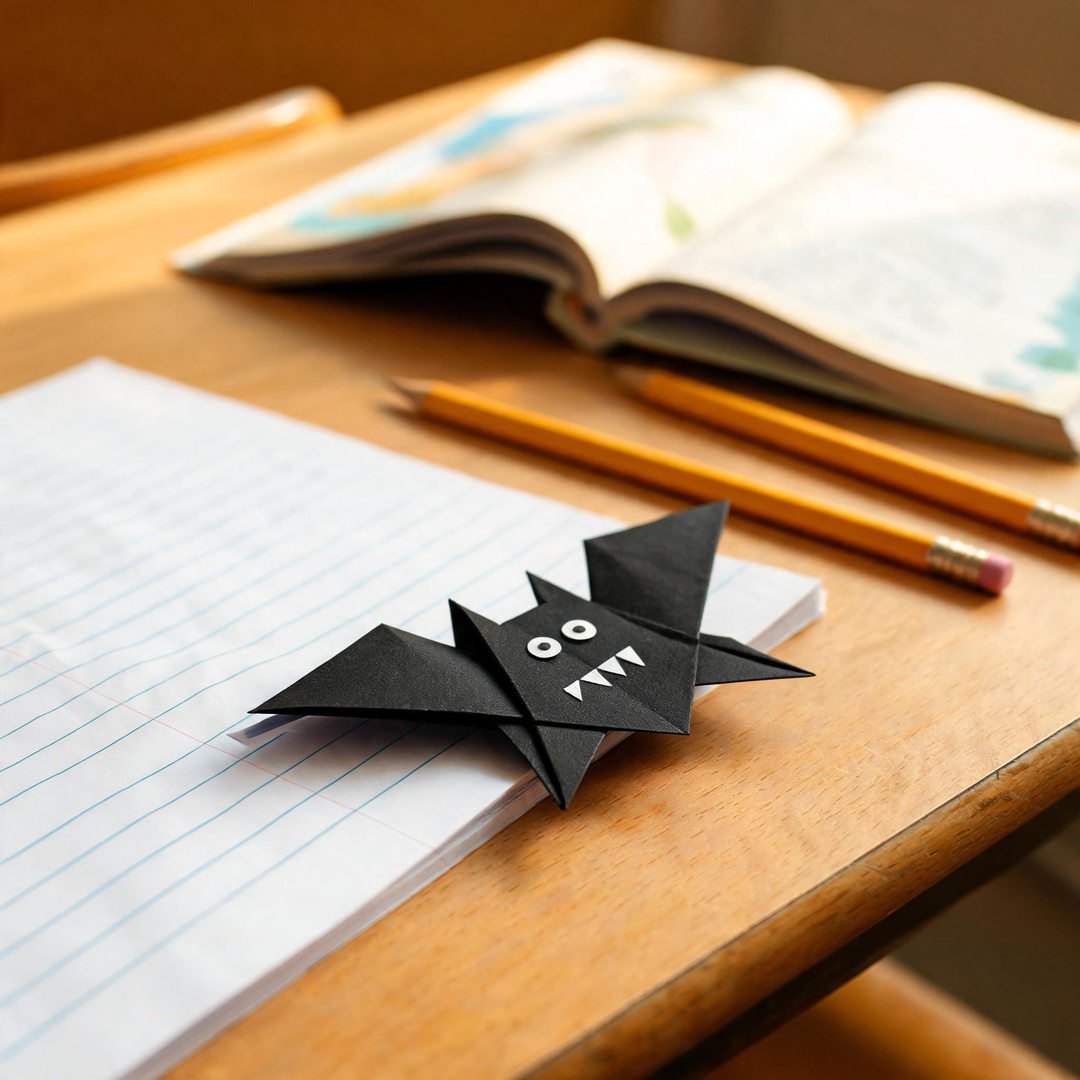
1. Origami Bat Corner Bookmark
⏱️ Active & Dry Time: 10 mins | 🧼 Mess Level: 2/5 | 👶 Age Adaptation: Ages 2–6 | 💰 Est. Cost: ~$0.35/child
This origami bat bookmark is a massive hit with 2nd through 5th graders because it slips right onto the corner of their reading chapter books! 🦇
It requires zero wet glue or paint, making it the ultimate tidy desk activity for reading period.
How to Craft It:
- Step 1: Give each student a 6×6-inch square of crisp black paper and guide them to fold it diagonally into a triangle.
- Step 2: Fold both lower corners up to the top peak to create a diamond crease pattern.
- Step 3: Tuck the tips inside the interior pocket to form a snug corner sleeve that slides onto book pages.
- Step 4: Cut small scalloped wings from scrap black paper and glue them behind the folded pocket.
- Step 5: Add two tiny white paper triangle fangs and mini wiggle eyes so the little bat smiles whenever they open their book.
Amazon Craft Materials You Should Buy:
| Material Name | Buy on Amazon |
|---|---|
| Double-Sided Black Origami Folding Paper (100-Sheets) | Buy on Amazon → |
| Elmer’s Disappearing Purple School Glue Sticks (6-Pack) | Buy on Amazon → |
| Westcott 5-Inch Kids Pointed Tip Scissors (Classroom Pack) | Buy on Amazon → |
👉 Watch the Origami Bat Corner Bookmark Tutorial on YouTube
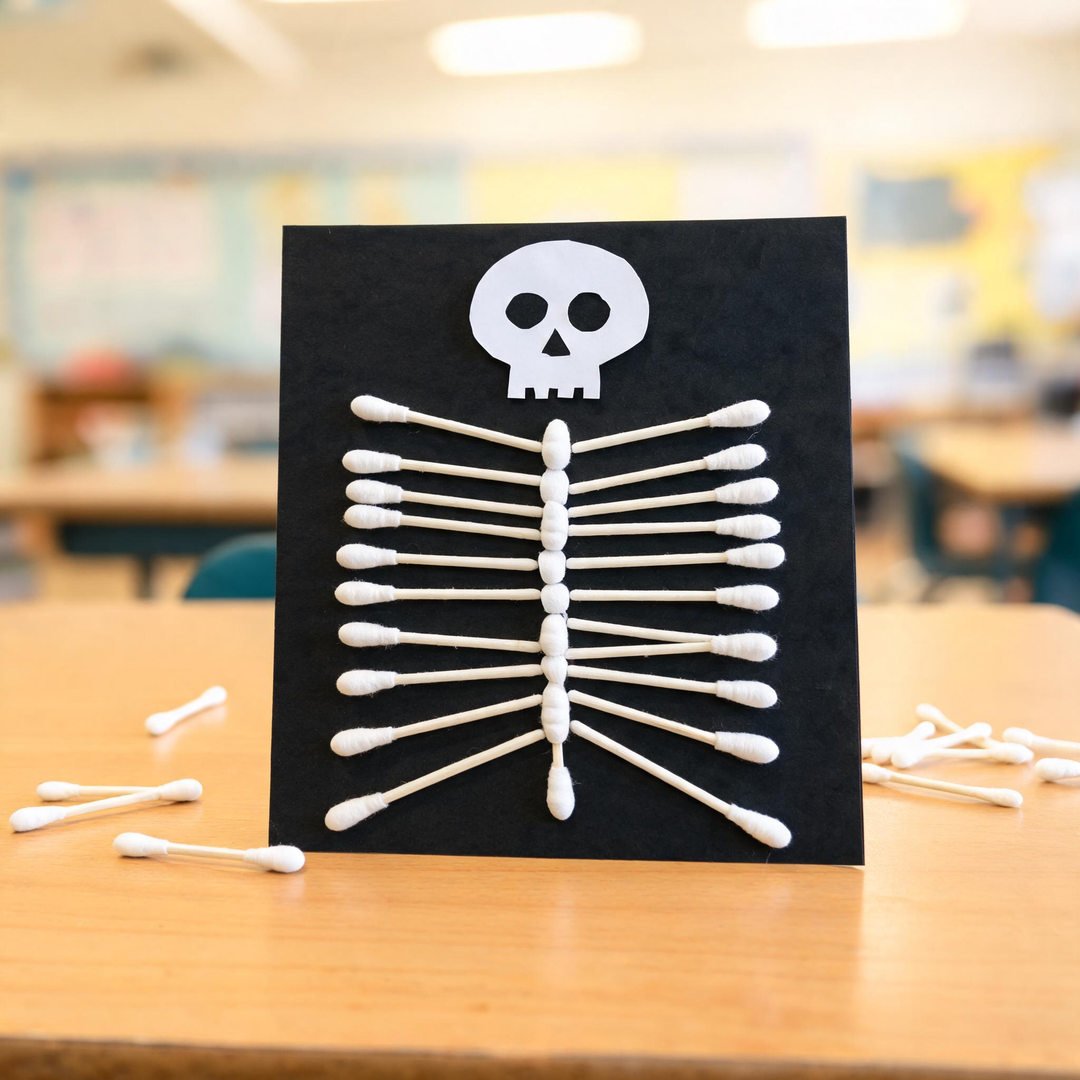
2. Q-Tip Cotton Skeleton Anatomy Craft
⏱️ Active & Dry Time: 10 mins | 🧼 Mess Level: 3/5 | 👶 Age Adaptation: Ages 2–6 | 💰 Est. Cost: ~$0.35/child
Combine Halloween excitement with elementary human anatomy by having students build real skeletal structures using cotton swabs. 💀
It teaches students how ribs protect the lungs and spine, creating a project that teachers and parents equally adore.
How to Craft It:
- Step 1: Hand each child a sheet of heavy black cardstock and a pre-cut white paper skull silhouette.
- Step 2: Glue the skull at the top center of the paper with a glue stick.
- Step 3: Use full-length cotton swabs for the central spine and long arm and leg bones.
- Step 4: Snip several cotton swabs in half with safety scissors to represent horizontal ribs and tiny finger bones.
- Step 5: Glue each bone firmly in anatomical order and label key body parts with a white gel pen.
Amazon Craft Materials You Should Buy:
| Material Name | Buy on Amazon |
|---|---|
| Amazon Basics Cotton Swabs (500-Count) | Buy on Amazon → |
| Neenah Premium Heavyweight Black Cardstock (50 Sheets) | Buy on Amazon → |
| Elmer’s Liquid Washable School Glue (4 oz Bottles) | Buy on Amazon → |
👉 Watch the Q-Tip Skeleton Craft Tutorial on YouTube
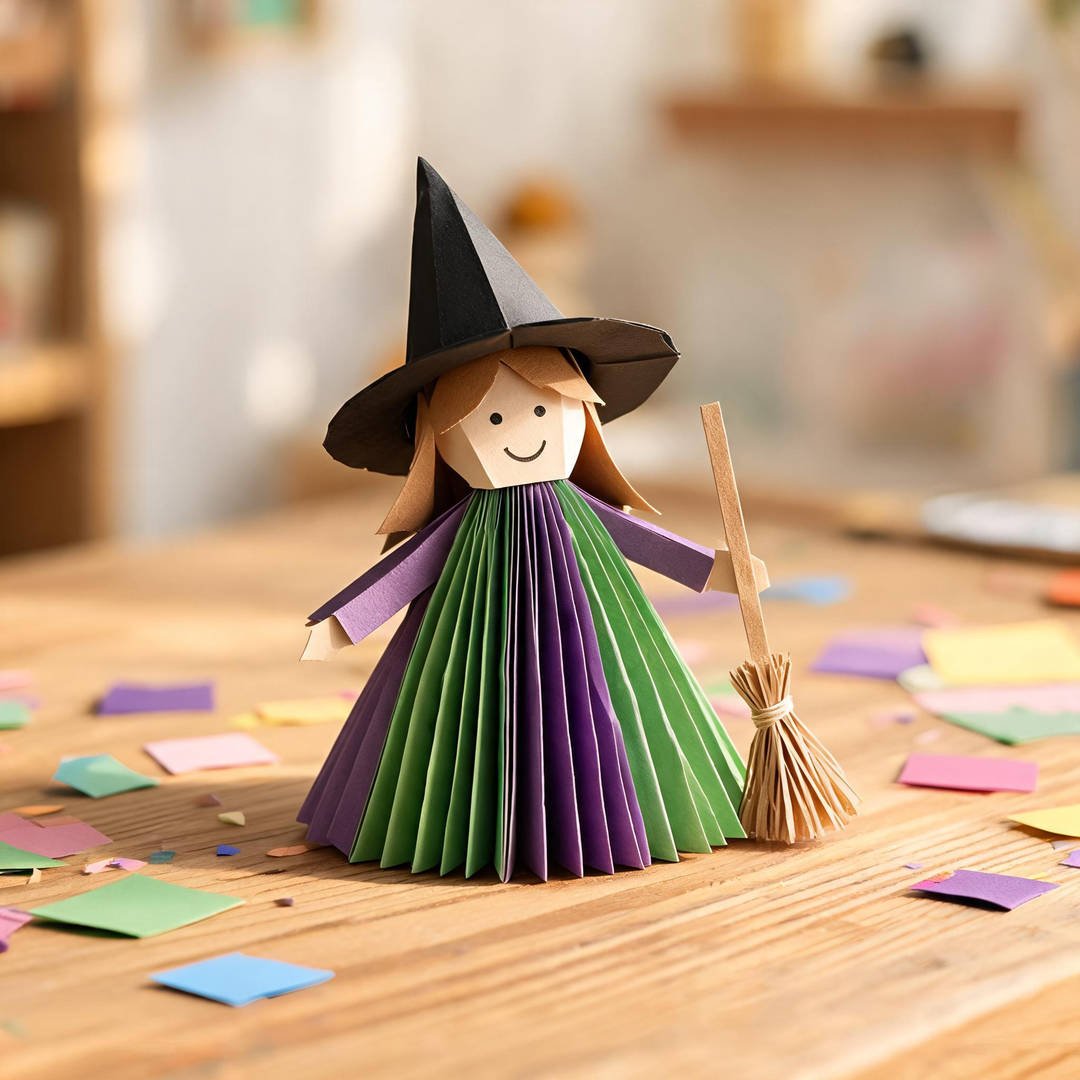
3. Accordion Fold Paper Witch
⏱️ Active & Dry Time: 10 mins | 🧼 Mess Level: 1/5 | 👶 Age Adaptation: Ages 2–6 | 💰 Est. Cost: ~$0.35/child
Accordion folding teaches students rhythmic precision and creates dynamic three-dimensional paper skirts that stand tall on classroom shelves. 🧙♀️
Mixing bright green and royal purple papers gives these friendly witches whimsical storybook charm.
How to Craft It:
- Step 1: Accordion fold a sheet of green or purple construction paper back and forth in one-inch pleats.
- Step 2: Pinch the top of the folded paper fan tightly and staple it to create a flared, flowing dress skirt.
- Step 3: Cut a classic pointed witch hat out of black cardstock and wrap an orange paper band around the base.
- Step 4: Glue a round paper face, two yarn pigtails, and the pointy hat directly above the pleated dress.
- Step 5: Glue a mini wooden coffee stirrer broomstick in the witch’s hand to finish her flying outfit.
Amazon Craft Materials You Should Buy:
| Material Name | Buy on Amazon |
|---|---|
| SunWorks Heavyweight Assorted Construction Paper Pad | Buy on Amazon → |
| Bostitch In-Hand Heavy Duty Stapler with Staples | Buy on Amazon → |
| Wooden Coffee Stirrer Craft Sticks (500-Pack) | Buy on Amazon → |
👉 Watch the Accordion Paper Witch Tutorial on YouTube
✂️ Easy Halloween Classroom Cut and Paste Projects
These next three projects maximize fine-motor cutting and pasting skills while maintaining an ultra-clean classroom environment.
Students can assemble them independently with basic supply caddies. 🎃
4. Coffee Filter Fluffy Ghost
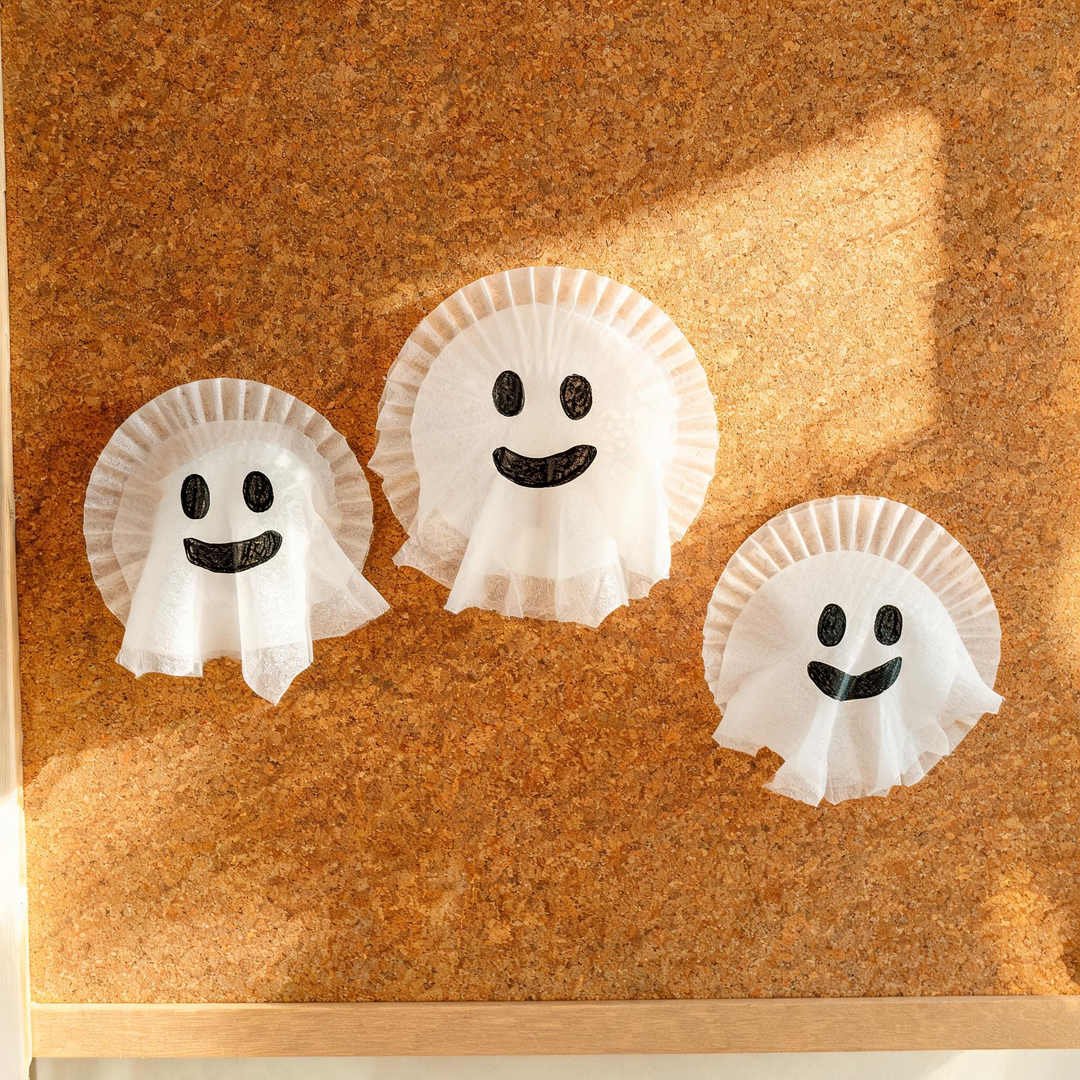
⏱️ Active & Dry Time: 10 mins | 🧼 Mess Level: 2/5 | 👶 Age Adaptation: Ages 2–6 | 💰 Est. Cost: ~$0.35/child
Coffee filters are an elementary art teacher’s secret weapon because they are featherlight and semi-translucent. 👻
Draping coffee filters over crushed paper balls creates floating 3D ghosts that look magical hanging from classroom ceiling tiles.
How to Craft It:
- Step 1: Wad a small scrap of scratch paper or a cotton ball into a round sphere for the ghost head.
- Step 2: Drape a standard white coffee filter smoothly over the center of the ball.
- Step 3: Twist a mini white rubber band or chenille stem snugly around the neck beneath the ball.
- Step 4: Let students draw funny smiling or surprised ghost faces using black washable markers.
- Step 5: Thread a string of fishing line through the top and pin them along classroom ceiling grids to dance in the air vents.
Amazon Craft Materials You Should Buy:
| Material Name | Buy on Amazon |
|---|---|
| Commercial Basket Coffee Filters (500-Count) | Buy on Amazon → |
| Crayola Fine Line Black Markers (12-Count) | Buy on Amazon → |
| Clear Monofilament Hanging Fishing Line Spool | Buy on Amazon → |
👉 Watch the Coffee Filter Ghost Tutorial on YouTube
5. Recycled Cardboard Tube Frankenstein
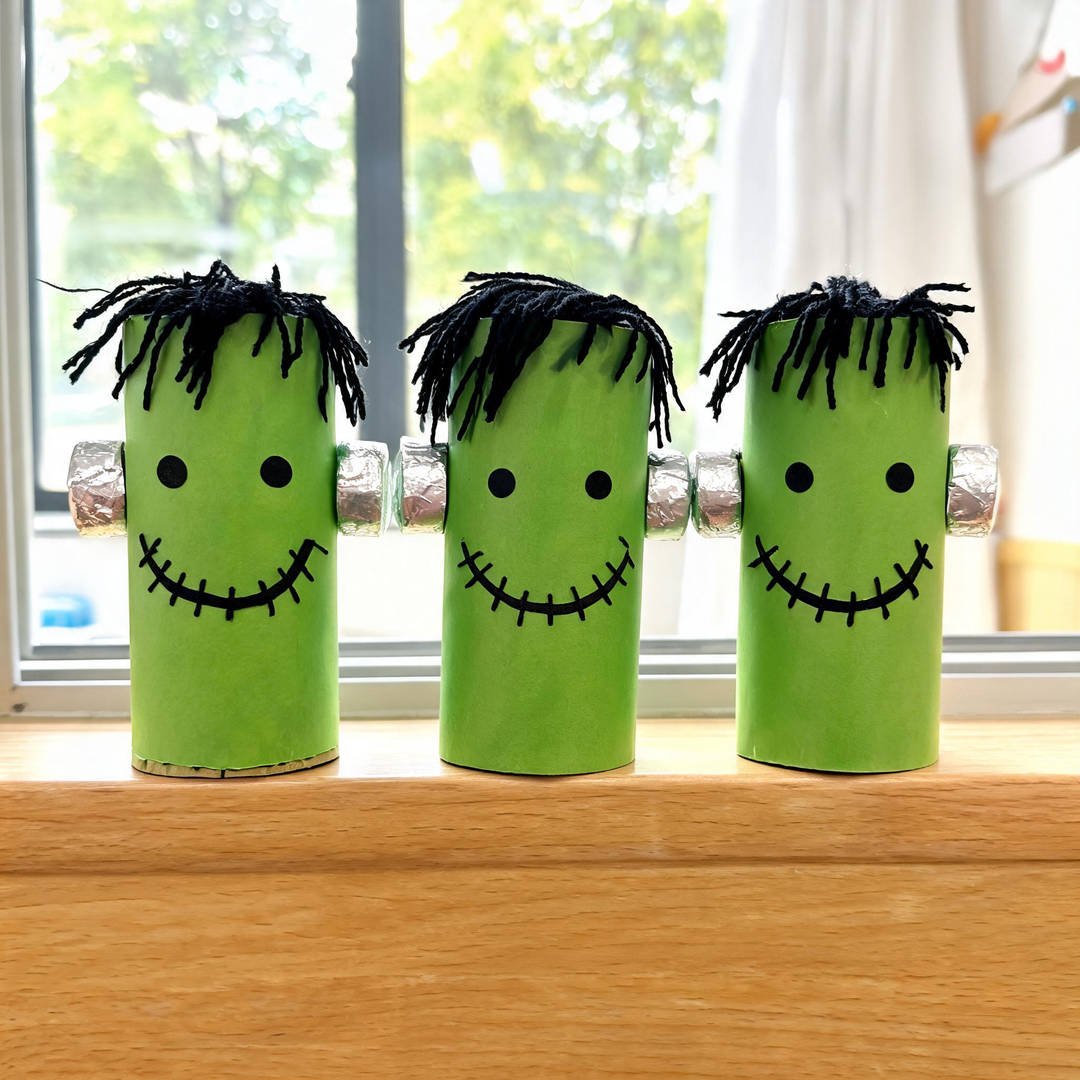
⏱️ Active & Dry Time: 10 mins | 🧼 Mess Level: 3/5 | 👶 Age Adaptation: Ages 2–6 | 💰 Est. Cost: ~$0.35/child
Send a note home the first week of October asking parents to save empty toilet paper tubes! 🧟♂️
Transforming recycled cardboard rolls into friendly green Frankensteins teaches students the joy of upcycling everyday items.
How to Craft It:
- Step 1: Wrap green construction paper smoothly around an empty cardboard tube and glue the seam shut.
- Step 2: Cut a fringe of black cardstock with jagged triangular points and glue it along the top rim for monster hair.
- Step 3: Roll two small balls of kitchen aluminum foil into cylindrical bolts and glue them to each side of the neck.
- Step 4: Stick on two large wiggle eyes and draw a zig-zag stitched smile with black marker.
- Step 5: Display the upright monster tribe across classroom window ledges for a silly seasonal border.
Amazon Craft Materials You Should Buy:
| Material Name | Buy on Amazon |
|---|---|
| SunWorks Heavyweight Green Construction Paper | Buy on Amazon → |
| Reynolds Wrap Aluminum Foil Roll | Buy on Amazon → |
| Self-Adhesive Googly Wiggle Eyes (200-Count Multi-Size) | Buy on Amazon → |
👉 Watch the Toilet Paper Roll Frankenstein Tutorial on YouTube
6. Yarn-Wrapped Cardboard Spider Web
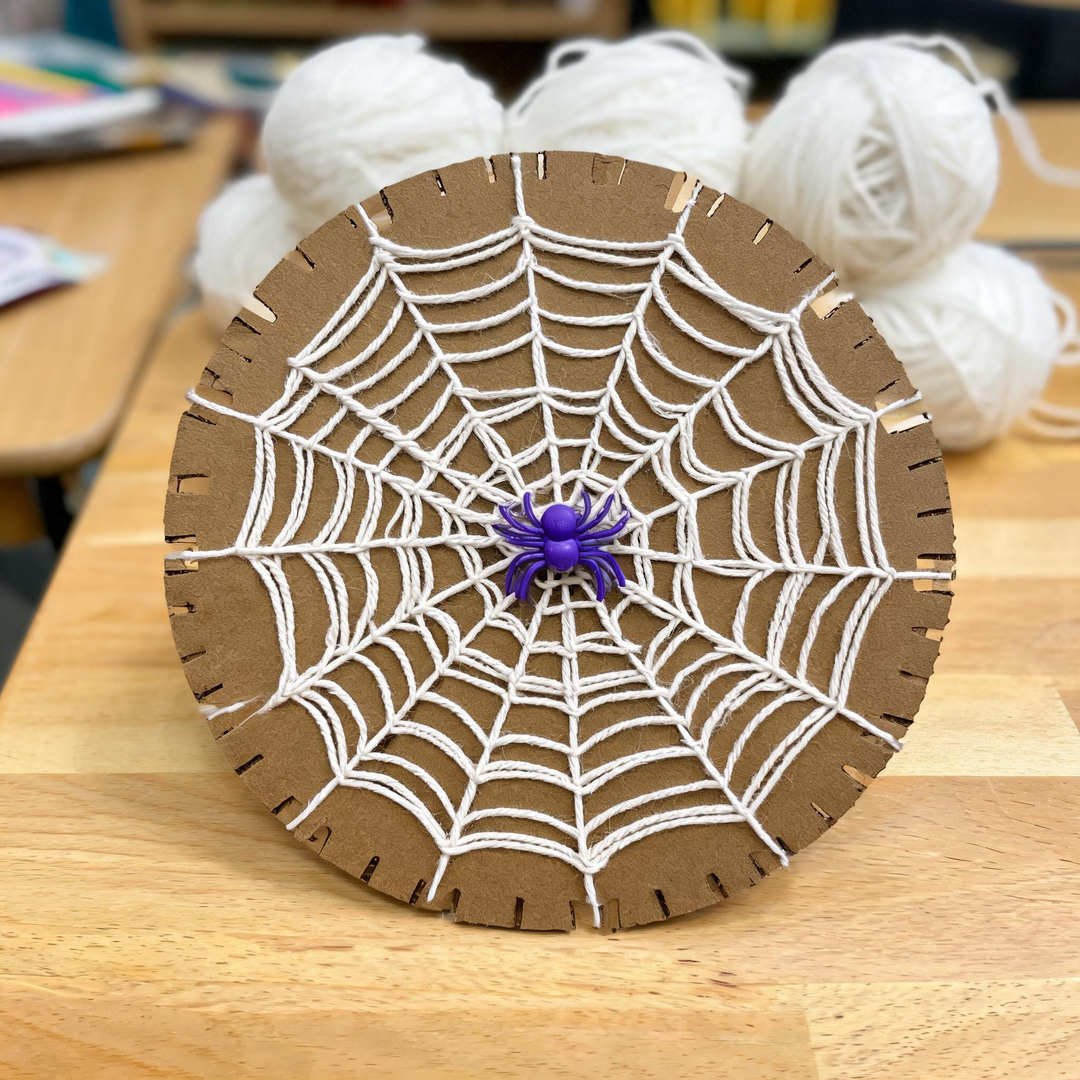
⏱️ Active & Dry Time: 10 mins | 🧼 Mess Level: 1/5 | 👶 Age Adaptation: Ages 2–6 | 💰 Est. Cost: ~$0.35/child
Weaving yarn through notched cardboard wheels introduces basic textile skills and keeps active students deeply focused. 🕸️
Every child’s web will look completely unique depending on their threading pattern across the notches.
How to Craft It:
- Step 1: Cut a 6-inch circle from sturdy recycled corrugated cardboard boxes.
- Step 2: Cut eight small half-inch slits evenly spaced around the outer cardboard circumference.
- Step 3: Tape one end of white yarn to the back of the disc, then guide students to weave across opposite notches.
- Step 4: Continue wrapping and crossing until an intricate geometric web forms across the circle.
- Step 5: Tape off the yarn end on the back and glue a plastic spider ring right in the center of their web.
Amazon Craft Materials You Should Buy:
| Material Name | Buy on Amazon |
|---|---|
| Red Heart Super Saver White Acrylic Yarn Skein | Buy on Amazon → |
| JOYIN 144 Pieces Halloween Plastic Spider Rings | Buy on Amazon → |
| Scotch Heavy Duty Clear Packaging Tape Roll | Buy on Amazon → |
👉 Watch the Yarn Wrapped Spider Web Tutorial on YouTube
🎨 Fun Halloween Crafts for Big Kids (Ages 8-10)
Older elementary students in 3rd through 5th grade crave projects with interactive playability and storytelling.
These final four activities let them express big creativity with puppets, masks, and mosaic art. ✨
7. Brown Lunch Bag Monster Puppet
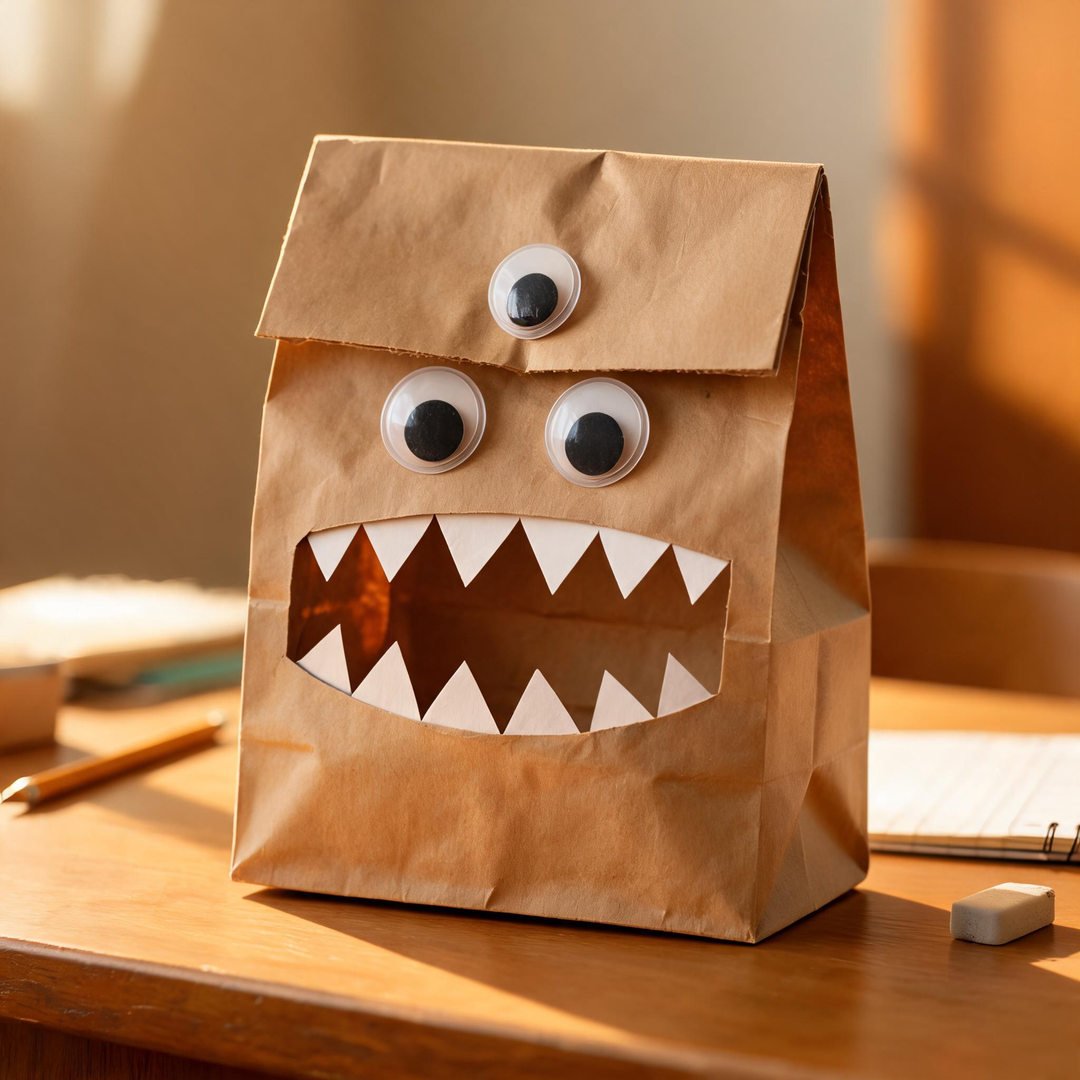
⏱️ Active & Dry Time: 10 mins | 🧼 Mess Level: 2/5 | 👶 Age Adaptation: Ages 2–6 | 💰 Est. Cost: ~$0.35/child
Classic paper bag puppets never go out of style because students can immediately slip their hand inside and put on a puppet show! 🎭
The underside of the folded bottom flap acts as a talking mouth when fingers move up and down.
How to Craft It:
- Step 1: Lay a flat brown kraft paper lunch bag face up with the bottom flap folded down toward the table.
- Step 2: Cut sharp triangular monster fangs out of white paper scraps and glue them along the inner flap crease.
- Step 3: Glue a long red or purple paper tongue tucked underneath the flap so it sticks out when the mouth opens.
- Step 4: Decorate the top flap with neon paper horns, wild yarn eyebrows, and three crazy mismatched eyes.
- Step 5: Pair students up for five minutes of creative theatrical monster roleplay before afternoon dismissal.
Amazon Craft Materials You Should Buy:
| Material Name | Buy on Amazon |
|---|---|
| Stock Your Home Brown Kraft Paper Lunch Bags (100-Pack) | Buy on Amazon → |
| Elmer’s Disappearing Purple School Glue Sticks (6-Pack) | Buy on Amazon → |
| Crayola Broad Line Washable Markers (10-Count) | Buy on Amazon → |
👉 Watch the Paper Bag Monster Puppet Tutorial on YouTube
8. Popsicle Stick Haunted House Frame
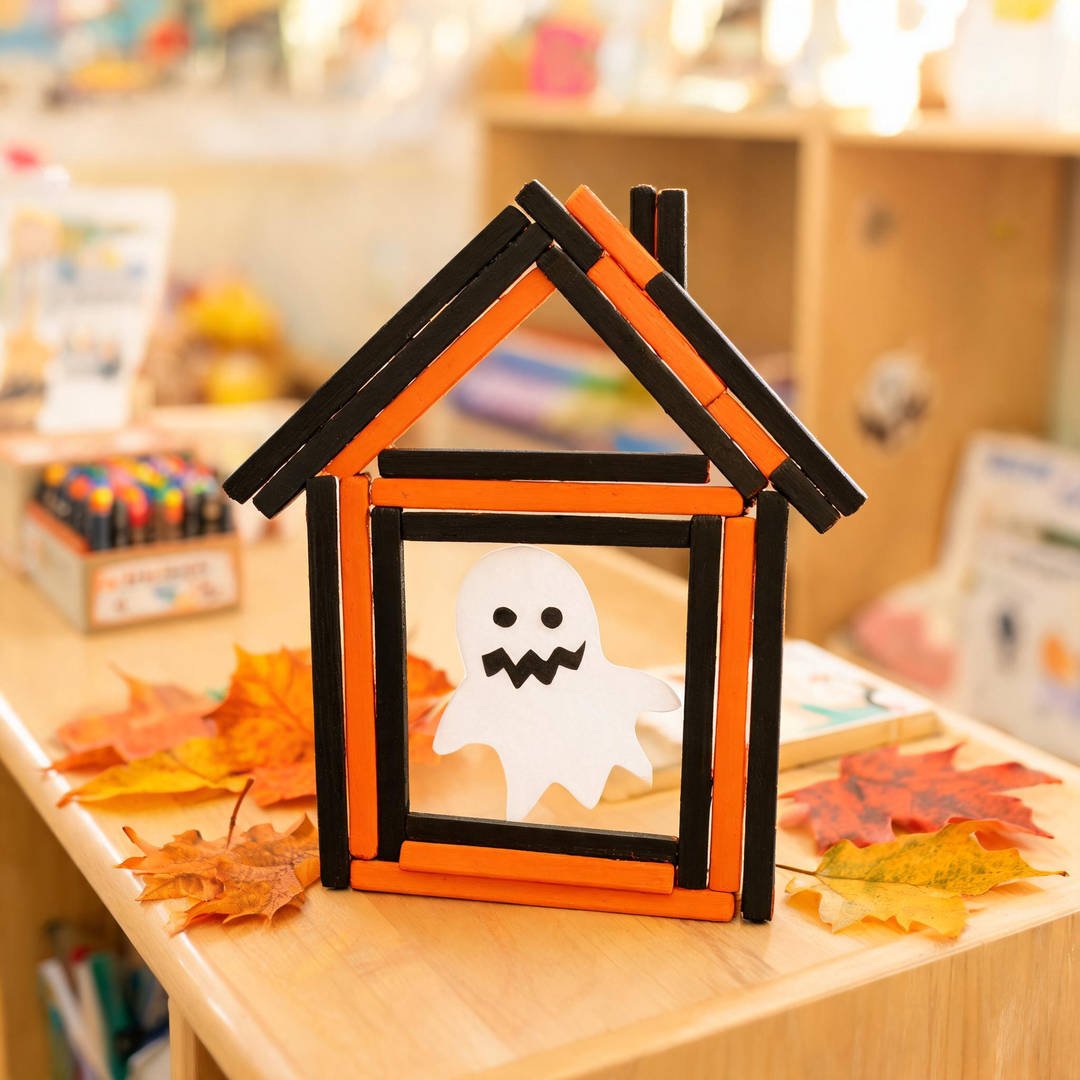
⏱️ Active & Dry Time: 10 mins | 🧼 Mess Level: 3/5 | 👶 Age Adaptation: Ages 2–6 | 💰 Est. Cost: ~$0.35/child
This project doubles as a precious seasonal photo frame where parents can display school portrait photos or spooky student drawings! 🏚️
Gluing craft sticks into a sturdy cabin silhouette gives older elementary students practical engineering practice.
How to Craft It:
- Step 1: Lay five wide jumbo popsicle sticks side by side and secure them with two crossbeam sticks glued across the back.
- Step 2: Color the front wood slats with black, orange, or purple quick-dry paint sticks.
- Step 3: Glue two craft sticks together at the top in a triangle peak to form the haunted house roofline.
- Step 4: Cut a square photo or hand-drawn student ghost portrait and glue it right inside the center frame opening.
- Step 5: Glue a magnet strip or jute twine loop to the back so families can display it on the kitchen refrigerator.
Amazon Craft Materials You Should Buy:
| Material Name | Buy on Amazon |
|---|---|
| Natural Jumbo Wood Craft Popsicle Sticks (200-Pack) | Buy on Amazon → |
| Crayola Quick Dry Paint Sticks for Kids (12-Count) | Buy on Amazon → |
| Self-Adhesive Magnetic Tape Strip Roll | Buy on Amazon → |
👉 Watch the Popsicle Stick Picture Frame Tutorial on YouTube
9. Paper Plate Black Cat Mask
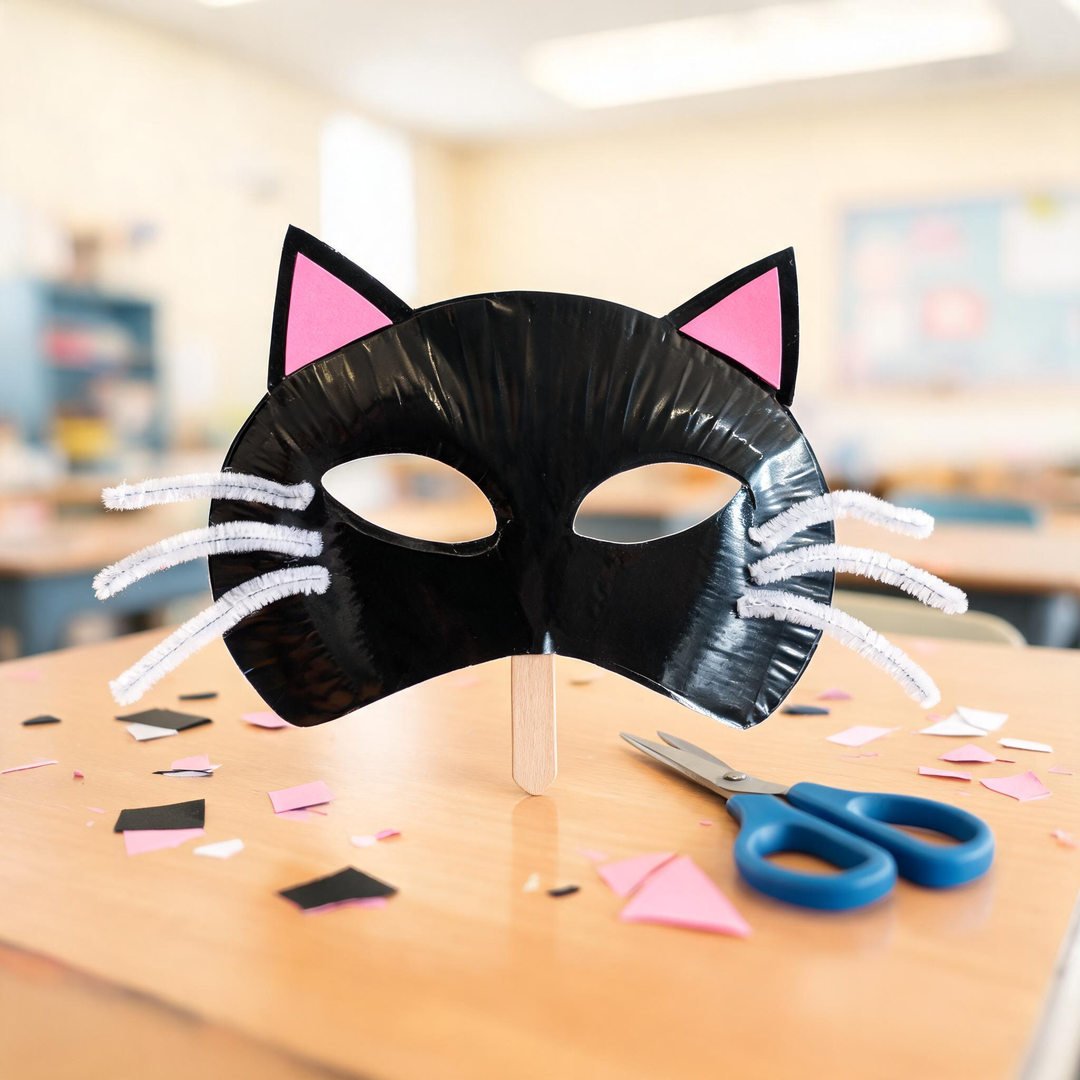
⏱️ Active & Dry Time: 10 mins | 🧼 Mess Level: 1/5 | 👶 Age Adaptation: Ages 2–6 | 💰 Est. Cost: ~$0.35/child
Paper plates make sturdy, durable face masks that students can hold up to their eyes during the annual school Halloween parade! 🐱
Cutting two almond-shaped eye holes allows children to see clearly while acting like silly black cats.
How to Craft It:
- Step 1: Cut an uncoated white paper plate directly in half to form the base mask structure.
- Step 2: Mark two circular eye openings with a pencil and carefully puncture and snip them out with blunt-tip scissors.
- Step 3: Have students color the entire curved surface with black crayons or quick-dry black paint sticks.
- Step 4: Glue two pink triangular inner ears to the top and staple three pipe cleaners on each side for springy whiskers.
- Step 5: Tape a thick jumbo craft stick securely to one back corner so children can hold the mask up to their face comfortably.
Amazon Craft Materials You Should Buy:
| Material Name | Buy on Amazon |
|---|---|
| Amazon Basics 9-Inch Uncoated Everyday Paper Plates (100-Pack) | Buy on Amazon → |
| Caydo Black Chenille Stems Pipe Cleaners (100-Pack) | Buy on Amazon → |
| Jumbo Natural Wood Craft Sticks for Mask Handles | Buy on Amazon → |
👉 Watch the Cat Mask Craft Tutorial on YouTube
10. Torn Paper Jack-O’-Lantern Mosaic
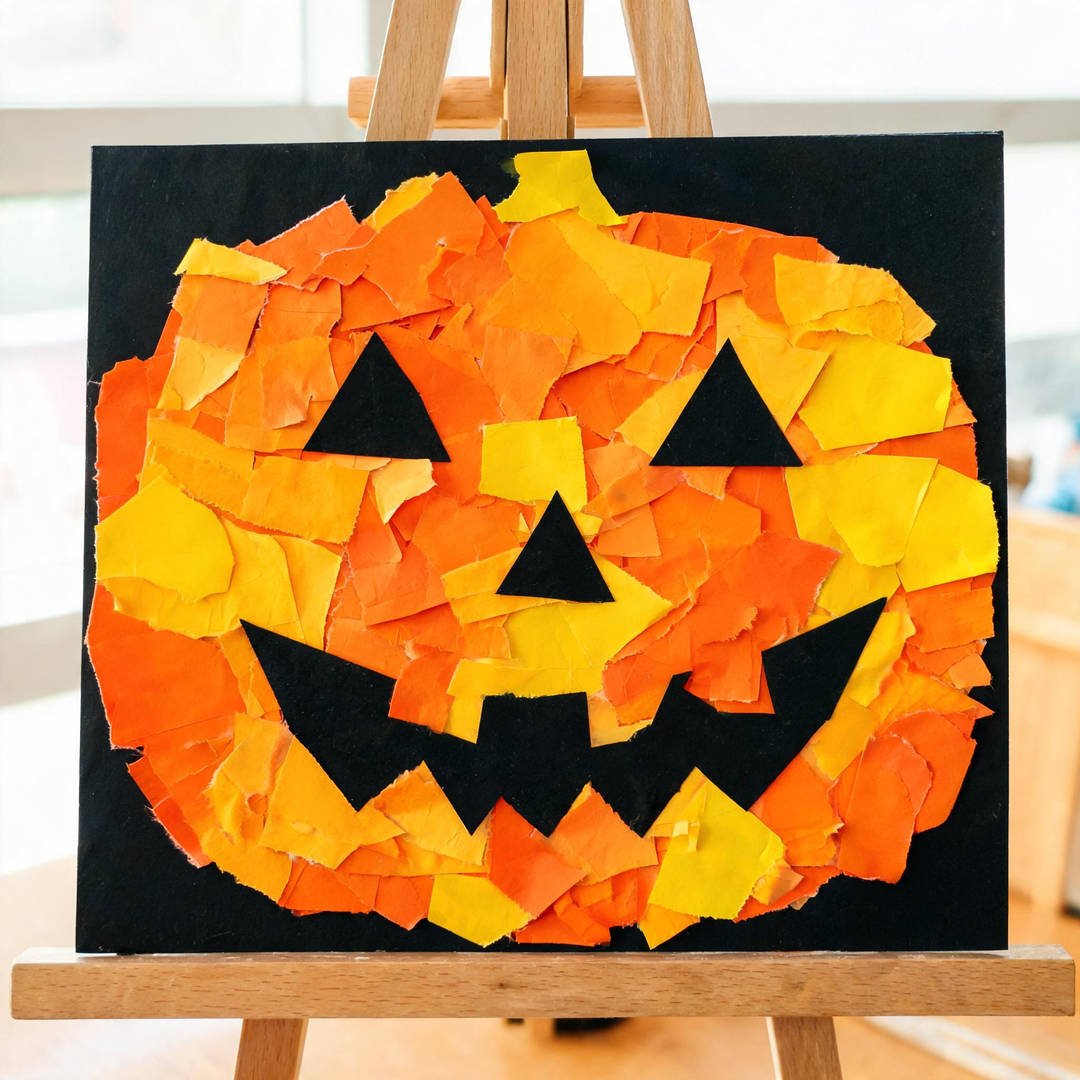
⏱️ Active & Dry Time: 10 mins | 🧼 Mess Level: 2/5 | 👶 Age Adaptation: Ages 2–6 | 💰 Est. Cost: ~$0.35/child
Paper mosaics are wonderful for older elementary students because they build spatial perception and artistic patience. 🎃
Layering different shades of orange and golden yellow paper creates rich depth that looks like real stained glass.
How to Craft It:
- Step 1: Lightly trace a large round pumpkin outline in white chalk on a piece of heavy black cardstock.
- Step 2: Have students tear warm orange, golden yellow, and deep pumpkin construction paper into half-inch square scraps.
- Step 3: Apply glue stick in small sections within the pumpkin boundary, pressing colored tiles closely together.
- Step 4: Leave narrow black gaps between paper pieces to mimic traditional stained glass or Italian tile mosaics.
- Step 5: Glue sharp black paper triangles for glowing eyes and a toothy grin right over the top of the mosaic surface.
Amazon Craft Materials You Should Buy:
| Material Name | Buy on Amazon |
|---|---|
| SunWorks Heavyweight Assorted Construction Paper Pad | Buy on Amazon → |
| Elmer’s Disappearing Purple School Glue Sticks (6-Pack) | Buy on Amazon → |
| Neenah Premium Heavyweight Black Cardstock (50 Sheets) | Buy on Amazon → |
👉 Watch the Halloween Classroom Tour & Crafts on YouTube
❓ Real Mom Questions Answered (From Reddit & Parenting Forums)
Q1: How do teachers manage craft supply distribution without chaotic lines?
As asked by parents on Reddit’s r/Teachers:
Nancy’s Answer:
Prep individual paper plate ‘craft kits’ before class containing exact pre-cut pieces, 2 glue dots, and materials for each desk pod. This eliminates supply-table bottlenecks and keeps cleanup under 5 minutes.
Q2: How do I keep 25 craft projects organized so they don’t get mixed up?
As discussed on Reddit’s r/Teachers:
Nancy’s Answer:
Have students write their name and desk number in pencil on the back of their base paper BEFORE adding any glue or paint. Keep a roll of painter’s tape to tag 3D projects.
💛 Nancy’s Sanity-Saving Tips for Classroom Party Crafting
After managing dozens of school party craft stations, here are three rules that keep classroom crafting organized: 💛
Pre-Bag Supplies in Individual Brown Sacks: Instead of letting 25 students dig into a shared pile of googly eyes and pipe cleaners, pre-pack each child’s exact pieces into their brown paper bag. This cuts out bickering and keeps desk tables tidy.
Use Table Supply Caddies with Sticky Notes: Place one communal caddy in the center of each desk cluster holding four glue sticks, two pairs of scissors, and scrap bins. Kids know exactly where to return tools before moving to their next rotation. ✨
Designate a Flat Drying Zone: If any students use wet glue or watercolor washes, clear a row of bookshelf tops or windowsill ledges marked with blue painter’s tape names so projects dry safely without getting crushed.
📚 Child Safety & Classroom Management Guidelines for Schools
Because keeping elementary students safe during school celebrations is paramount:
According to the U.S. Consumer Product Safety Commission (CPSC), school-approved craft tools must feature blunt-nosed or safety-shielded scissor blades, and all adhesives must be certified ACMI AP Non-Toxic to eliminate inhalation hazards in enclosed classrooms.
Furthermore, education specialists at the National Association for the Education of Young Children (NAEYC) emphasize that collaborative hands-on holiday art strengthens peer communication and fine-motor perseverance while providing inclusive creative outlets for children of all developmental levels.
Frequently Asked Questions
What are the cheapest Halloween crafts for an entire elementary classroom?
Coffee filter ghosts and origami bat bookmarks are the most economical projects. Both use standard paper and cafeteria coffee filters, costing less than ten cents per student while delivering high engagement and zero liquid mess. 🎃
How long does each Halloween classroom craft take to complete?
Most elementary school projects featured here are calibrated for a 20 to 30-minute classroom rotation period. Quick activities like the origami bat take under 15 minutes, while detailed mosaic art can fill a full 45-minute art period.
How do I prevent massive mess during an elementary school party?
Avoid liquid white glue bottles and loose glitter entirely. Substituting solid purple glue sticks, pre-cut cardstock pieces, and quick-dry tempera paint sticks prevents sticky puddles and ensures all student artwork dries before dismissal.