10 Easy Halloween Crafts for Toddlers (Ages 1-4)

Looking for adorable, stress-free halloween crafts for toddlers that keep tiny hands happily engaged without leaving your kitchen covered in sticky disaster? Here are 10 sweet, mom-tested Halloween projects designed specifically for ages 1 through 4. 🎃
💬 The Real Mom Question (from Reddit’s r/toddlers):
“How do I do Halloween crafts with my 1-year-old and 3-year-old without my dining room turning into a sticky, unpeelable nightmare? Every Pinterest tutorial looks gorgeous until wet paint is smeared on the wall.”
If you’ve ever found yourself asking this exact question, take a deep breath mama: you are in the right place! 🎃
Crafting with toddlers shouldn’t feel like an Olympic test of endurance.
At ages one, two, and three, little learners are all about sensory discovery: squishing cool paint between their fingers, hearing paper tear, and stamping big round colorful dots.
They don’t care about making a museum masterpiece. They care about having fun right alongside you! ✨
Every activity in this guide uses simple kitchen-table supplies, completely non-toxic washable materials, and wraps up in under 10 minutes before attention spans wander.
Grab an old t-shirt, pour yourself a fresh cup of tea ☕, and let’s make some fright-free memories together!
⚡ The Quick Mom Skim (TL;DR)
- 100% Fright-Free: Every craft features smiling, friendly faces so sensitive toddlers never get scared.
- Process Over Perfection: Focuses on open sensory play like sponge stamping, handprinting, and squish painting.
- Under 10 Minutes: Perfect for short attention spans and quick morning craft sessions before naptime.
- Easy Cleanup Hacks: Includes mess-free sensory bag options and non-toxic washable supplies you can wipe down in seconds.
🏆 Nancy’s Top 3 Quick Picks for Toddler Halloween Crafts
If you only have 15 minutes before lunch or naptime, start with these three foolproof favorites:
| Category Award | Toddler Craft Idea | Why It Won |
|---|---|---|
| 🥇 Best Zero-Mess Activity | Mess-Free Ziploc Squish Pumpkin | Sealed in a plastic freezer bag so little hands squish paint with zero sticky cleanup. |
| 🥈 Cutest Nursery Keepsake | Little Footprint White Ghost | Captures tiny baby feet in an adorable holiday keepsake you’ll cherish forever. |
| 🥉 Best Fine-Motor Muscle Builder | Yarn-Wrapped Cardboard Mummy | Winding chunky yarn around sturdy cardboard builds essential little finger coordination. |
👀 People Also Read
🧺 Nancy’s Real-Mom Supply Swap Table
Never rush out to buy expensive specialty supplies when you have a curious toddler! 💛
Here are the easy kitchen pantry swaps we use at home, alongside our favorite non-toxic Amazon staples:
| If You Don’t Have… | Swap It With This! | Recommended Amazon Staple |
|---|---|---|
| Dot Markers | Dip a clean wine cork or the eraser end of an unsharpened pencil into washable paint. | Do A Dot Art! Marker Rainbow 6-Pack |
| Washable Tempera Paint | Mix plain vanilla yogurt with a single drop of natural food coloring for edible-safe finger painting. | Crayola Washable Kids Paint 10-Bottle Set |
| Googly Eyes | Draw simple round eyes with a child-safe black marker or stick on round white garage sale stickers. | Creativity Street Peel and Stick Googly Eyes (500-Pack) |
| Paper Plates | Cut sturdy circles out of cereal boxes or clean cardboard delivery boxes. | Amazon Basics Everyday 9-Inch Paper Plates (100-Pack) |
| Chunky Yarn | Use torn strips of white toilet paper or painter’s masking tape wrapped gently around cardboard. | Bernat Blanket Big Chunky Soft Yarn |
🎃 Easy Halloween Crafts for Toddlers & Daycare
These first three projects are gentle classics designed for quick playgroup and daycare table setups.
They build confidence and introduce festive colors with zero stress. 🎃
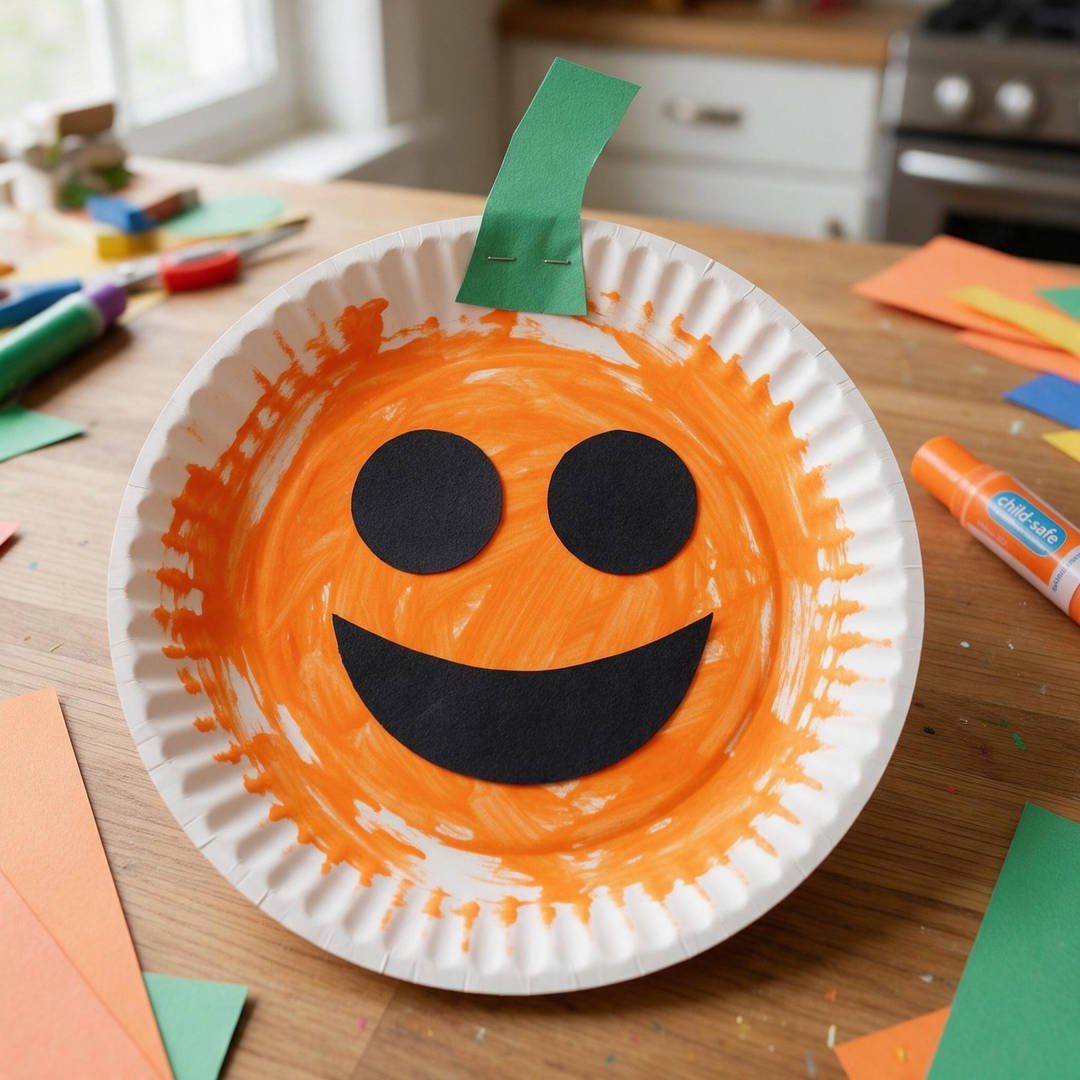
1. Smiley Paper Plate Pumpkin
⏱️ Active & Dry Time: 8 mins (Dries in 90 secs) | 🧼 Mess Level: 1/5 | 👶 Age Adaptation: Ages 1–3 (Assisted stick grip) | 💰 Est. Cost: ~$0.38/child
💬 Real Mom Question (from Reddit’s r/toddlers): “My 2-year-old eats or rips wet painted paper in 10 seconds. How do I make this last?”
Nancy’s Fix: Ditch wet liquid paint for solid tempera paint sticks (like Kwik Stix). They glide like silky butter, dry in 90 seconds flat, and don’t soak through the paper plate!
Toddlers adore holding large round paper plates. This craft lets them paint freely without worrying about staying inside the lines.
Using a solid tempera paint stick gives vibrant orange coverage that dries in under 90 seconds, meaning no messy wet paint smeared onto shirts.
How to Craft It:
- Step 1: Lay the paper plate flat on your table and hand your toddler an orange paint stick to color the surface.
- Step 2: Assist them in rubbing a glue stick across the back of the black felt eyes and smiling mouth.
- Step 3: Help them press the facial features directly onto the center of their pumpkin.
- Step 4: Staple or glue the green paper stem firmly to the top rim.
- Step 5: Display proudly on your refrigerator or front window for neighbors to see!
Amazon Craft Materials You Should Buy:
| Material Name | Buy on Amazon |
|---|---|
| Kwik Stix Solid Tempera Paint Sticks (12-Pack) | Buy on Amazon → |
| Amazon Basics Everyday 9-Inch Paper Plates (100-Pack) | Buy on Amazon → |
| Assorted Soft Felt Sheets for Crafting (40-Pack) | Buy on Amazon → |
👉 Watch the Toddler Paper Plate Pumpkin Tutorial on YouTube
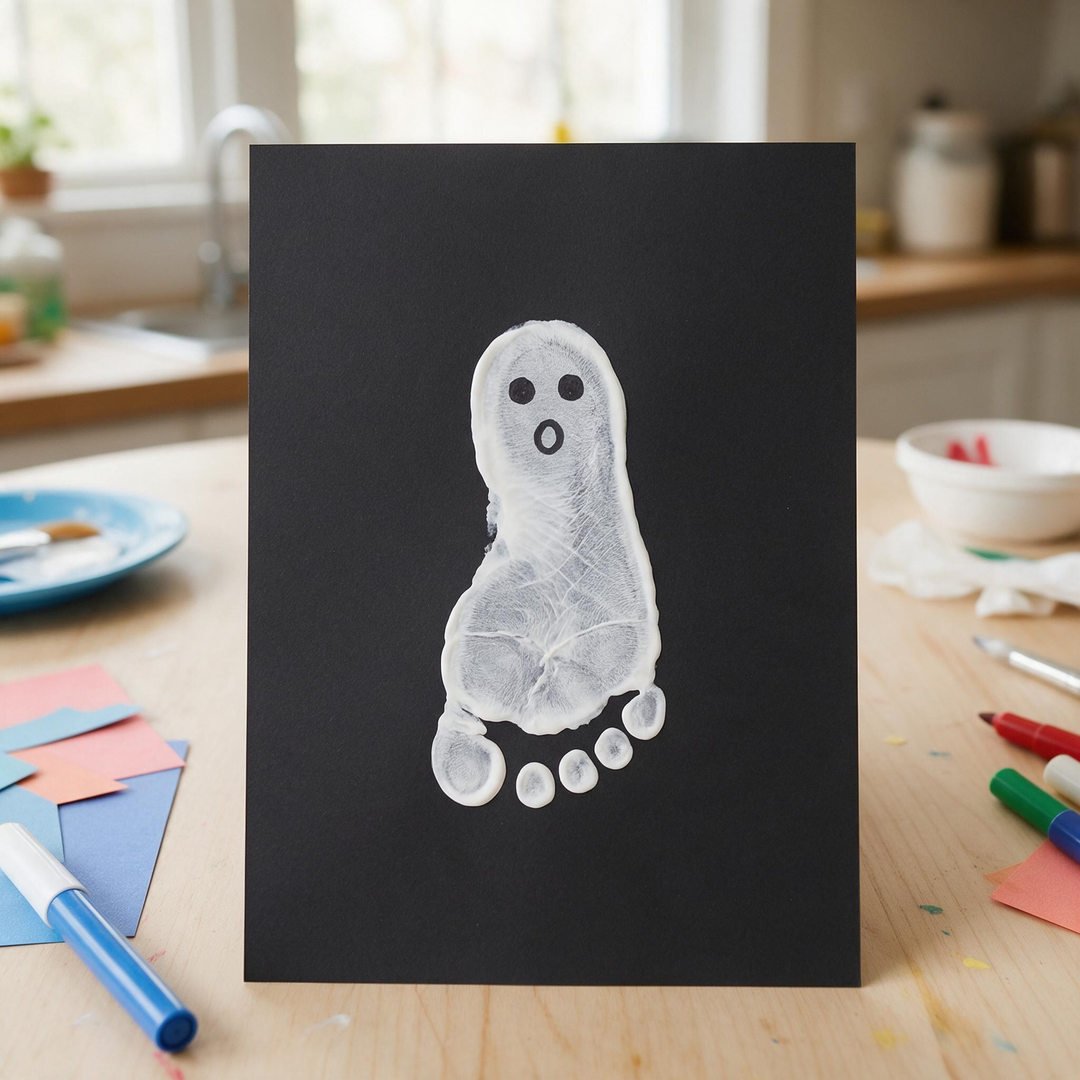
2. Little Footprint White Ghost Keepsake
⏱️ Active & Dry Time: 5 mins (Dries in 15 mins) | 🧼 Mess Level: 2/5 | 👶 Age Adaptation: Ages 0–3 (Baby & Toddler Keepsake) | 💰 Est. Cost: ~$0.45/child
💬 Real Mom Question (from Reddit’s r/Mommit): “How do you stamp a wiggly toddler foot without smearing white paint across the rug?”
Nancy’s Fix: Sit your toddler in their highchair with a small snack. Paint their foot with a foam sponge, press the cardstock firmly on a clipboard up against their sole, and wipe immediately with an open baby wipe before their foot touches the floor.
There is nothing sweeter than freezing tiny toddler feet in time with a handmade holiday keepsake.
This footprint ghost is completely fright-free, featuring a soft smiling mouth and wide friendly eyes placed right on the heel.
How to Craft It:
- Step 1: Brush a thin, even coat of washable white paint onto your toddler’s foot using a soft foam brush.
- Step 2: Gently press their painted foot down onto the black cardstock, holding it firmly for 2 seconds.
- Step 3: Lift straight up and immediately wipe their foot clean with a baby wipe.
- Step 4: Once dry, let your child help draw two black marker dots for eyes and an open smile on the heel.
- Step 5: Write your child’s name, age, and October year along the bottom margin.
Amazon Craft Materials You Should Buy:
| Material Name | Buy on Amazon |
|---|---|
| Crayola Non-Toxic Washable White Tempera Paint (16 oz) | Buy on Amazon → |
| Pacon Heavyweight Black Construction Cardstock (50 Sheets) | Buy on Amazon → |
| Huggies Natural Care Sensitive Baby Wipes (3-Pack) | Buy on Amazon → |
👉 Watch the Baby Footprint Ghost Tutorial on YouTube
3. Cardboard Tube Friendly Bat
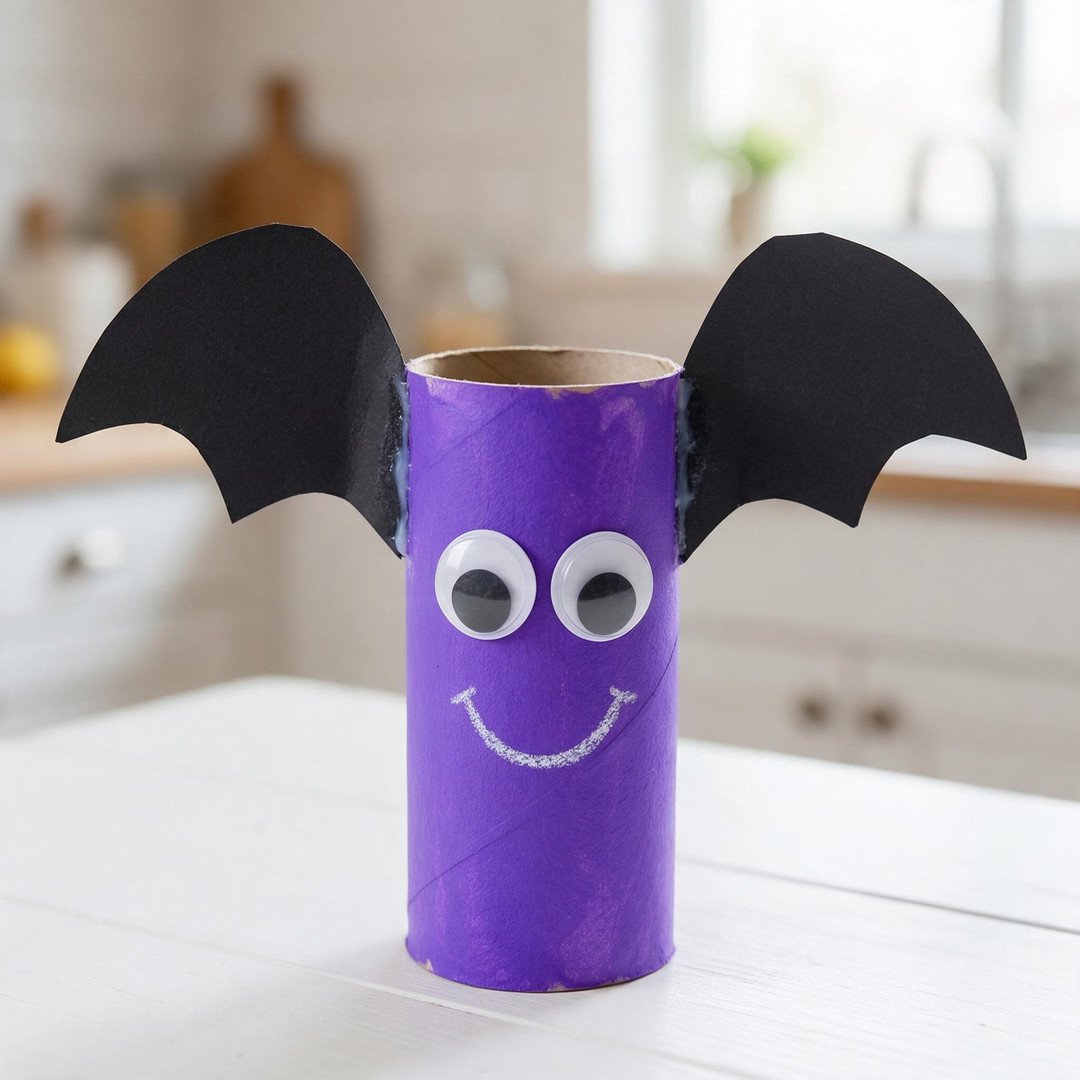
⏱️ Active & Dry Time: 10 mins (Dries in 10 mins) | 🧼 Mess Level: 2/5 | 👶 Age Adaptation: Ages 2–4 (Fine-motor scissor and glue practice) | 💰 Est. Cost: ~$0.25/child
Save those cardboard toilet paper rolls! They make the perfect chunky cylinder for tiny hands to grasp.
Painting the tube in cheerful purple or classic black helps two-year-olds practice their fine-motor paintbrush grip.
How to Craft It:
- Step 1: Let your toddler paint the cardboard tube completely using wide, easy strokes.
- Step 2: Allow 10 minutes to dry while you cut out two simple scalloped wings from black paper.
- Step 3: Add a strip of glue along the wing tabs and press them against the back of the dry tube.
- Step 4: Stick two big googly eyes onto the front and draw a gentle white chalk smile.
- Step 5: Zoom your friendly bat around the room for active Halloween imaginative play!
Amazon Craft Materials You Should Buy:
| Material Name | Buy on Amazon |
|---|---|
| Crayola Washable Kids Paint 10-Bottle Assortment | Buy on Amazon → |
| SunWorks Heavyweight Black Construction Paper | Buy on Amazon → |
| Creativity Street Peel and Stick Wiggle Eyes (500-Pack) | Buy on Amazon → |
👉 Watch the Cardboard Tube Bat Craft Tutorial on YouTube
🎨 Simple Ghost & Spider Painting Ideas for 2 Year Olds
Two-year-olds love tactile sensory exploration and cause-and-effect painting.
These activities keep the focus on squishing, stamping, and feeling textures. 👻
4. Mess-Free Ziploc Squish Pumpkin
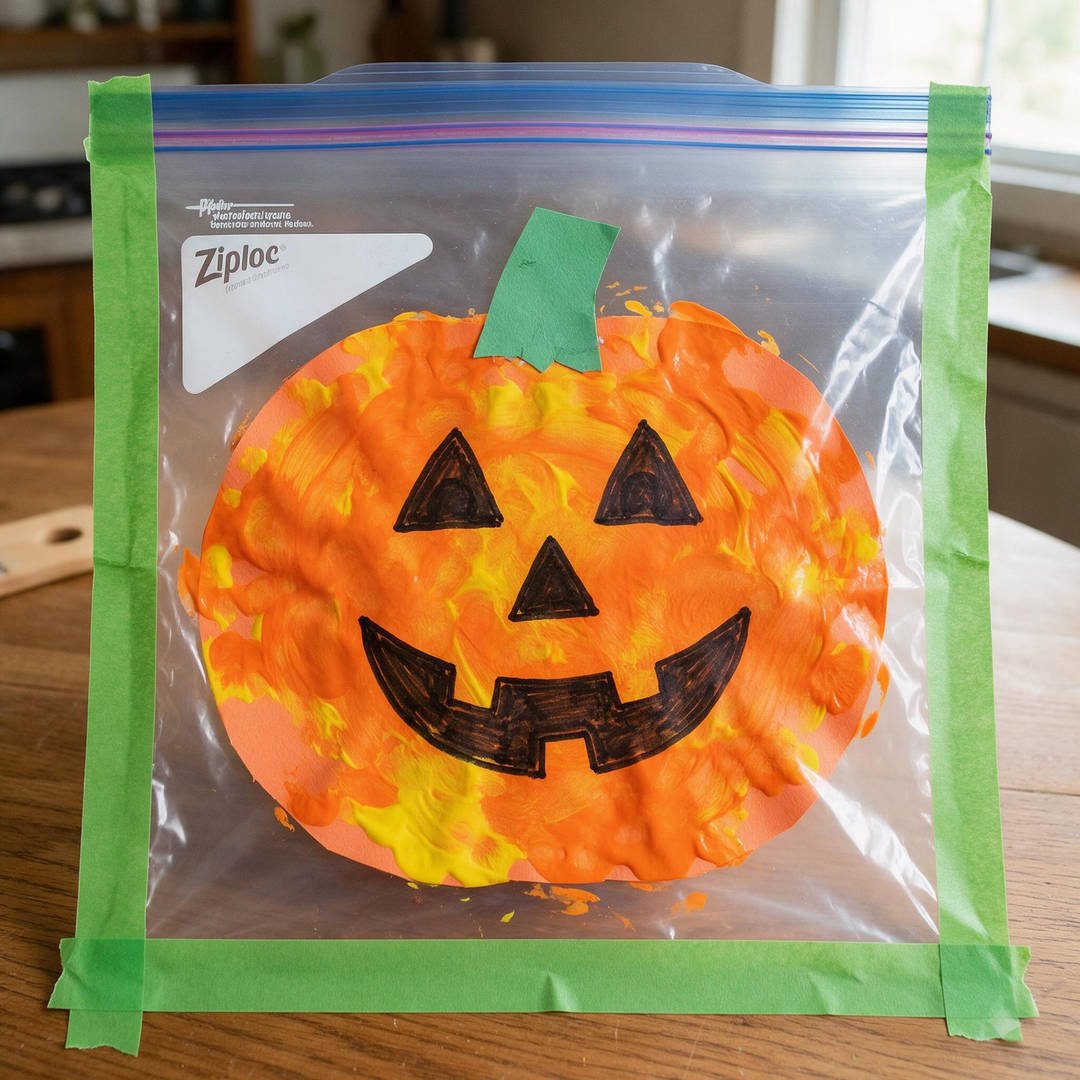
⏱️ Active & Dry Time: 5 mins (Zero dry time!) | 🧼 Mess Level: 0/5 | 👶 Age Adaptation: Ages 1–2 (Sensory cause-and-effect) | 💰 Est. Cost: ~$0.55/bag
💬 Real Mom Question (from Reddit’s r/Parenting): “Is there literally any Halloween craft a 14-month-old can do that has zero chance of ending up in their mouth or on the couch?”
Nancy’s Fix: The sealed sensory paint bag! Squeeze orange and yellow tempera inside a heavy-duty gallon freezer bag, seal it tight, and tape all four borders flat to your kitchen table with blue painter’s tape. Zero skin contact, zero cleanup.
If you have a toddler who dislikes getting sticky paint on their fingers, this sensory bag is pure magic.
Squirting bright orange and yellow tempera paint inside a sealed plastic bag lets them press, slide, and mix colors without a single drop on their skin.
How to Craft It:
- Step 1: Draw a simple pumpkin face outline on the front of the Ziploc bag with a black marker.
- Step 2: Squirt 3 tablespoons of orange paint and 1 tablespoon of yellow paint inside the bag.
- Step 3: Squeeze all excess air out and seal the zipper completely.
- Step 4: Tape all four edges flat onto your kitchen table with painter’s tape and let your toddler squish!
- Step 5: Tape the finished bag to a sunny window for a glowing stained-glass pumpkin effect.
Amazon Craft Materials You Should Buy:
| Material Name | Buy on Amazon |
|---|---|
| Ziploc Heavy Duty Freezer Gallon Bags (60-Count) | Buy on Amazon → |
| ScotchBlue Multi-Surface Painter’s Tape Roll | Buy on Amazon → |
| Crayola Washable Orange and Yellow Paint Jugs | Buy on Amazon → |
👉 Watch the Mess-Free Sensory Paint Bag Tutorial on YouTube
5. Kitchen Sponge Stamped Jack-O’-Lantern
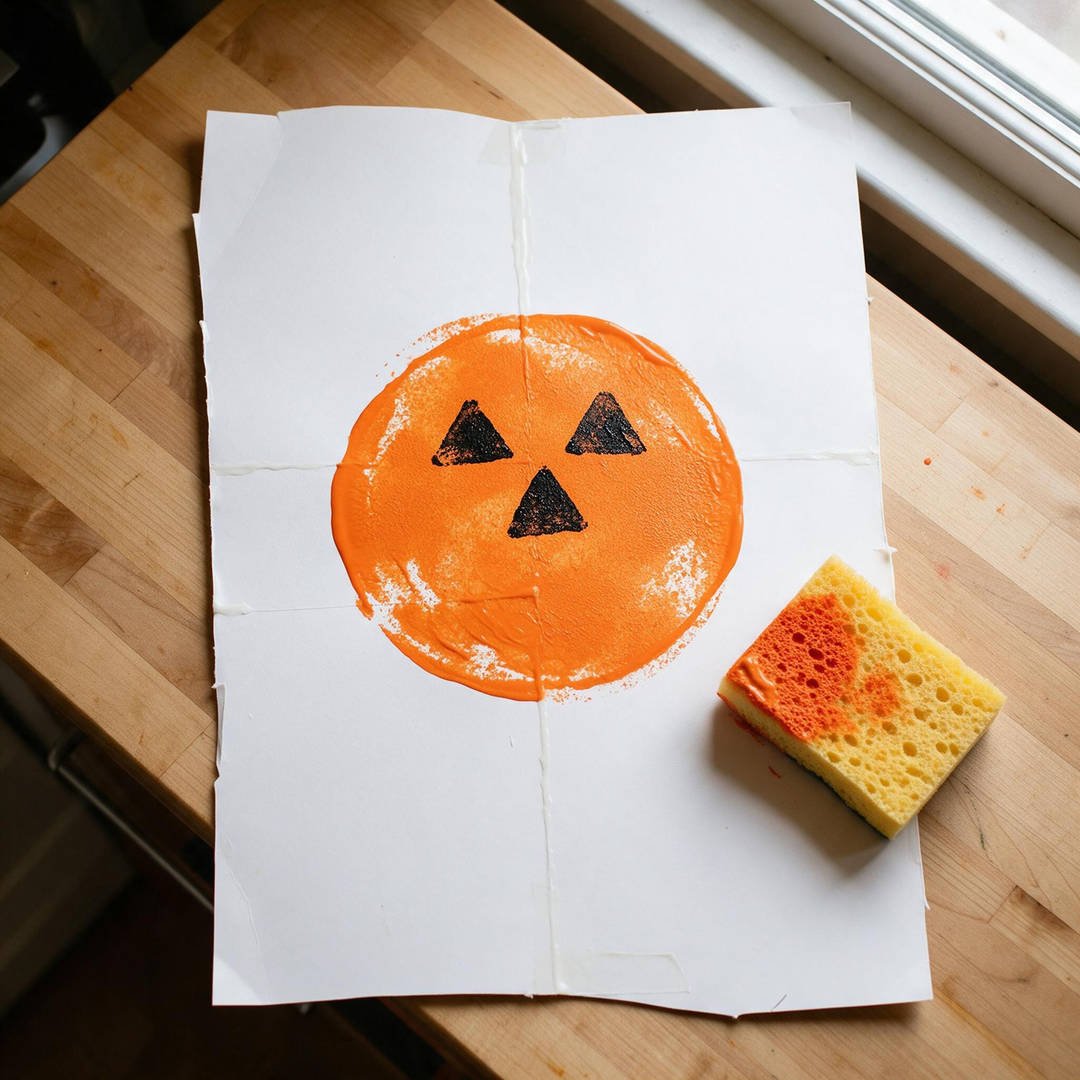
⏱️ Active & Dry Time: 10 mins (Dries in 12 mins) | 🧼 Mess Level: 3/5 | 👶 Age Adaptation: Ages 1.5–3 (Grip stamping) | 💰 Est. Cost: ~$0.30/child
Kitchen sponges are cheap, soft, and easy for toddler fists to squeeze and manipulate.
Cutting a standard kitchen sponge into simple geometric shapes turns stamp painting into a joyful sensory lesson.
How to Craft It:
- Step 1: Cut a round circle or large pumpkin shape out of a clean household dish sponge.
- Step 2: Pour a shallow puddle of orange paint onto a paper plate and let your toddler press the sponge in.
- Step 3: Guide their hand to stamp the paint-loaded sponge firmly down onto the white paper.
- Step 4: Use a smaller triangle sponge scrap dipped in black paint to stamp on eyes and a smile.
- Step 5: Allow 15 minutes to dry before framing on the fridge.
Amazon Craft Materials You Should Buy:
| Material Name | Buy on Amazon |
|---|---|
| Scotch-Brite Non-Scratch Cleaning Sponges (6-Pack) | Buy on Amazon → |
| Crayola Washable Kids Paint 10-Bottle Assortment | Buy on Amazon → |
| Pacon White Heavyweight Construction Paper Pad | Buy on Amazon → |
👉 Watch the Sponge Stamped Pumpkin Tutorial on YouTube
6. Fluffy White Cotton Ball Cloud Ghost
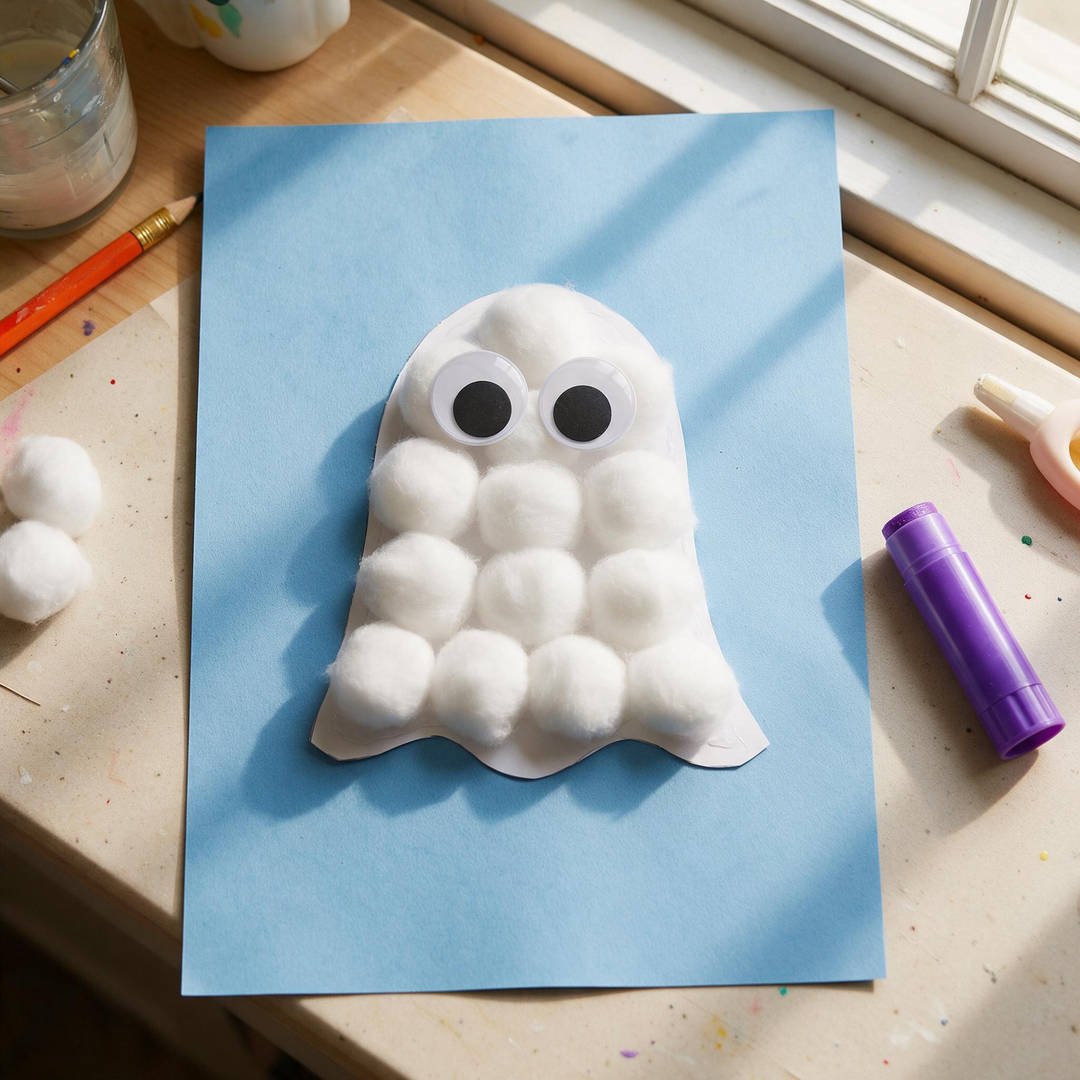
⏱️ Active & Dry Time: 8 mins (Dries in 5 mins) | 🧼 Mess Level: 1/5 | 👶 Age Adaptation: Ages 2–4 (Pincer grasp fine motor) | 💰 Est. Cost: ~$0.28/child
💬 Real Mom Question (from Reddit’s r/toddlers): “My toddler hates sticky glue fingers and refuses to touch standard glue. Any suggestions?”
Nancy’s Fix: Use an Elmer’s Disappearing Purple glue stick! It glides on purple so they can clearly see where it’s sticky, doesn’t pool on fingers like liquid glue, and dries completely clear.
Preschoolers love soft, fluffy textures, and cotton balls are wonderful for practicing the pincer grasp.
Pre-cutting a friendly ghost shape on cardstock gives them a clear canvas to paste their fluffy cotton clouds.
How to Craft It:
- Step 1: Glue the ghost outline onto the light blue backing paper.
- Step 2: Have your toddler rub the purple glue stick liberally across the belly of the ghost.
- Step 3: Hand them cotton balls one by one to press firmly down onto the sticky surface.
- Step 4: Finish by pressing two large googly eyes onto the top cotton balls.
- Step 5: Hang your fluffy ghost from the ceiling with a piece of clear fishing line or thread.
Amazon Craft Materials You Should Buy:
| Material Name | Buy on Amazon |
|---|---|
| Amazon Basics White Cotton Balls (300-Count) | Buy on Amazon → |
| Elmer’s Disappearing Purple Washable Glue Sticks (12-Pack) | Buy on Amazon → |
| Creativity Street Peel and Stick Wiggle Eyes (500-Pack) | Buy on Amazon → |
👉 Watch the Fluffy Cotton Ball Ghost Tutorial on YouTube
7. Paper Bowl Little Green Monster
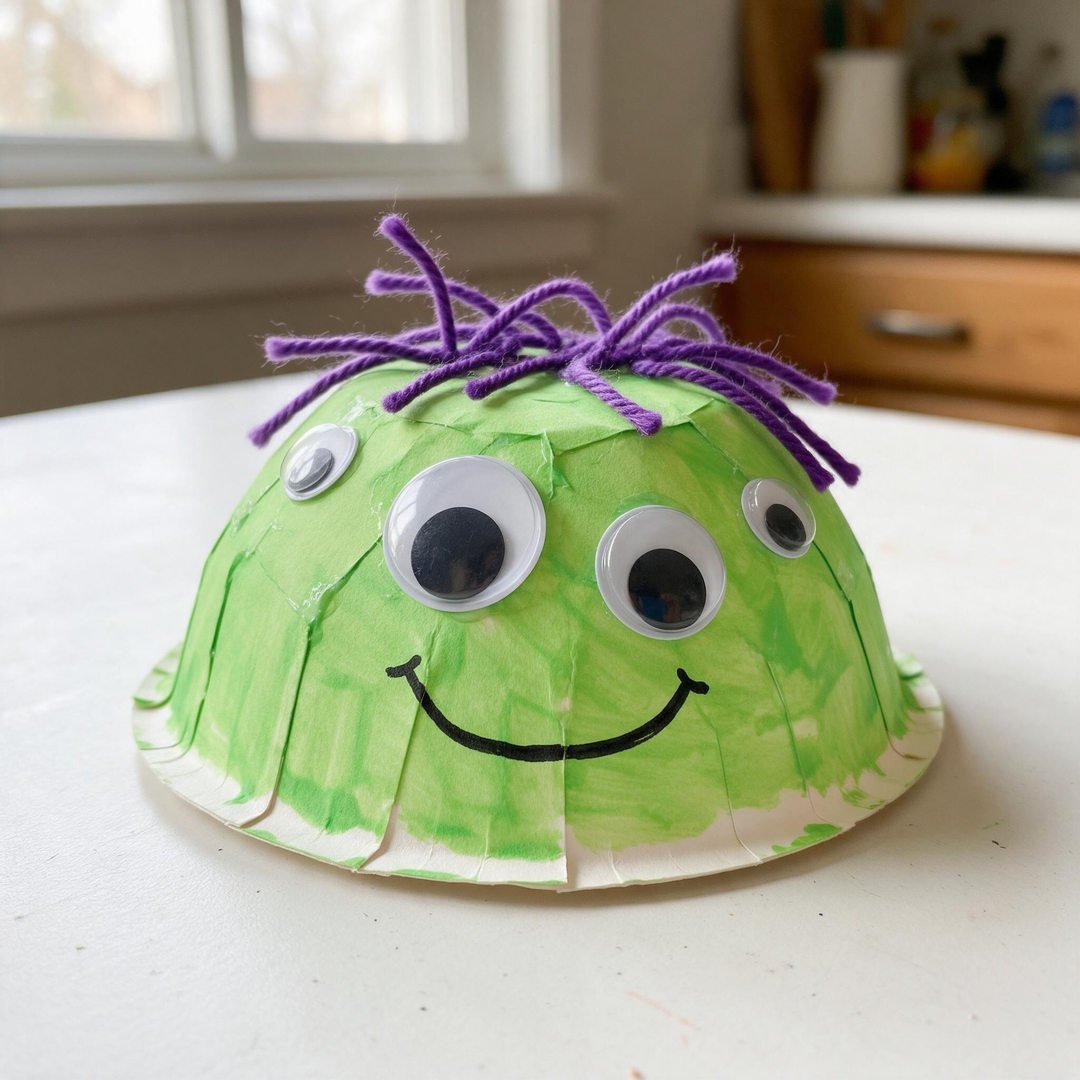
⏱️ Active & Dry Time: 12 mins (Dries in 15 mins) | 🧼 Mess Level: 2/5 | 👶 Age Adaptation: Ages 2–4 (3D dome surface painting) | 💰 Est. Cost: ~$0.40/child
Turning an everyday disposable paper bowl upside down creates a sturdy 3D dome that toddlers can easily paint.
Green washable paint coats the curved surface smoothly, giving them practice moving their brush around 3D curves.
How to Craft It:
- Step 1: Place the paper bowl upside down and let your toddler paint the exterior with bright green paint.
- Step 2: While the paint dries, help them gather strands of purple yarn.
- Step 3: Add a generous dab of school glue on top of the dome and press the yarn down as crazy hair.
- Step 4: Let your toddler press several googly eyes across the front in any silly arrangement they choose!
- Step 5: Draw a smiling mouth with a black marker to give your monster a sweet personality.
Amazon Craft Materials You Should Buy:
| Material Name | Buy on Amazon |
|---|---|
| Amazon Basics Everyday Paper Bowls (100-Pack) | Buy on Amazon → |
| Crayola Non-Toxic Green Tempera Paint (16 oz) | Buy on Amazon → |
| Multi-Pack Acrylic Craft Yarn Skeins | Buy on Amazon → |
👉 Watch the Paper Bowl Monster Craft Tutorial on YouTube
🍂 Cute Footprint & Pumpkin Crafts for Preschool
These final three crafts offer wonderful tactile opportunities for developing fine motor muscles and hand-eye coordination. 🎃
8. Dot Marker Halloween Candy Corn Art
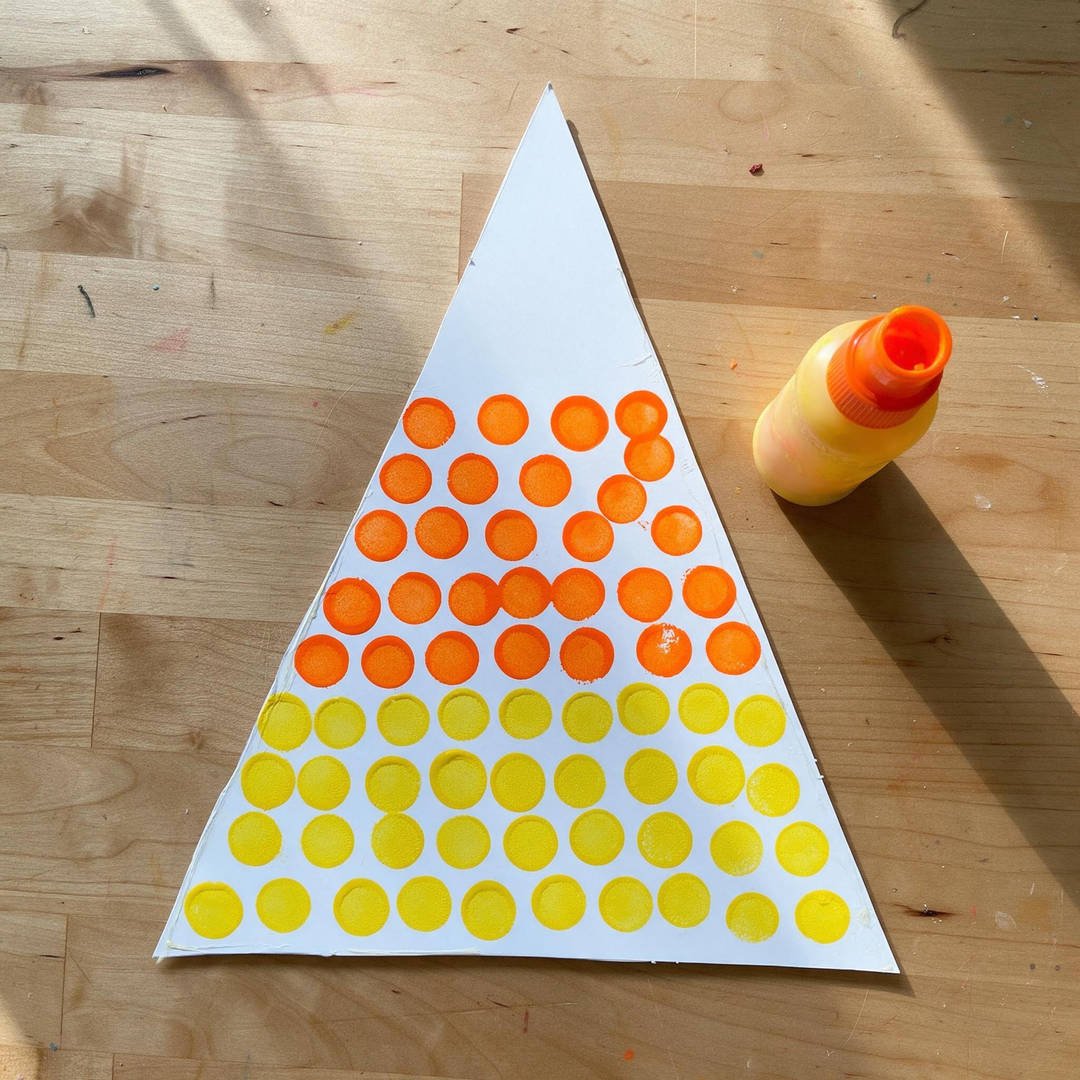
⏱️ Active & Dry Time: 6 mins (Dries in 3 mins) | 🧼 Mess Level: 1/5 | 👶 Age Adaptation: Ages 1–3 (Color grouping & stamping) | 💰 Est. Cost: ~$0.32/child
Dot markers (bingo daubers) are the ultimate toddler art supply because they require zero dipping and don’t spill when dropped.
This candy corn project teaches simple color grouping (yellow at the base, orange in the middle) while strengthening hand muscles.
How to Craft It:
- Step 1: Draw two light pencil guide lines across the triangle dividing it into three horizontal sections.
- Step 2: Hand your child the yellow dot marker and let them stamp dots all across the bottom section.
- Step 3: Switch to the orange dot marker and help them stamp dots across the middle section.
- Step 4: Leave the top pointed tip white to complete the classic candy corn look!
- Step 5: Cut out the completed candy corn and punch a hole at the top to hang as holiday bunting.
Amazon Craft Materials You Should Buy:
| Material Name | Buy on Amazon |
|---|---|
| Do A Dot Art! Marker Rainbow 6-Pack | Buy on Amazon → |
| Pacon White Heavyweight Construction Paper Pad | Buy on Amazon → |
| Single Hole Metal Hand Puncher | Buy on Amazon → |
👉 Watch the Dot Marker Candy Corn Tutorial on YouTube
9. Yarn Wrapped Cardboard Mummy
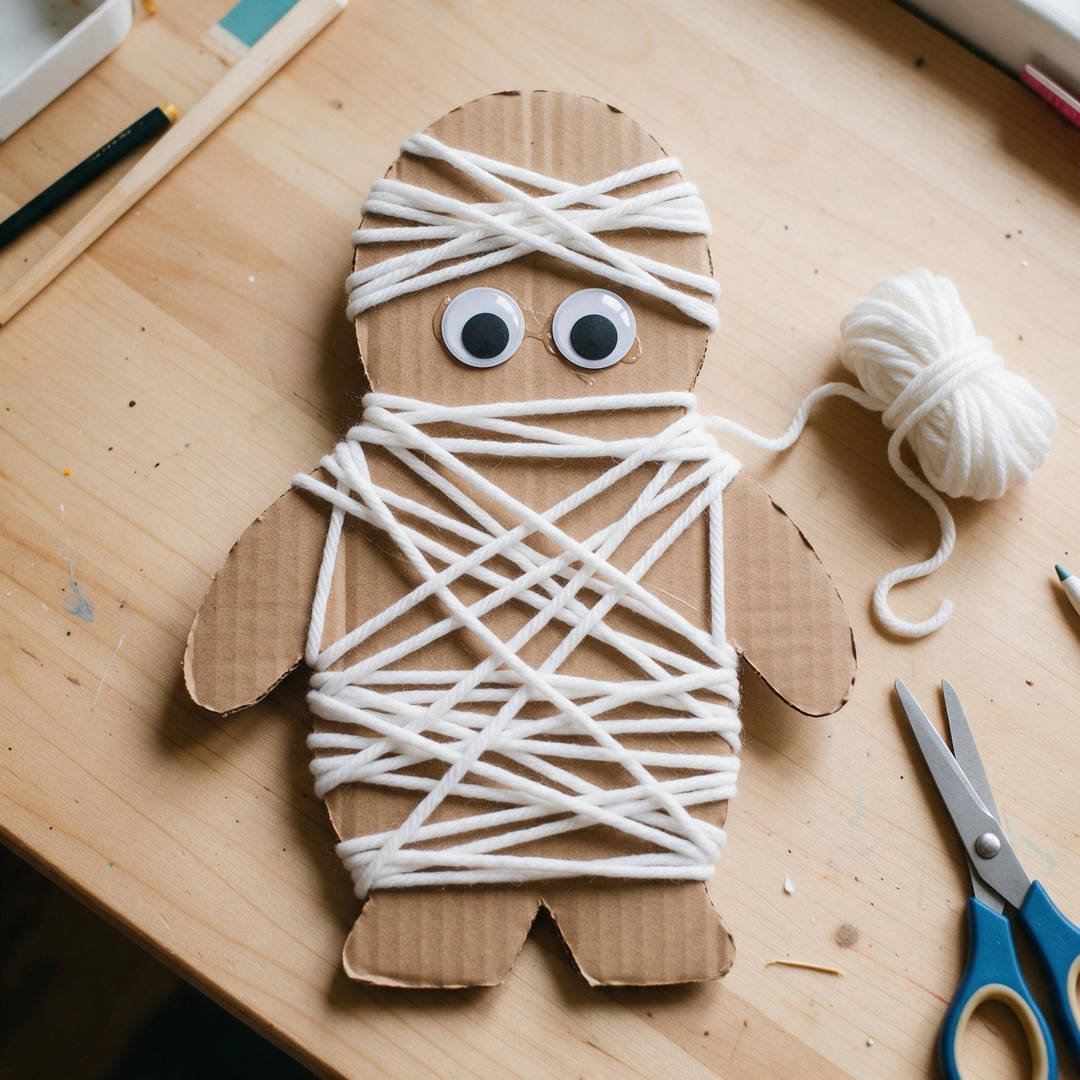
⏱️ Active & Dry Time: 10 mins (Zero dry time!) | 🧼 Mess Level: 0/5 | 👶 Age Adaptation: Ages 2–4 (Wrist rotation & bi-lateral coordination) | 💰 Est. Cost: ~$0.30/child
💬 Real Mom Question (from Reddit’s r/Preschoolers): “How do you keep yarn from instantly unraveling when a toddler wraps cardboard?”
Nancy’s Fix: Tape the yarn tail securely to the back with packaging tape first! That way little hands can wind and overlap in messy loops without having to pinch or hold an anchor.
Tearing and wrapping yarn is one of the best occupational therapy activities for strengthening toddler wrists and fingers.
A simple gingerbread man outline cut from corrugated Amazon delivery boxes provides a rigid, unbending base.
How to Craft It:
- Step 1: Tape one end of the white yarn securely to the back of the cardboard mummy cutout.
- Step 2: Demonstrate how to pass the yarn ball over and under the cardboard body.
- Step 3: Let your toddler wrap the yarn around the torso and legs in overlapping messy loops.
- Step 4: Tape the final tail to the back and stick two googly eyes peering out through the yarn strands.
- Step 5: Add a small twine loop at the top to hang your mummy on the doorknob.
Amazon Craft Materials You Should Buy:
| Material Name | Buy on Amazon |
|---|---|
| Bernat Blanket Big Chunky Soft White Yarn | Buy on Amazon → |
| Creativity Street Peel and Stick Wiggle Eyes (500-Pack) | Buy on Amazon → |
| Scotch Heavy Duty Clear Packaging Tape | Buy on Amazon → |
👉 Watch the Yarn Mummy Wrapping Tutorial on YouTube
10. Handprint Black Spider Keepsake
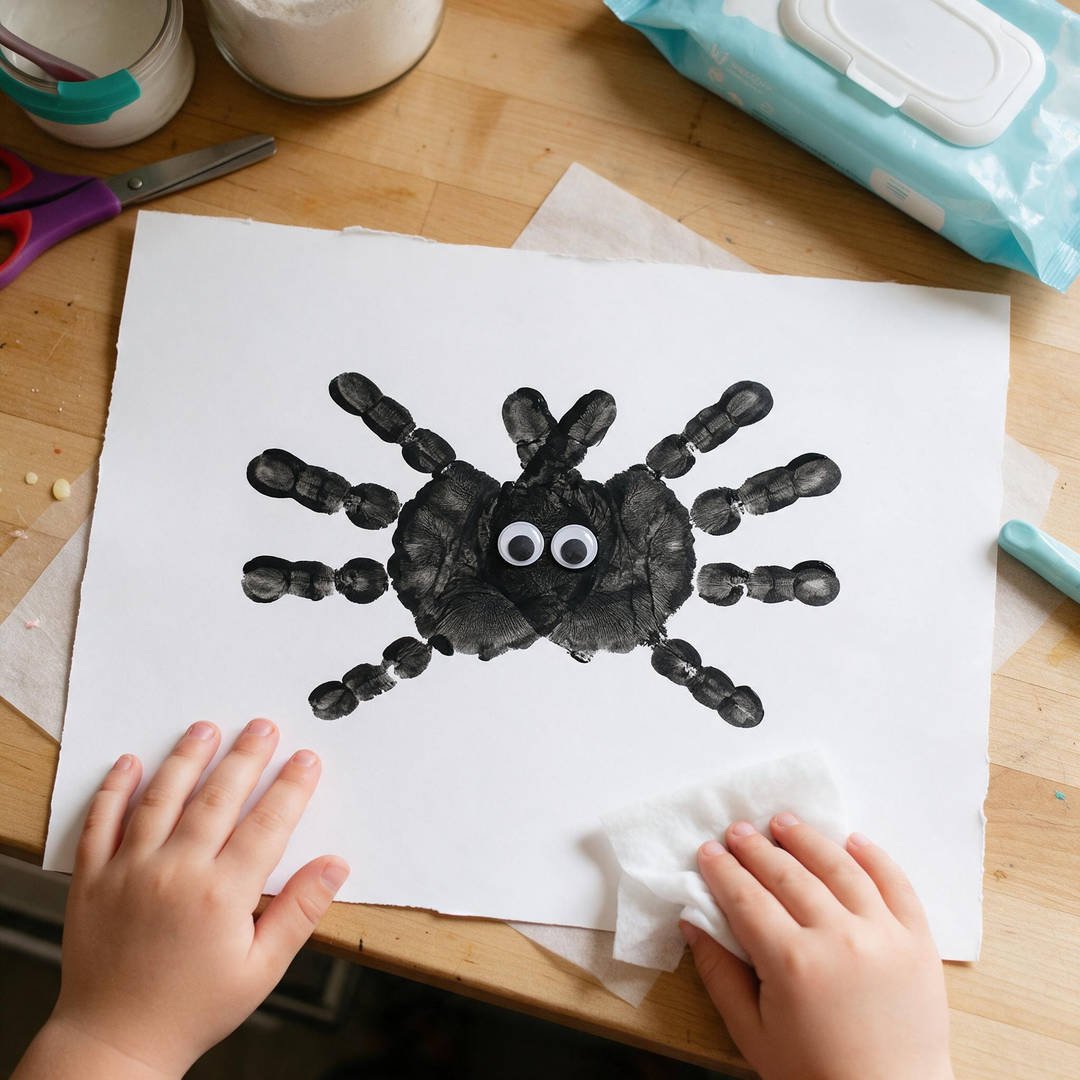
⏱️ Active & Dry Time: 6 mins (Dries in 15 mins) | 🧼 Mess Level: 3/5 | 👶 Age Adaptation: Ages 1–4 (Handprint keepsake) | 💰 Est. Cost: ~$0.35/child
Spiders don’t have to be creepy! This sweet handprint keepsake turns tiny hands into an eight-legged autumn friend.
By overlapping the two palms in the middle and leaving the thumbs tucked in, your child’s 8 fingers become the walking spider legs.
How to Craft It:
- Step 1: Paint your toddler’s right hand with washable black paint, keeping their thumb clean or folded down.
- Step 2: Press their palm down on the right side of the paper with fingers splayed outward.
- Step 3: Paint their left hand and press it down overlapping the first palm, with fingers pointing to the left.
- Step 4: Once dry, stick two oversized googly eyes right in the center of the palm body!
- Step 5: Draw a wavy white or silver web line leading from the spider to the top of the paper.
Amazon Craft Materials You Should Buy:
| Material Name | Buy on Amazon |
|---|---|
| Crayola Non-Toxic Washable Black Tempera Paint (16 oz) | Buy on Amazon → |
| Strathmore 300 Series Heavyweight White Cardstock Pad | Buy on Amazon → |
| Huggies Natural Care Sensitive Baby Wipes (3-Pack) | Buy on Amazon → |
👉 Watch the Handprint Spider Keepsake Tutorial on YouTube
❓ Real Mom Questions Answered (From Reddit & Parenting Forums)
Q1: What is the best way to contain paint mess when crafting with multiple toddlers?
As asked by moms on Reddit’s r/Parenting:
“I have a 1-year-old and 3-year-old. Putting them at the table with paint feels like inviting a hurricane. What containment hacks actually work?”
Nancy’s Answer:
Two words: Highchair & Bathtub! For babies and one-year-olds, strapping them into their highchair with the tray snapped on confines the paint to a smooth plastic surface you can wipe down with a single wet rag in 20 seconds. For older toddlers (ages 2–4), strip them down to their diaper or an old t-shirt, set them inside an empty bathtub or shower stall with washable paint, and when craft time ends, simply turn on the handheld shower head for an instant, happy rinse!
Q2: Glue sticks vs. liquid Elmer’s glue—which should I use for 2-year-olds?
As debated by parents on Reddit’s r/toddlers:
“Is liquid glue even safe or doable with a 2-year-old? Every time I try, an entire bottle ends up pooled in one spot.”
Nancy’s Answer:
Stick exclusively to purple washable glue sticks for ages 1 through 3. Toddlers haven’t developed the hand strength to gauge liquid glue bottle pressure, which leads to immediate giant glue puddles. The purple color helps toddlers see where they’ve rubbed the adhesive, and it dries completely clear within minutes without soaking through paper plates or cardstock.
Q3: What should I do if my toddler loses interest in the craft after 3 minutes?
As discussed on Reddit’s r/Mommit:
“I spent 20 minutes prepping craft supplies and my toddler walked away after 2 minutes. Did I do something wrong?”
Nancy’s Answer:
You did nothing wrong! At ages one, two, and three, a 3-to-5 minute attention span for table crafts is completely normal and age-appropriate. Crafting with toddlers is about process over perfection—the sensory feeling of squishing paint, ripping paper, or sticking eyes. If they walk away after 3 minutes, celebrate their artwork, hang it on the fridge, and don’t force them to finish. They had their fun! 💛
🧹 Real-Mom Cleanup & Storage Checklist
- Wet Wipes on Deck: Keep an open container of unscented baby wipes right beside the craft tray for instant hand wipes.
- Fitted Crib Sheet Hack: Place a waterproof fitted crib sheet over your kitchen craft table for an instant spill barrier that washes easily in the laundry.
- Save the Cardboard Delivery Boxes: Flatten clean shipping boxes to use as disposable painting mats under toddler art.
- Keepsake Date Stamping: Always flip the paper over and write your child’s name, age (e.g., 2 years 3 months), and the date with a pen so you never forget this sweet milestone!