10 Easy Disney Pumpkin Painting Ideas for Kids & Families

Transform ordinary pumpkins into magical Disney favorites! Try these 10 easy disney pumpkin painting ideas for kids with zero carving and zero stress. 🎃
💬 The Real Mom Question (from Reddit’s r/crafts):
“Every October my kids want to paint character pumpkins, but acrylic paint always peels off the smooth pumpkin rind in giant rubbery sheets. How do we get paint to actually stick to pumpkins without peeling?”
Nancy’s Fix: Real pumpkins come from the patch coated in natural agricultural wax that repels water-based paint! Wash your pumpkin with warm water and grease-cutting dish soap, let it dry completely, and brush on a quick base coat of matte Mod Podge or matte white acrylic paint as primer. The paint bonds permanently with zero peeling!
There is nothing quite like the whimsical joy of blending autumn Halloween traditions with beloved Disney magic. But if you have ever tried carving intricate character faces into thick pumpkin rinds with flimsy tools while toddlers reach for sharp blades, you know how quickly craft time can turn into stressful chaos.
No-carve pumpkin painting gives your family all the colorful holiday creativity with zero sharp knives, zero gut-scooping mess, and zero pumpkin rot. In fact, painted pumpkins last up to two full months on your front porch when sealed properly, letting your little ones enjoy their favorite fairytale friends all season long. Pair these projects with our enchanting magical halloween gingerbread house ideas, creative halloween crafts for kids, and thrifty budget-friendly halloween crafts for a complete autumn activity lineup!
⚡ The Quick Mom Skim (TL;DR)
- The Dawn Dish Soap De-Waxing Secret: Always scrub your pumpkin skin with warm water and a drop of dish soap before painting to strip agricultural wax. This ensures your acrylic paint never beads up or flakes off.
- Wooden Dowel Ear Anchors: Ditch floppy cardboard ears that melt in October humidity. Cut ears from stiff felt or foam board, glue them to wooden craft sticks, and push the stems directly into the pumpkin crown.
- The Magic of Acrylic Paint Pens: When drawing character faces like Jack Skellington or Baymax, use fine-tip paint pens instead of floppy brushes to get crisp cartoon lines over bumpy pumpkin ridges.
- All-Weather Acrylic Sealer: Spray your finished, fully dried painted pumpkins with clear matte Mod Podge or acrylic sealer to prevent morning porch condensation from causing rot.
🏆 Nancy’s Top 3 Quick Picks for Disney Pumpkin Painting
| Category | Product Name | Why Busy Moms Love It |
|---|---|---|
| Best All-Purpose Pumpkin Acrylics | Apple Barrel Acrylic Craft Paint Set | Rich, non-toxic pigment that provides opaque one-coat coverage on real and faux pumpkins. |
| Best Fine-Line Character Detailer | POSCA Fine Point Acrylic Paint Markers | Controlled bullet-tip acrylic markers that glide across bumpy pumpkin curves without drips or bleeding. |
| Best Upright Ear Craft Felt | YYCRAFT Craft Soft Felt Sheets Pack | Vibrant multi-color felt sheets that cut cleanly for character ears and accessories. |
👀 People Also Read
🧺 Nancy’s Real-Mom Supply Swap Table
| Craft Supply Needed | Real-Mom Pantry / Household Swap | What to Buy if Starting Fresh |
|---|---|---|
| Mickey / Minnie Mouse Ears | Sturdy black takeout container lids or cereal box cardboard | YYCRAFT Craft Soft Felt Sheets Pack |
| Ear Support Anchors | Wooden kitchen toothpicks or plastic forks | Perfect Stix Jumbo Birchwood Craft Sticks |
| Polka Dot Sponges | Clean round wine corks or cotton cosmetic rounds | DMSVK Foam Paint Brushes Sponge Set |
| Surface Primer & Sealer | White school glue mixed 50/50 with water | Mod Podge Waterbase Sealer and Finish |
| Googly Eyes for Aliens | White paper circles colored with a black sharpie dot | FEBSNOW Self-Adhesive Googly Wiggle Eyes |
1. Classic Mickey Mouse Painted Pumpkin
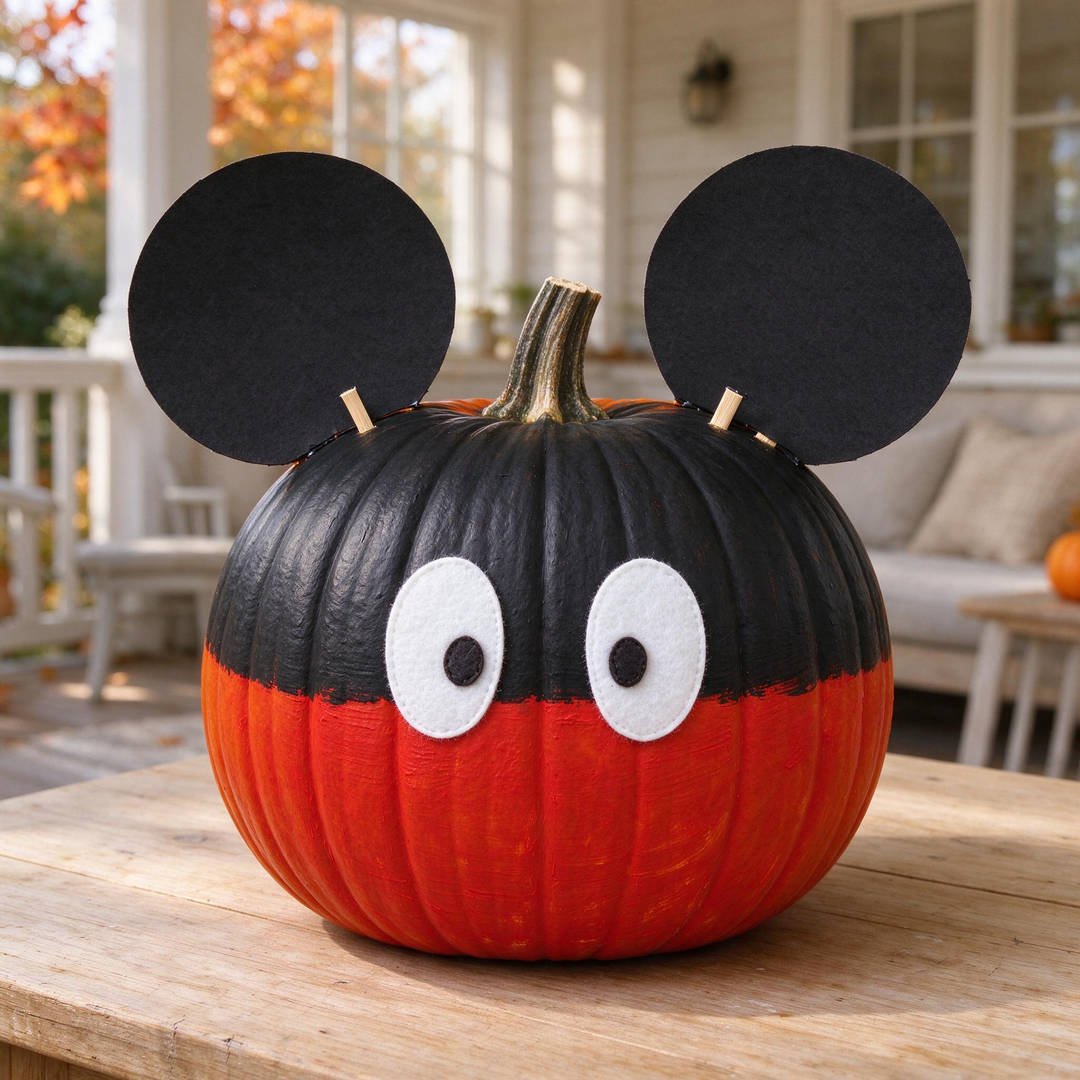
⏱️ Active & Dry Time: 20 mins active, 15 mins dry | 🧼 Mess Level: 2/5 | 👶 Age Adaptation: Ages 3+ (painting red pants, pressing felt ear sticks) | 💰 Est. Cost: ~$3.50 total
💬 Real Mom Question (from Reddit’s r/disney): “How do I make Mickey ears stay upright on a pumpkin without flopping over in the afternoon heat?”
Nancy’s Fix: Hot-glue stiff black felt circles onto jumbo wooden craft sticks and push the wooden stems two inches directly into the pumpkin flesh! It locks them rock-solid all season long.
This classic Mickey design is the absolute centerpiece of Disney Halloween decorating. Little ones love painting Mickey’s bright red trousers while parents help attach his iconic round ears.
Seeing your child’s favorite Disney mascot sitting proudly on your front steps brings instant theme park magic right to your doorstep.
How to Craft It:
- Wash your pumpkin thoroughly with warm soapy water, dry completely, and tape painters tape across the center equator using ScotchBlue Multi-Surface Painters Tape.
- Paint the lower half with bright red acrylic paint from your Apple Barrel Acrylic Craft Paint Set.
- Paint the upper half solid matte black and let both sections dry for 15 minutes.
- Cut two circular ears and two white oval buttons from your YYCRAFT Craft Soft Felt Sheets Pack using BURVAGY Kids Safety Scissors.
- Hot-glue the black felt ears onto Perfect Stix Jumbo Birchwood Craft Sticks, insert the sticks into the pumpkin top, and glue the white buttons onto the red pants.
Amazon Craft Materials You Should Buy:
| Material Name | Buy on Amazon |
|---|---|
| YYCRAFT Craft Soft Felt Sheets Pack | Buy on Amazon → |
| Apple Barrel Acrylic Craft Paint Set | Buy on Amazon → |
| Perfect Stix Jumbo Birchwood Craft Sticks | Buy on Amazon → |
👉 Watch the Classic Mickey Mouse Painted Pumpkin Tutorial on YouTube
2. Minnie Mouse Polka Dot Bow Pumpkin
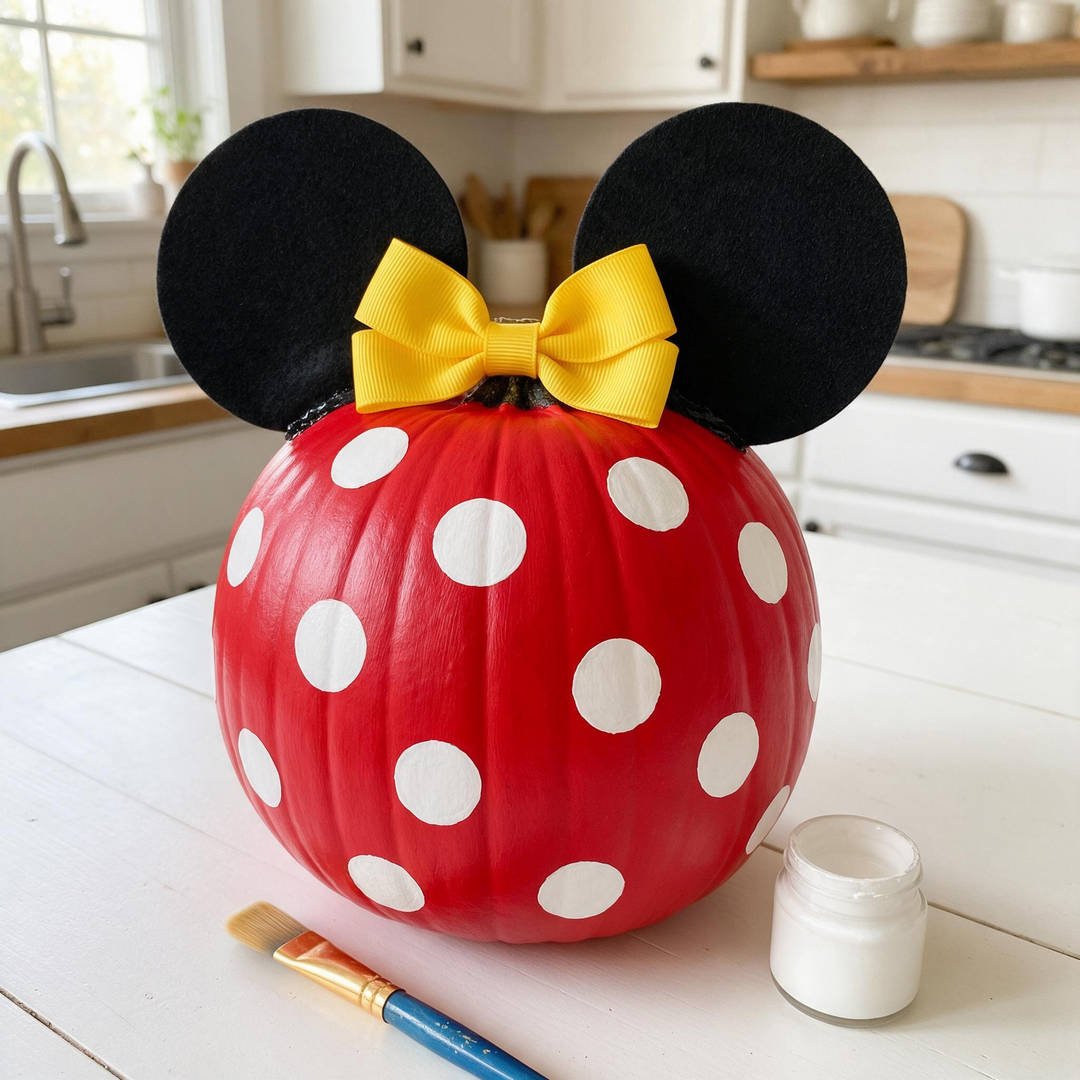
⏱️ Active & Dry Time: 25 mins active, 20 mins dry | 🧼 Mess Level: 2/5 | 👶 Age Adaptation: Ages 2+ (dot marker white polka dots) | 💰 Est. Cost: ~$4.00 total
💬 Real Mom Question (from Reddit’s r/crafts): “How can toddlers make neat polka dots on curved pumpkins without smearing red paint everywhere?”
Nancy’s Fix: Use round foam spouncer sponge dabbers dipped in thick white acrylic paint! Toddlers just press and lift for flawless cartoon polka dots in seconds.
Minnie Mouse is pure charm and elegance wrapped in cheerful polka dots. This project is ideal for toddlers who love rhythmic stamping activities that yield stunning results.
The bright yellow bow nestled between those upright black ears makes this pumpkin an instant neighborhood crowd-pleaser.
How to Craft It:
- Paint the entire pumpkin surface with two coats of rich candy-apple red from your Apple Barrel Acrylic Craft Paint Set.
- Dip a round sponge from your DMSVK Foam Paint Brushes Sponge Set into white paint and let your child stamp polka dots all over.
- Cut two circular black ears from your YYCRAFT Craft Soft Felt Sheets Pack.
- Fold a wide strip of yellow craft felt into a puffy bow shape, securing the middle with clear craft wire.
- Glue the black ears to wooden craft sticks, push them into the pumpkin crown, and adhere the yellow bow snugly in between.
Amazon Craft Materials You Should Buy:
| Material Name | Buy on Amazon |
|---|---|
| DMSVK Foam Paint Brushes Sponge Set | Buy on Amazon → |
| Apple Barrel Acrylic Craft Paint Set | Buy on Amazon → |
| YYCRAFT Craft Soft Felt Sheets Pack | Buy on Amazon → |
👉 Watch the Minnie Mouse Polka Dot Bow Pumpkin Tutorial on YouTube
3. Jack Skellington Nightmare Before Christmas Pumpkin
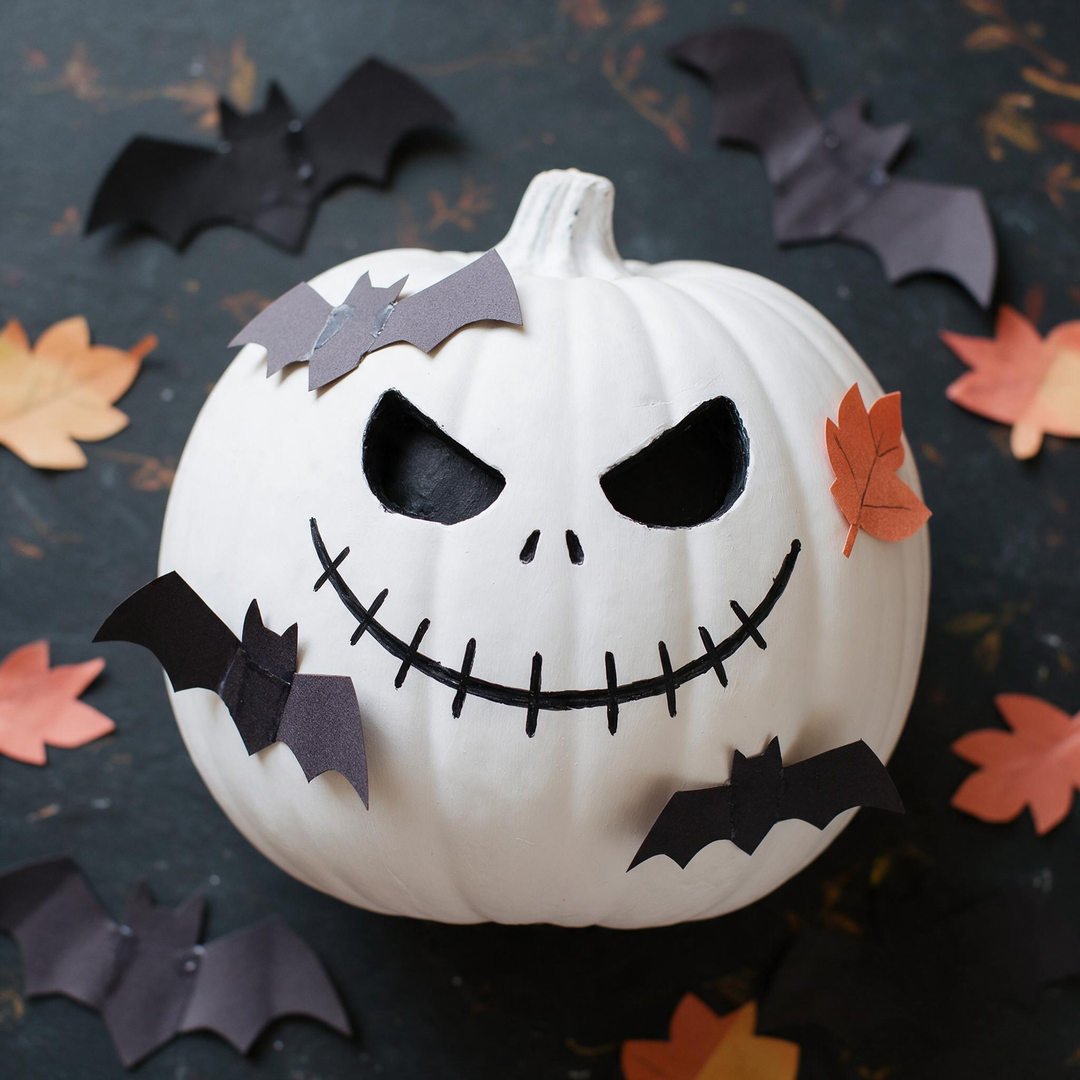
⏱️ Active & Dry Time: 15 mins active, 10 mins dry | 🧼 Mess Level: 1/5 | 👶 Age Adaptation: Ages 4+ (drawing facial stitches with paint markers) | 💰 Est. Cost: ~$2.50 total
💬 Real Mom Question (from Reddit’s r/parenting): “How do I draw Jack’s mouth stitches without paint running into the pumpkin grooves?”
Nancy’s Fix: Ditch runny brushes and use a fine-tip black POSCA acrylic paint marker! The controlled ink flows over curved pumpkin ridges with zero drips.
Jack Skellington brings that perfect touch of spooky-silly Disney charm that older kids and tweens adore. Because Jack’s face is naturally rounded and skeletal, a smooth white pumpkin is the ultimate natural canvas.
You do not need any special drawing talent to make this look authentic; Jack’s crooked grin actually looks better with imperfect lines!
How to Craft It:
- Start with a natural white ghost pumpkin, or coat an orange pumpkin in smooth white paint from your Apple Barrel Acrylic Craft Paint Set.
- Lightly sketch two large angled ovals for the eyes and two tiny angled dash marks for the nostrils using pencil.
- Draw Jack’s wide ear-to-ear curving smile across the front belly using POSCA Fine Point Acrylic Paint Markers.
- Have your child draw small vertical stitch lines crossing through the horizontal smile line at random intervals.
- Seal the entire design with a light coat of Mod Podge Waterbase Sealer and Finish to lock in the black ink.
Amazon Craft Materials You Should Buy:
| Material Name | Buy on Amazon |
|---|---|
| POSCA Fine Point Acrylic Paint Markers | Buy on Amazon → |
| Apple Barrel Acrylic Craft Paint Set | Buy on Amazon → |
| Mod Podge Waterbase Sealer and Finish | Buy on Amazon → |
👉 Watch the Jack Skellington Pumpkin Painting Tutorial on YouTube
4. Mike Wazowski One-Eyed Monster Pumpkin
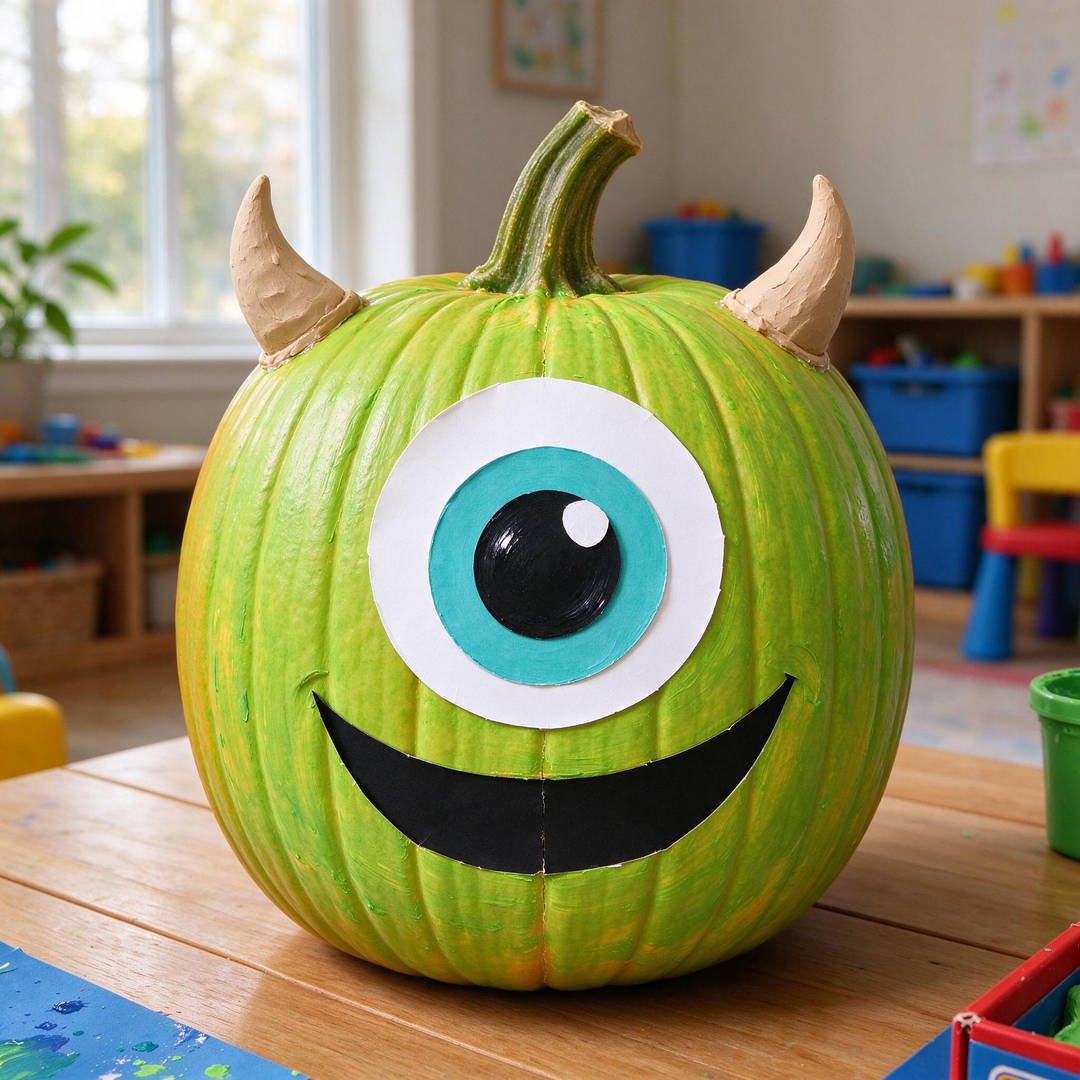
⏱️ Active & Dry Time: 20 mins active, 15 mins dry | 🧼 Mess Level: 2/5 | 👶 Age Adaptation: Ages 3+ (painting lime green base) | 💰 Est. Cost: ~$3.00 total
💬 Real Mom Question (from Reddit’s r/toddlers): “How do I paint a perfectly round giant eyeball on a bumpy green pumpkin?”
Nancy’s Fix: Trace the rim of a wide-mouth mason jar lid onto the pumpkin with a pencil first! Then let your child fill in the circle with white paint.
Mike Wazowski from Monsters, Inc. is practically shaped like a pumpkin already, making him one of the easiest characters to recreate with toddlers.
The vibrant lime green color stands out brightly among traditional orange patch displays, giving your stoop a hilarious pop of color.
How to Craft It:
- Paint your pumpkin in bright lime green using a sponge brush from your DMSVK Foam Paint Brushes Sponge Set.
- Once dry, trace a large circle in the upper center and fill it with two coats of opaque white acrylic paint from your Apple Barrel Acrylic Craft Paint Set.
- Paint a crisp turquoise circle inside the white eye, followed by a solid black pupil and tiny white catchlight dot.
- Draw Mike’s crooked smile and tiny monster teeth using POSCA Fine Point Acrylic Paint Markers.
- Cut two small triangular horns from white felt sheets in your YYCRAFT Craft Soft Felt Sheets Pack and adhere them near the stem.
Amazon Craft Materials You Should Buy:
| Material Name | Buy on Amazon |
|---|---|
| Apple Barrel Acrylic Craft Paint Set | Buy on Amazon → |
| POSCA Fine Point Acrylic Paint Markers | Buy on Amazon → |
| YYCRAFT Craft Soft Felt Sheets Pack | Buy on Amazon → |
👉 Watch the Mike Wazowski Painted Pumpkin Tutorial on YouTube
5. Winnie the Pooh Hunny Pot Pumpkin
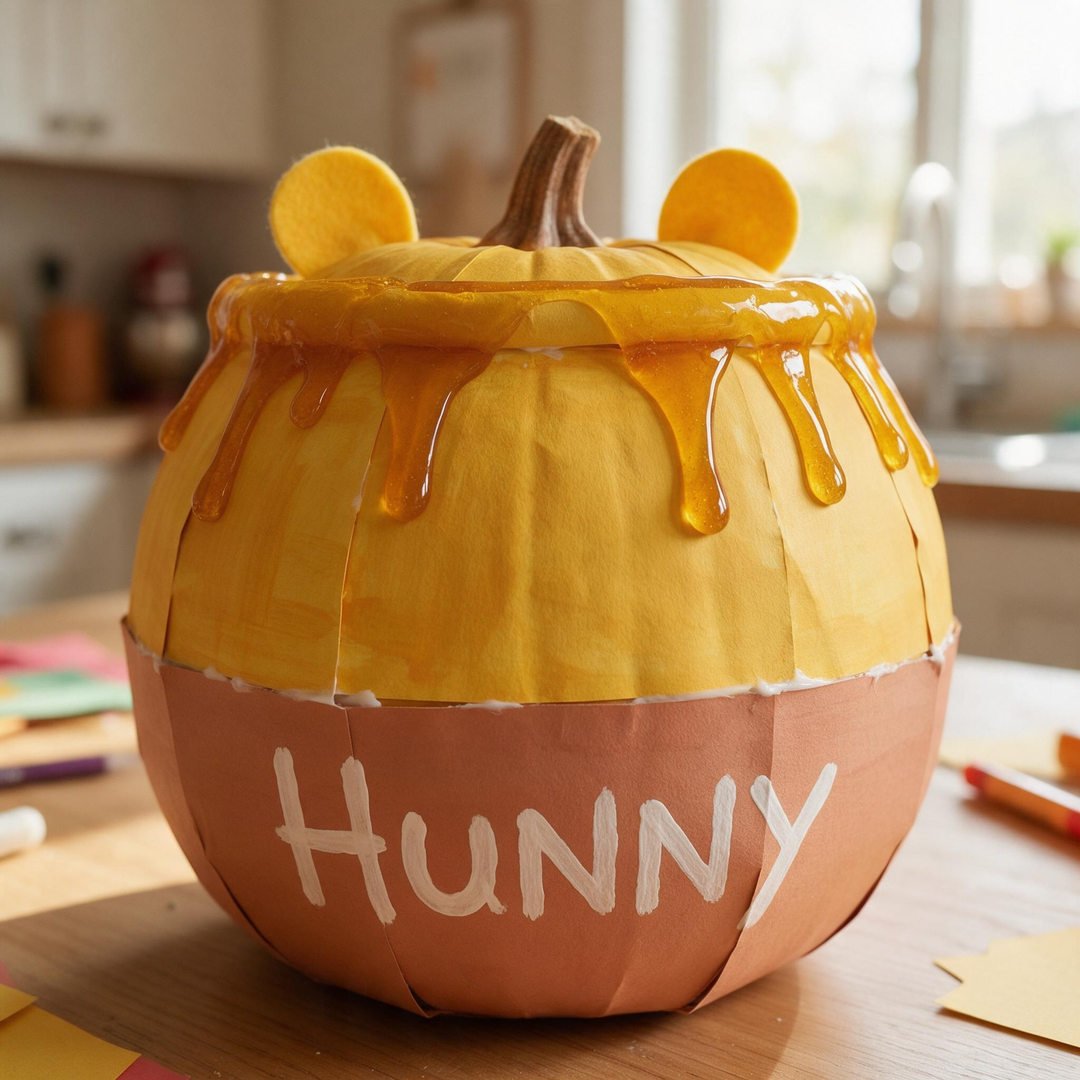
⏱️ Active & Dry Time: 20 mins active, 20 mins dry | 🧼 Mess Level: 2/5 | 👶 Age Adaptation: Ages 3+ (dabbing honey drips around the top) | 💰 Est. Cost: ~$3.25 total
💬 Real Mom Question (from Reddit’s r/Parenting): “How do we make the golden honey look thick and drippy without running down the whole pumpkin?”
Nancy’s Fix: Mix yellow acrylic craft paint with a teaspoon of Mod Podge! The glue thickens the paint so it pools into adorable golden glossy drips that stay right where you place them.
Winnie the Pooh brings cozy, warm autumn storybook nostalgia to any home. This design turns a round squat pumpkin into Pooh Bear’s favorite sweet treat.
Kids love creating the thick, gooey drips over the rim, celebrating the warm honey-toned palette of October.
How to Craft It:
- Paint the upper third of the pumpkin with warm golden yellow acrylic paint.
- Paint the lower two-thirds of the pumpkin in a warm terracotta or slate blue clay pot shade from your Apple Barrel Acrylic Craft Paint Set.
- Mix yellow paint with a spoonful of Mod Podge Waterbase Sealer and Finish to create a thick golden glaze.
- Spoon the thickened glaze along the rim and let it naturally drip down the sides in luscious scalloped shapes.
- Use a fine white paint pen from your POSCA Fine Point Acrylic Paint Markers to write “HUNNY” in backward child-like lettering across the belly.
Amazon Craft Materials You Should Buy:
| Material Name | Buy on Amazon |
|---|---|
| Mod Podge Waterbase Sealer and Finish | Buy on Amazon → |
| Apple Barrel Acrylic Craft Paint Set | Buy on Amazon → |
| POSCA Fine Point Acrylic Paint Markers | Buy on Amazon → |
👉 Watch the Winnie the Pooh Pumpkin Painting Tutorial on YouTube
6. Toy Story Little Green Alien Pumpkin
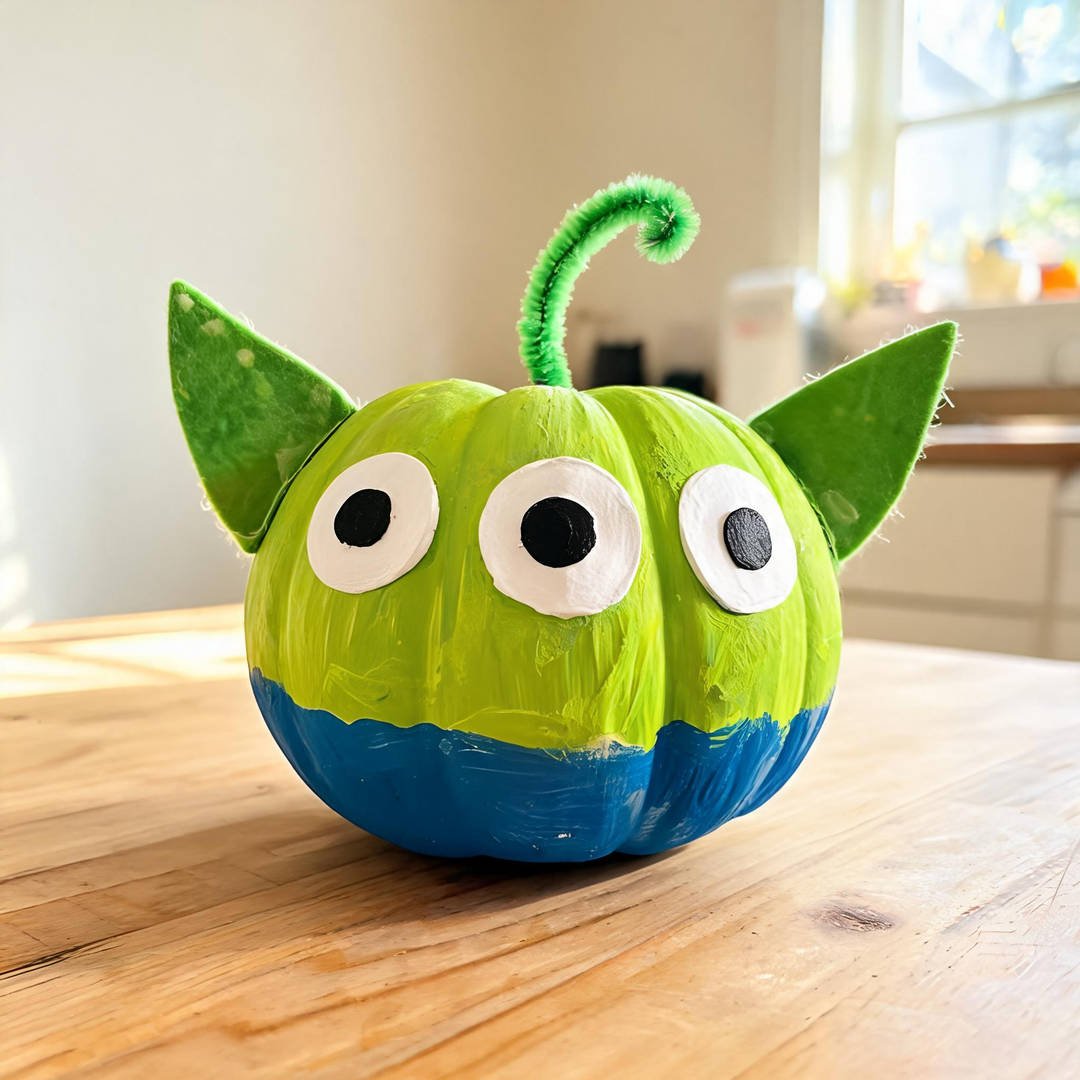
⏱️ Active & Dry Time: 15 mins active, 10 mins dry | 🧼 Mess Level: 1/5 | 👶 Age Adaptation: Ages 2+ (pressing three googly eyes onto lime green paint) | 💰 Est. Cost: ~$2.75 total
💬 Real Mom Question (from Reddit’s r/toddlers): “What is the best way to get three large googly eyes to stick securely to rounded painted pumpkins?”
Nancy’s Fix: Self-adhesive googly eyes with industrial sticky backing work wonders, or add a dab of clear tacky craft glue directly onto dry matte acrylic paint.
“Ooooh! The Claw!” Pixar’s beloved little green aliens from Pizza Planet make hilarious, friendly Halloween porch companions.
With their three signature eyes and pointed ears, this project comes together in minutes and is a huge hit with toddlers and preschoolers.
How to Craft It:
- Paint your pumpkin in solid bright neon lime green from your Apple Barrel Acrylic Craft Paint Set.
- Paint the bottom 2 inches in deep royal blue to mimic the alien’s cosmic space suit.
- Peel and press three jumbo wiggle eyes from your FEBSNOW Self-Adhesive Googly Wiggle Eyes pack in a straight row across the upper face.
- Cut two pointed oval alien ears from green sheets in your YYCRAFT Craft Soft Felt Sheets Pack.
- Attach the felt ears to the sides and twist a small green pipe cleaner around the top stem for his perky antenna!
Amazon Craft Materials You Should Buy:
| Material Name | Buy on Amazon |
|---|---|
| FEBSNOW Self-Adhesive Googly Wiggle Eyes | Buy on Amazon → |
| Apple Barrel Acrylic Craft Paint Set | Buy on Amazon → |
| YYCRAFT Craft Soft Felt Sheets Pack | Buy on Amazon → |
👉 Watch the Toy Story Alien Pumpkin Painting Tutorial on YouTube
7. Stitch Blue Alien Pumpkin
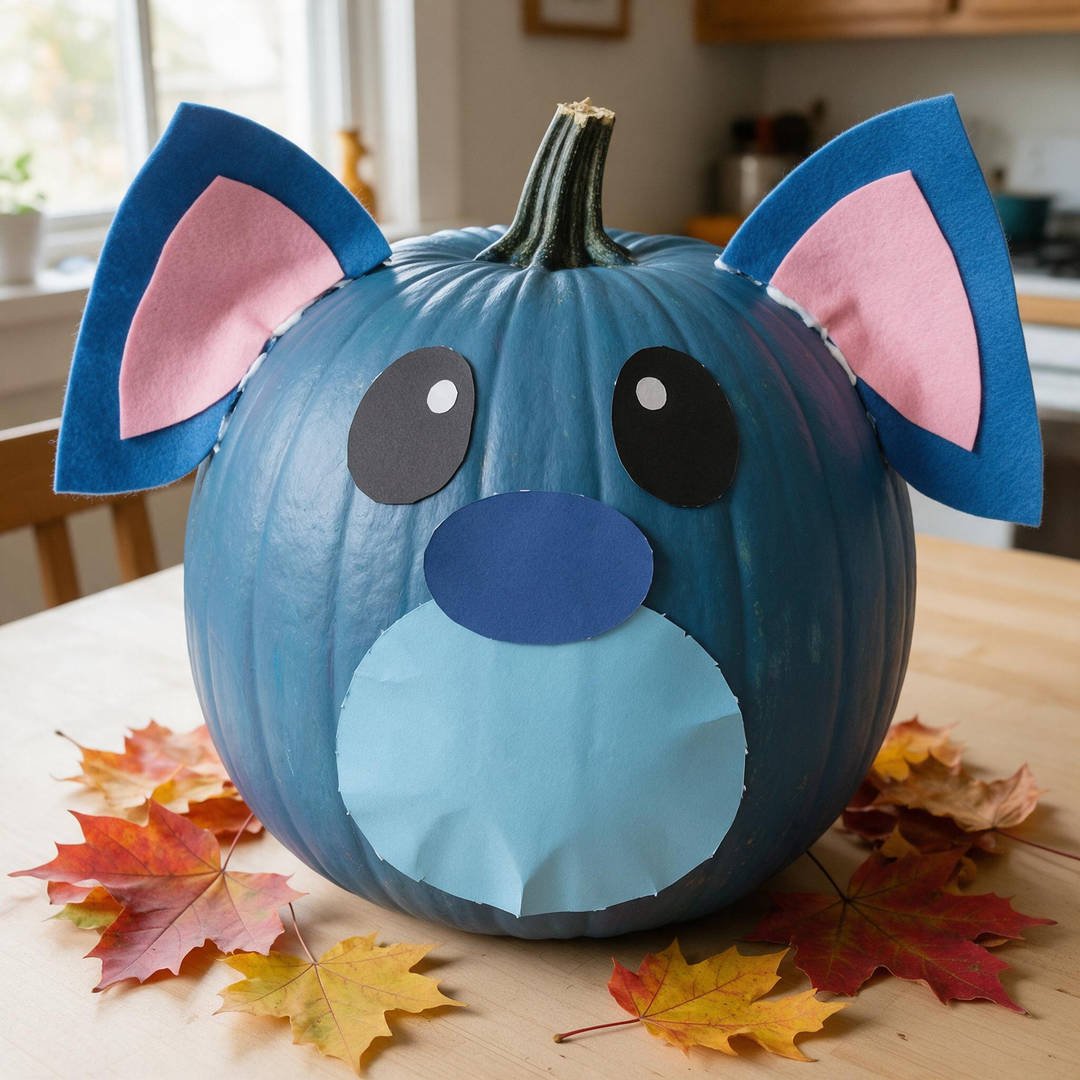
⏱️ Active & Dry Time: 25 mins active, 20 mins dry | 🧼 Mess Level: 2/5 | 👶 Age Adaptation: Ages 4+ (painting periwinkle blue coat and cutting felt ears) | 💰 Est. Cost: ~$3.75 total
💬 Real Mom Question (from Reddit’s r/crafts): “How do you give Stitch’s pumpkin ears that signature floppy, folded alien look?”
Nancy’s Fix: Cut large blue felt ears, line the inside with pink felt, and pinch the bottom edge together with a dab of hot glue before inserting wooden craft stick anchors into the pumpkin sides.
Experiment 626 is mischievous, lovable, and an all-time family favorite for autumn crafting.
The playful contrast between Stitch’s deep periwinkle blue coat and oversized pink-lined felt ears makes this pumpkin an instant showstopper on your front porch.
How to Craft It:
- Paint the entire pumpkin in periwinkle blue by blending primary blue and a touch of purple and white from your Apple Barrel Acrylic Craft Paint Set.
- Paint a lighter sky-blue patch on the lower belly and around both eye sockets.
- Cut two large pointed ear shapes from blue felt and smaller inner-ear linings from pink felt in your YYCRAFT Craft Soft Felt Sheets Pack.
- Use your POSCA Fine Point Acrylic Paint Markers to draw his large black oval eyes, dark blue nose, and happy alien grin.
- Pinch the bottom of each ear, glue them to wooden craft sticks, and insert them firmly into the sides of the pumpkin crown.
Amazon Craft Materials You Should Buy:
| Material Name | Buy on Amazon |
|---|---|
| YYCRAFT Craft Soft Felt Sheets Pack | Buy on Amazon → |
| Apple Barrel Acrylic Craft Paint Set | Buy on Amazon → |
| POSCA Fine Point Acrylic Paint Markers | Buy on Amazon → |
👉 Watch the Stitch Blue Alien Pumpkin Tutorial on YouTube
8. Elsa Frozen Snowflake Sparkle Pumpkin
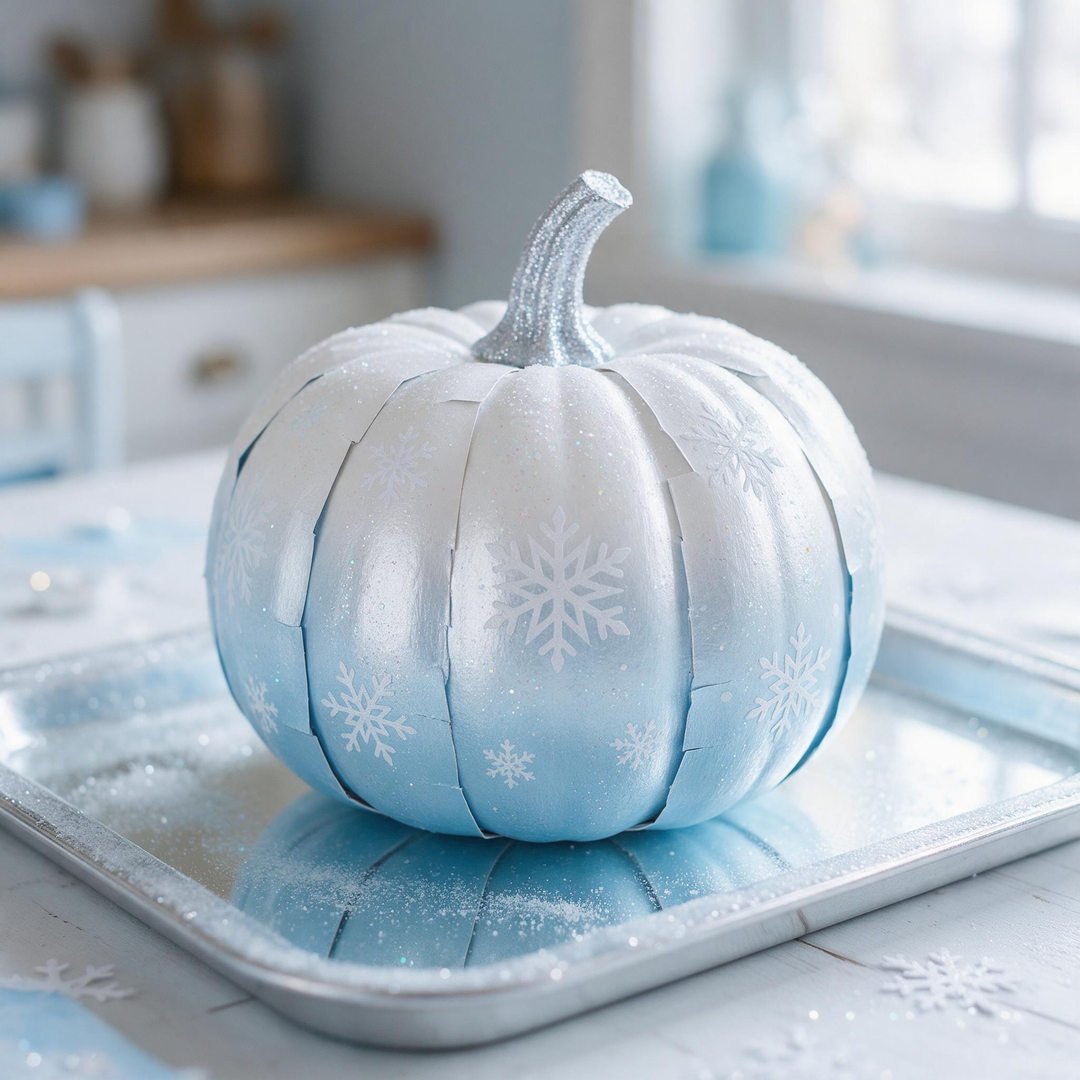
⏱️ Active & Dry Time: 20 mins active, 25 mins dry | 🧼 Mess Level: 2/5 | 👶 Age Adaptation: Ages 3+ (sponge ombre blending and dusting fine glitter) | 💰 Est. Cost: ~$3.50 total
💬 Real Mom Question (from Reddit’s r/Parenting): “How do I create a beautiful Frozen ombre effect on a pumpkin without harsh paint brush lines?”
Nancy’s Fix: Dab baby blue and deep turquoise acrylic paint together using a damp natural sea sponge or foam brush! The colors blend seamlessly from dark base to icy white crown.
For every child who loves singing “Let It Go” all autumn long, this icy winter-meets-Halloween pumpkin is pure fairytale bliss.
The soft gradient from deep royal turquoise to frosty white, topped with delicate shimmering snowflakes, turns ordinary pumpkins into regal palace decor.
How to Craft It:
- Paint the top half of the pumpkin pure snow-white and the bottom half soft pastel icy blue.
- Blend the seam between the two colors by gently tapping a damp sponge from your DMSVK Foam Paint Brushes Sponge Set.
- While the paint is slightly tacky, lightly dust the surface with fine iridescent craft glitter.
- Draw delicate six-pointed geometric snowflakes across the icy blue gradient using a fine white marker from your POSCA Fine Point Acrylic Paint Markers.
- Seal the glitter and paint beneath a glossy layer of Mod Podge Waterbase Sealer and Finish for an enchanting crystal ice finish.
Amazon Craft Materials You Should Buy:
| Material Name | Buy on Amazon |
|---|---|
| DMSVK Foam Paint Brushes Sponge Set | Buy on Amazon → |
| Mod Podge Waterbase Sealer and Finish | Buy on Amazon → |
| POSCA Fine Point Acrylic Paint Markers | Buy on Amazon → |
👉 Watch the Elsa Frozen Snowflake Sparkle Pumpkin Tutorial on YouTube
9. Cinderella’s Bibbidi-Bobbidi Carriage Pumpkin
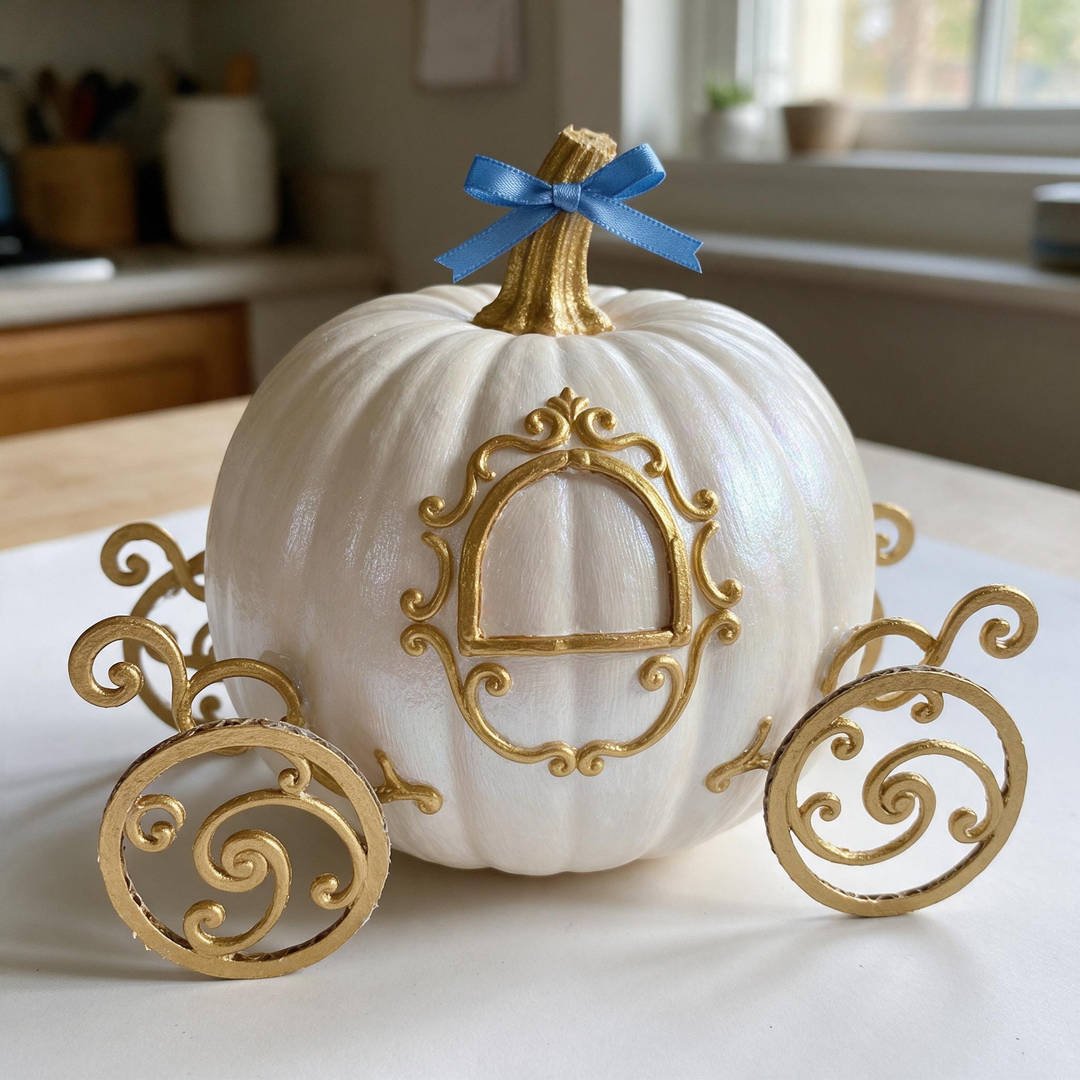
⏱️ Active & Dry Time: 25 mins active, 15 mins dry | 🧼 Mess Level: 2/5 | 👶 Age Adaptation: Ages 5+ (metallic gold detailing and wheel filigree) | 💰 Est. Cost: ~$4.50 total
💬 Real Mom Question (from Reddit’s r/crafts): “How do we make gold carriage wheels look elegant on a real white pumpkin without carving?”
Nancy’s Fix: Use a metallic gold POSCA paint marker to draw four swirling wheels and carriage scrollwork directly on a pearlescent white ghost pumpkin!
Cinderella’s enchanted carriage is the ultimate pumpkin fairytale origin story! The natural ridges of a squat white pumpkin perfectly mimic the ornate curves of the royal carriage.
Adorned with shimmering metallic gold scrollwork and delicate floral filigree, this piece looks like a boutique decor heirloom.
How to Craft It:
- Choose a naturally ribbed white Casper pumpkin, or paint an orange pumpkin pearl-white using your Apple Barrel Acrylic Craft Paint Set.
- Sketch four large swirling wheels near the lower base using a light graphite pencil.
- Trace the wheel spokes and ornate swirling vine scrollwork using a gold metallic marker from your POSCA Fine Point Acrylic Paint Markers.
- Draw an arched carriage window in the front center, adding small curtain drapery lines.
- Paint the top pumpkin stem shimmering metallic gold and tie a small pale blue satin ribbon around the top as a final magical touch!
Amazon Craft Materials You Should Buy:
| Material Name | Buy on Amazon |
|---|---|
| POSCA Fine Point Acrylic Paint Markers | Buy on Amazon → |
| Apple Barrel Acrylic Craft Paint Set | Buy on Amazon → |
| Mod Podge Waterbase Sealer and Finish | Buy on Amazon → |
👉 Watch the Cinderella Carriage Painted Pumpkin Tutorial on YouTube
10. Baymax Minimalist Care Robot Pumpkin
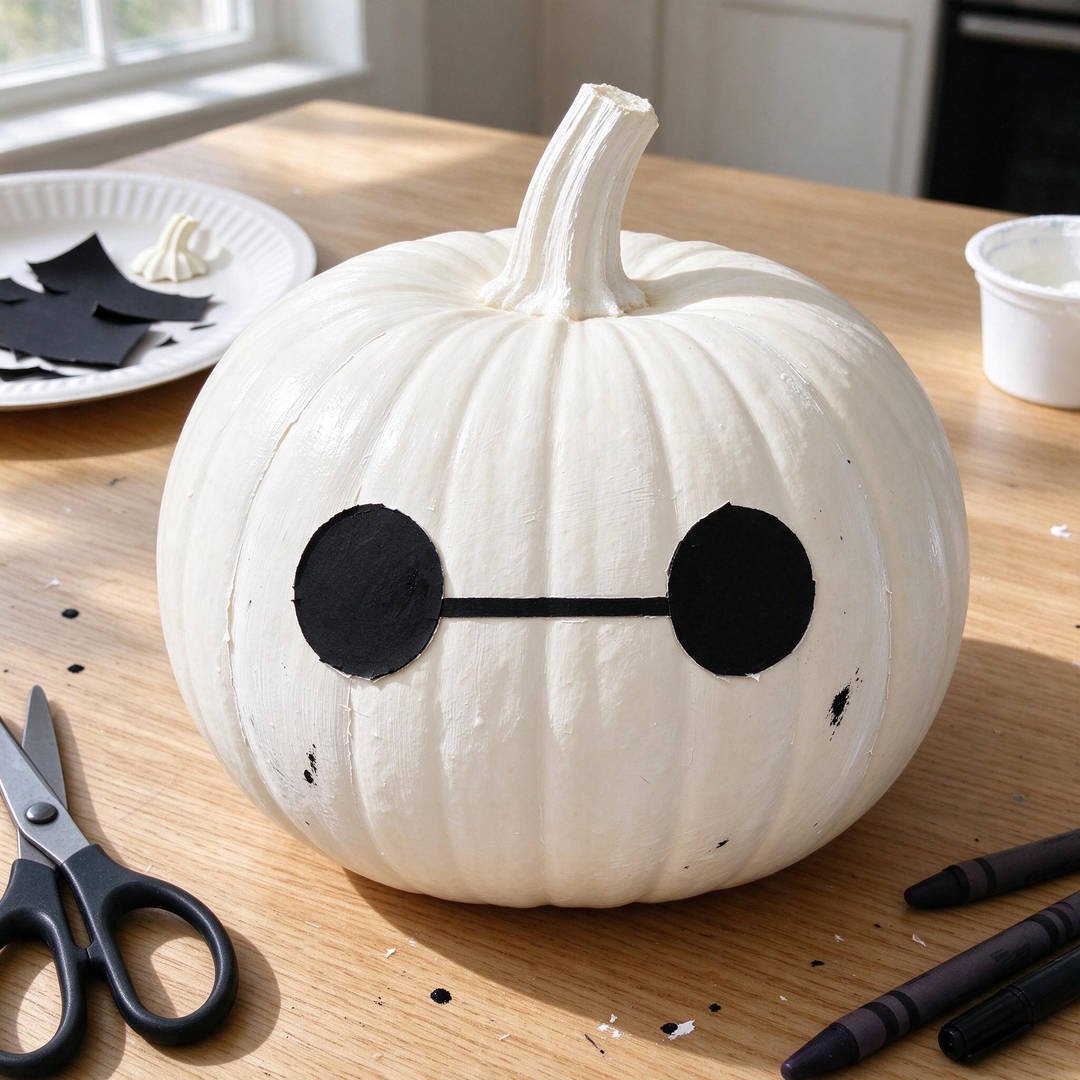
⏱️ Active & Dry Time: 5 mins active, 5 mins dry | 🧼 Mess Level: 1/5 | 👶 Age Adaptation: Ages 1+ (the ultimate 60-second toddler Disney craft) | 💰 Est. Cost: ~$1.50 total
💬 Real Mom Question (from Reddit’s r/toddlers): “What is the fastest Disney pumpkin craft for a toddler with zero attention span?”
Nancy’s Fix: Grab a white ghost pumpkin (or prime a small orange pumpkin white) and draw two solid black circles connected with one straight line! Done in two minutes and looks instantly iconic.
“Hello, I am Baymax, your personal pumpkin companion!” This project is the ultimate lifesaver when dinner is burning, the kids want to craft right this second, and you have zero time for cleanup.
Despite taking less than two minutes from start to finish, Baymax’s minimalist Japanese bell-inspired face is recognizable to every Disney fan who sees it.
How to Craft It:
- Select a smooth, round natural white pumpkin (or spray a small pumpkin white with non-toxic white craft primer).
- Trace two nickel-sized circles approximately three inches apart on the smoothest face of the pumpkin.
- Fill in both circles completely using an opaque black marker from your POSCA Fine Point Acrylic Paint Markers.
- Draw a single straight black horizontal line connecting the inner edges of both black circles.
- Step back, let it dry for two minutes, and give your little one a warm marshmallow hug!
Amazon Craft Materials You Should Buy:
| Material Name | Buy on Amazon |
|---|---|
| POSCA Fine Point Acrylic Paint Markers | Buy on Amazon → |
| Apple Barrel Acrylic Craft Paint Set | Buy on Amazon → |
| Mod Podge Waterbase Sealer and Finish | Buy on Amazon → |
👉 Watch the Baymax Painted Pumpkin Tutorial on YouTube
❓ Real Mom Questions Answered (From Reddit & Parenting Forums)
How do I make painted Disney pumpkins last until Halloween without rotting?
💬 Reddit Dilemma (from r/gardening): “My painted pumpkins always start rotting around the stem after just two weeks on the front porch. What can I do?”
The secret to pumpkin longevity is keeping moisture from settling around the stem! When washing your pumpkin, avoid submerging the stem in water. Once your acrylic paint is completely dry, brush a generous layer of Mod Podge Waterbase Sealer and Finish over the entire rind. Keep your pumpkins elevated on a dry wooden riser or porch mat rather than sitting directly on damp outdoor concrete, and they will stay fresh and firm for up to two full months.
Can toddlers use washable tempera paint instead of acrylic on pumpkins?
💬 Reddit Dilemma (from r/toddlers): “I am terrified of acrylic paint getting on my toddler’s clothes. Will washable paint work on pumpkins?”
Yes, but with one critical preparation step! Washable tempera paint will slide right off natural pumpkin wax and wipe off if exposed to rain. If crafting with toddlers under three, prime the pumpkin with a base coat of white acrylic paint or Mod Podge first to give the surface tooth. Let toddlers paint with washable tempera, and then spray a coat of clear non-toxic acrylic sealer over the dry art to lock it in permanently.
What is the easiest way to draw symmetrical Disney ears?
💬 Reddit Dilemma (from r/crafts): “Every time I cut out Mickey ears, one looks giant and the other looks tiny. How do I get them uniform?”
Use a round kitchen staple as your stencil! Trace the rim of a standard drinking glass or a wide-mouth mason jar lid twice onto heavyweight felt sheets from your YYCRAFT Craft Soft Felt Sheets Pack. Cut both out using BURVAGY Kids Safety Scissors for identical, professional-looking circular mouse ears every single time.
🧹 Real-Mom Cleanup & Storage Checklist
- The Dish Soap Degreasing Bath: Before bringing pumpkins into the craft area, scrub them in the kitchen sink with warm water and dish soap to remove dirt and agricultural wax.
- Felt Scrap Storage: Save unused felt remnants and ribbon trims in a labeled zip-top freezer bag for future holiday hair bows and stocking stuffers.
- Paint Pen Tip Protection: Always wipe POSCA marker nibs with a damp paper towel and click caps on tightly before storing horizontally to prevent dry-out.
- Porch Moisture Barrier: Place a sheet of parchment paper or cardboard underneath outdoor painted pumpkins to prevent morning ground frost from soaking through the base.
📋 Healthy Play & Child Safety Guidelines
According to the American Academy of Pediatrics (HealthyChildren.org), open-ended seasonal art like pumpkin painting provides critical sensory exploration that strengthens bilateral hand-eye coordination, pencil grasp, and spatial reasoning in young children without the risks associated with sharp cutting tools.
When selecting craft supplies for home holiday projects, the Consumer Product Safety Commission (CPSC) strongly recommends that parents always ensure all paints, adhesives, and sealers feature the ACMI AP Non-Toxic Certification label to guarantee products are completely free from toxic heavy metals and harmful volatile fumes.