10 Magical Glow in the Dark Halloween Crafts Kids Will Love

Light up October night! Discover 10 glow in the dark halloween crafts for kids made with paper plates, neon slime, and cozy glowing keepsakes. 🎃
💬 The Real Mom Question (from Reddit’s r/crafts):
“We spent hours painting paper plates and mason jars with glow-in-the-dark paint, but as soon as we turned off the kitchen lights, they were barely visible and faded in three minutes! What is the secret to getting Halloween crafts to actually glow brightly without buying expensive blacklight fixtures?”
Nancy’s Fix: Phosphorescent craft paints contain specialty glow crystals that require high-intensity ultraviolet (UV) light to charge—standard warm LED living room lightbulbs give off almost zero UV rays! Set your finished crafts outside in direct late-afternoon sunlight for 10 minutes or shine a $5 pocket UV blacklight over them for 30 seconds before dark. For maximum neon pop, always paint a smooth base coat of white acrylic paint underneath your glow colors so the luminescence bounces outward instead of getting swallowed by dark surfaces!
10 Magical Glow in the Dark Halloween Crafts Kids Will Love
There is an indescribable hush that falls over the living room right as the sun dips below the horizon in late October. The spooky season excitement reaches a fever pitch, but after hours of costume fittings and school party planning, the last thing any mom needs is an elaborate craft that demands twenty steps, sticky hot glue burns, or thirty dollars in boutique materials. What we really crave are simple, tactile kitchen-table wins that ignite our children’s imaginations and turn ordinary household items into glowing nocturnal magic.
These 10 handpicked glow in the dark halloween crafts deliver all the luminous wonder your little goblins adore without the headache. Whether you are hosting an energetic backyard playdate, searching for a calming bedtime craft, or prepping festive classroom art, these kid-tested ideas rely on pantry staples, dollar-store supplies, and verified safe pigments. Best of all, every single project comes with real-world mom cleanup tricks, frugal supply swaps, and easy age adaptations so siblings of all ages can join the fun together.
⚡ The Quick Mom Skim (TL;DR)
- The 10-Minute UV Charge Rule: Phosphorescent glow paint needs concentrated ultraviolet light to activate; charge finished crafts in bright afternoon sunlight or with a cheap handheld blacklight for hours of nighttime radiance.
- The White Primer Miracle: Always apply a clean white acrylic primer or use bright white paper plates beneath glow pigments to reflect light outward and double your luminescence.
- Frugal Freezer Hack: Slow down the chemical glow reaction of cracked glow sticks by popping them in your kitchen freezer between afternoon play and evening trick-or-treating.
- Zero-Mess Fine Motor Wins: Toddlers and preschoolers can skip paint entirely by threading glow-in-the-dark pony beads onto pipe cleaners for radiant jack-o’-lanterns and monster bracelets.
🏆 Nancy’s Top 3 Quick Picks for Glow in the Dark Halloween Crafts
| Pick Category | Recommended Supply & Link | Real-Mom Why |
|---|---|---|
| Best Radiant Glow Paint | Nicpro Fluorescent Washable Paint Set | Rich fluorescent and phosphorescent pigments that charge ultra-fast under blacklight and wash cleanly off little hands with mild soap. |
| Best Mess-Free Toddler Pick | Glow in The Dark Pony Beads | Durable glow beads that thread effortlessly onto chenille stems with zero sticky cleanup or carpet stress. |
| Best Slime & Craft Adhesive | Elmer’s Liquid School Glue | The golden standard child-safe PVA glue base for smooth neon monster slime and flexible paper bonding. |
👀 People Also Read
🧺 Nancy’s Real-Mom Supply Swap Table
| Standard Craft Supply | Nancy’s Frugal Kitchen Swap | The Secret Mom Advantage |
|---|---|---|
| Expensive Glow Acrylics | Yellow & Green Highlighters soaked in water | Free neon dye extracted from dried highlighters that glows intensely under blacklights when mixed with school glue. |
| Black Cardstock Art Paper | Inside cardboard from empty cereal boxes painted black | Thick, tear-resistant cardboard that doesn’t buckle under heavy wet paint or glue. |
| Craft Store Pony Beads | Cut neon drinking straws | Effortless scissor practice for preschoolers that creates lightweight beads for threading pipe cleaners. |
| Mod Podge Clear Sealer | 50/50 Elmer’s School Glue and warm tap water | Seals salt dough and paper plates with a glossy protective coat that locks in glow powder without yellowing. |
10 Magical Glow in the Dark Halloween Crafts
1. Glow in the Dark Paper Plate Flying Saucer
⏱️ Active & Dry Time: 20 mins active, 30 mins dry | 🧼 Mess Level: 2/5 | 👶 Age Adaptation: Ages 3+ (Pre-punch holes for toddlers; let elementary kids design alien pilot) | 💰 Est. Cost: ~$2.50 total
💬 Real Mom Question (from Reddit’s r/parenting): “My preschooler loves outer space and aliens. How can we make a sturdy UFO craft that actually flies across the room without falling apart?”
Nancy’s Fix: Staple two uncoated white paper plates rim-to-rim to form an aerodynamic disc, and reinforce the seam with clear Scotch tape. To keep the plastic cup cockpit from popping off during flight, use double-sided glue dots or low-temp craft glue rather than school glue sticks.
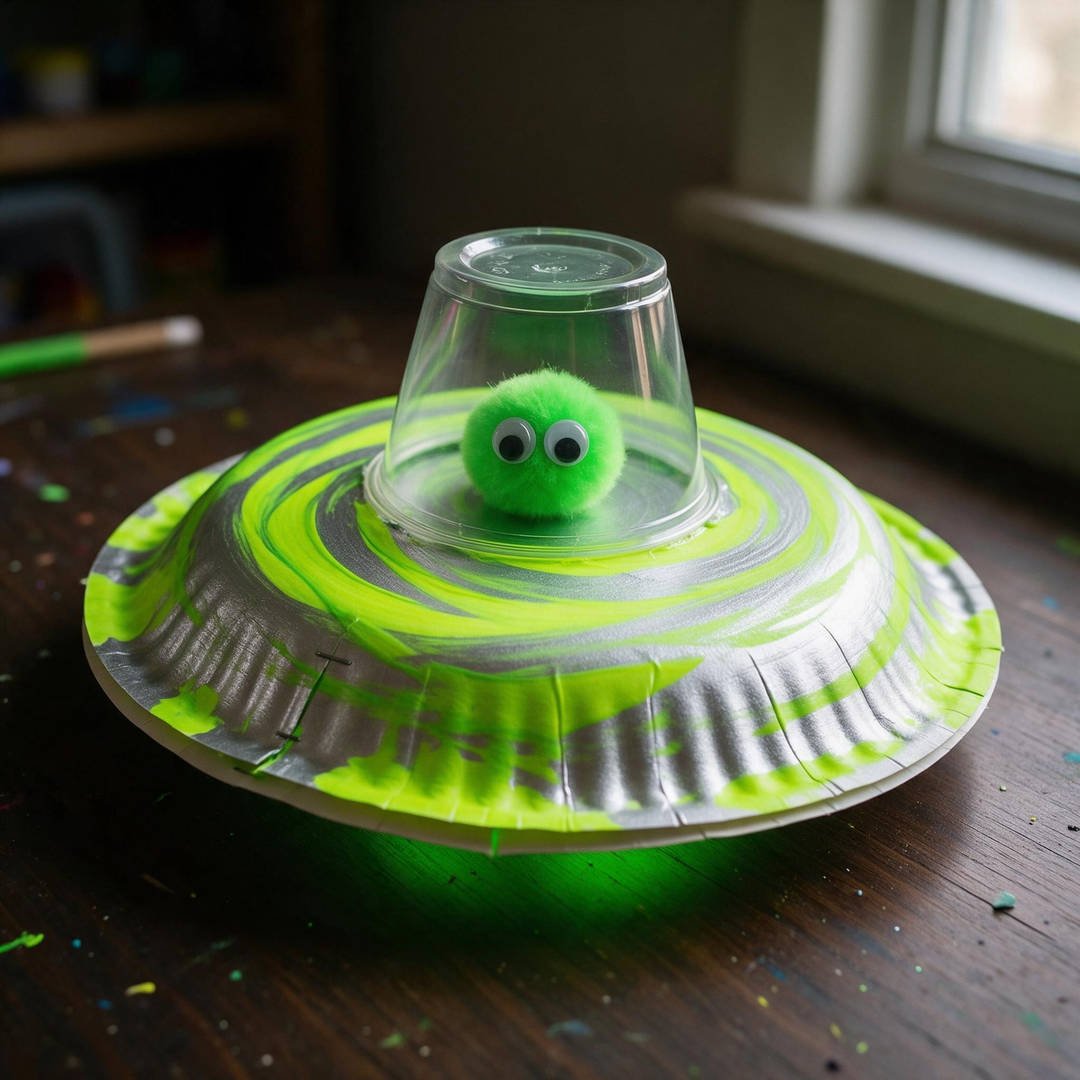
Nothing sparks giggles quite like a neon green UFO hovering across a darkened hallway! My kids spent hours zooming these glowing saucers from bedroom to bedroom.
The rim-to-rim paper plate design creates a remarkably stable flying glider, and the clear plastic cup dome on top houses a silly alien pilot ready for intergalactic adventures.
How to Craft It:
- Take two uncoated white paper plates and place them face-to-face so their rims touch, forming a flying saucer saucer shape.
- Staple around the entire perimeter every two inches to securely join the plates together.
- Paint the exterior surfaces with bright lime-green and neon yellow glow paint; let dry for 25 minutes.
- Glue an inverted small clear plastic punch cup to the top center plate using craft glue dots.
- Place a fluffy green pom-pom with two glued mini googly eyes inside the cup to serve as the alien navigator!
Amazon Craft Materials You Should Buy:
| Material Name | Product Link |
|---|---|
| Amazon Basics 9″ Uncoated White Paper Plates | Buy on Amazon ➔ |
| Nicpro Fluorescent Washable Paint Set | Buy on Amazon ➔ |
👉 Watch the Easy Paper Plate UFO Craft for Kids Tutorial on YouTube
2. Neon Glow-in-the-Dark Slime Monsters
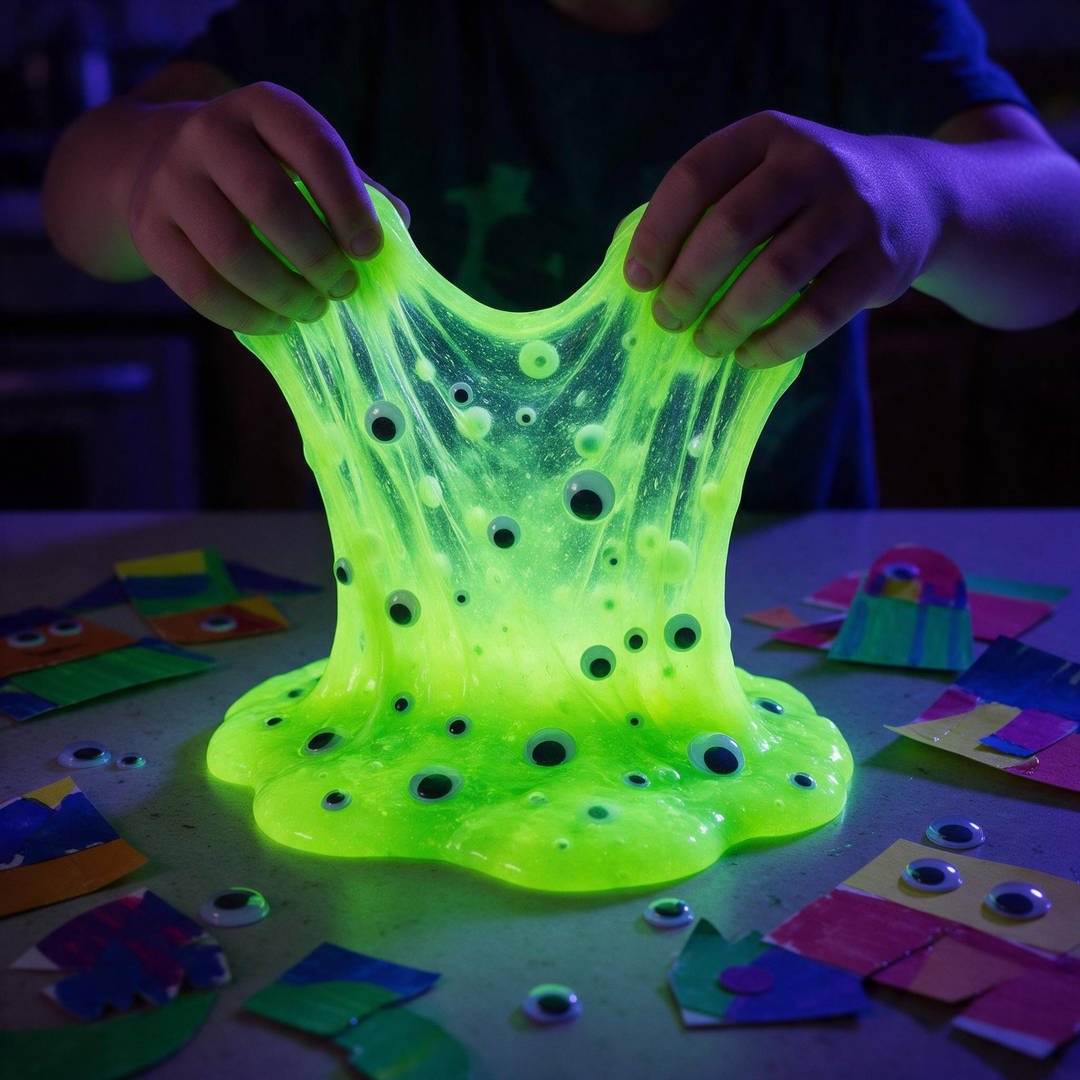
⏱️ Active & Dry Time: 15 mins active, instant play | 🧼 Mess Level: 3/5 | 👶 Age Adaptation: Ages 4+ (Supervise measuring; use buffered contact lens solution activator) | 💰 Est. Cost: ~$3.80 total
💬 Real Mom Question (from Reddit’s r/slime): “Our homemade glow slime turned stiff like a bouncy rubber ball instead of stretching. What did we do wrong?”
Nancy’s Fix: You added too much activator too quickly! Always stir in buffered contact lens solution one half-teaspoon at a time. If your slime stiffens up, knead in a pump of gentle baby lotion or a splash of warm water to soften the polymer chains.
Squishy, stretchy, and delightfully eerie, this glowing monster slime is the undisputed star of October playdates. Watching it ooze between little fingers under a blacklight feels like holding pure radioactive magic!
We pack our slime with floating self-adhesive googly eyes and neon foam beads so kids can sculpt multi-eyed swamp creatures over and over again. For more sensory fun, check out our glow-in-the-dark sensory bin tutorial.
How to Craft It:
- Pour 5 ounces of clear washable Elmer’s school glue into a medium glass mixing bowl.
- Stir in 1/2 teaspoon of baking soda and 1 tablespoon of phosphorescent green glow pigment or neon paint.
- Add buffered contact lens solution 1/2 teaspoon at a time, stirring vigorously until the slime pulls away from bowl sides.
- Knead the slime with your hands for 3 minutes until smooth, glossy, and non-sticky.
- Fold in a handful of assorted plastic googly eyes and black plastic spiders for creepy monster texture!
Amazon Craft Materials You Should Buy:
| Material Name | Product Link |
|---|---|
| Elmer’s Liquid School Glue | Buy on Amazon ➔ |
| FEBSNOW Googly Wiggle Eyes Self Adhesive | Buy on Amazon ➔ |
👉 Watch the DIY Glow in the Dark Slime Recipe Tutorial on YouTube
3. Phosphorescent Salt Dough Keepsake Ornaments
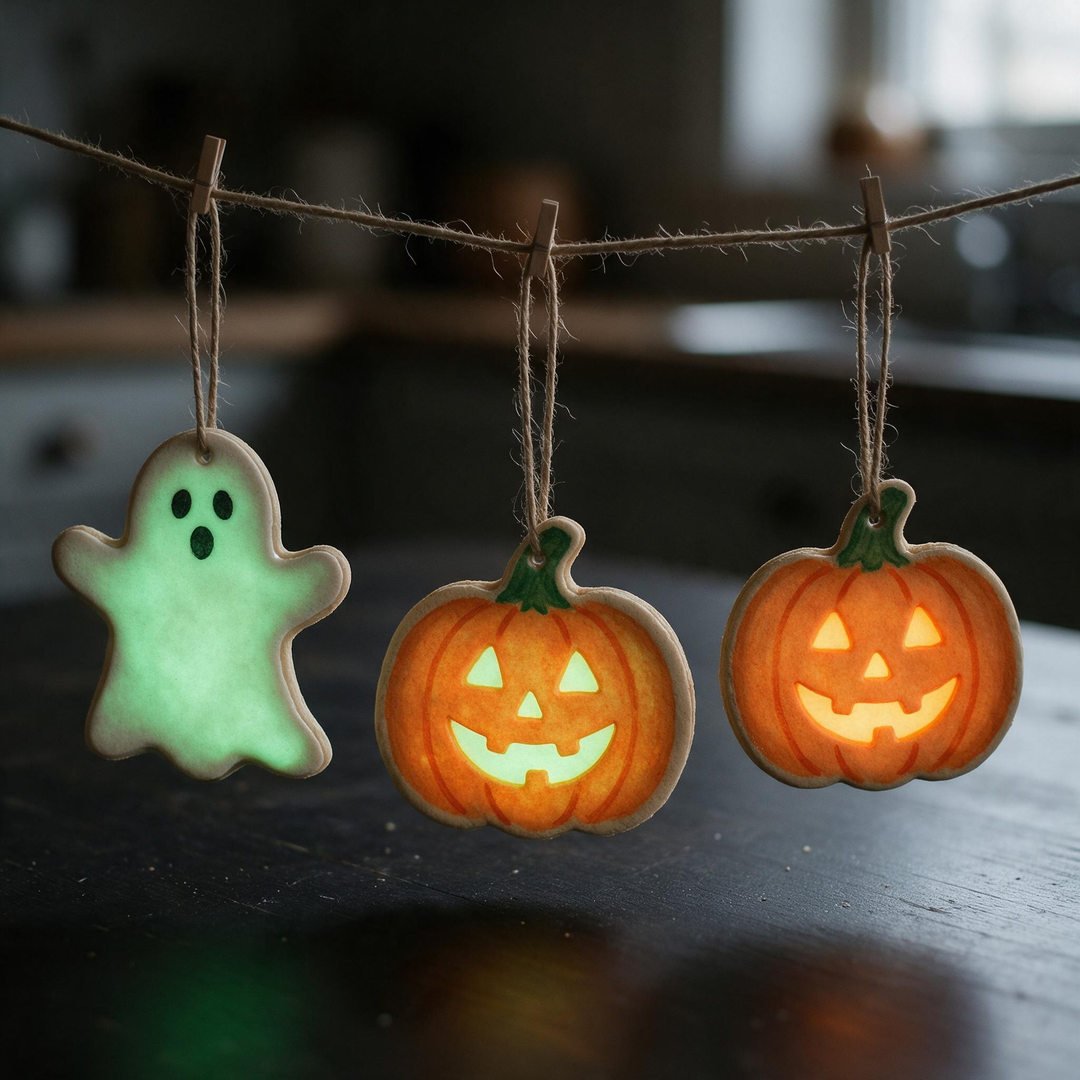
⏱️ Active & Dry Time: 25 mins active, 2 hours bake | 🧼 Mess Level: 2/5 | 👶 Age Adaptation: All ages (Perfect for baby and toddler handprint impressions) | 💰 Est. Cost: ~$1.80 total
💬 Real Mom Question (from Reddit’s r/crafts): “Our salt dough ornaments puffed up like biscuits in the oven and distorted my baby’s handprint. How do we keep them flat?”
Nancy’s Fix: Your oven temperature was too high! Bake salt dough low and slow at 200°F (95°C) for 2 to 2.5 hours on parchment paper. High heat creates steam bubbles that warp the dough; gentle drying cures it rock-hard and perfectly flat.
Preserving those chubby toddler handprints in glowing dough is one of my all-time favorite autumn traditions. Hanging these luminous ghosts and pumpkins on door handles brings instant warmth to chilly nights.
A quick coat of glossy Mod Podge locks in the phosphorescent paint so your precious Halloween keepsakes will glow year after year without flaking.
How to Craft It:
- Mix 2 cups of all-purpose flour, 1 cup of table salt, and 1 cup of warm water in a bowl until a pliable dough forms.
- Roll the dough to 1/4-inch thickness on parchment paper and cut out ghost and pumpkin shapes using cookie cutters or handprints.
- Poke a clean drinking straw through the top of each ornament to create a hanging ribbon hole.
- Bake at 200°F for 2 hours until bone-dry and cool completely on a wire rack.
- Paint with two coats of phosphorescent acrylic paint, seal with Mod Podge, and thread with rustic twine.
Amazon Craft Materials You Should Buy:
| Material Name | Product Link |
|---|---|
| Apple Barrel Acrylic Craft Paint Set | Buy on Amazon ➔ |
| Mod Podge Waterbase Sealer, Glue and Finish | Buy on Amazon ➔ |
👉 Watch the Spooky Glow Jar Easy Halloween DIY on YouTube
4. Popsicle Stick Glowing Spider Webs
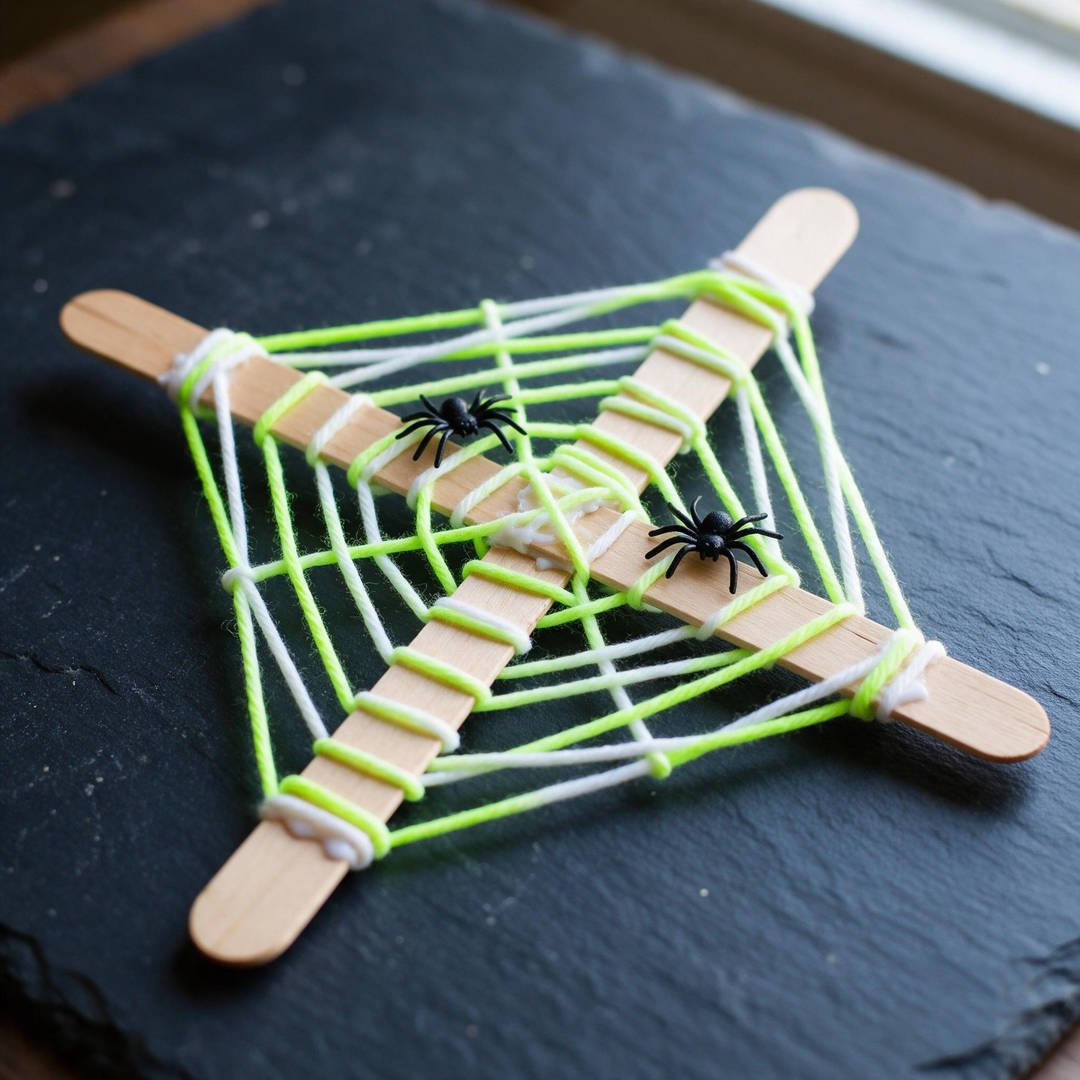
⏱️ Active & Dry Time: 15 mins active, 10 mins dry | 🧼 Mess Level: 1/5 | 👶 Age Adaptation: Ages 4+ (Fantastic fine-motor winding coordination practice) | 💰 Est. Cost: ~$2.10 total
💬 Real Mom Question (from Reddit’s r/toddlers): “My 4-year-old gets frustrated when yarn slips off popsicle sticks. How can I make web winding easier for small hands?”
Nancy’s Fix: Use child safety scissors to snip tiny shallow V-notches along the edges of the craft sticks before you begin. The yarn settles naturally into each notch without sliding off, boosting your child’s confidence and keeping the web taut.
This classic preschool craft gets a high-voltage Halloween upgrade when paired with phosphorescent yarn and creepy crawly plastic spiders. It is whisper-quiet, practically zero-mess, and wonderful for developing hand-eye coordination.
We hang these glowing webs in our front porch windows so neighborhood trick-or-treaters can spot them from the sidewalk! For more front-porch lighting magic, explore our glow-in-the-dark halloween ideas.
How to Craft It:
- Lay three jumbo wooden craft sticks across each other in a snowflake asterisk shape and glue the center joint with low-temp glue or craft dots.
- Paint the wooden sticks matte black with acrylic paint and let dry for 10 minutes.
- Tie one end of neon glow-in-the-dark yarn to the center hub.
- Weave the yarn over and under each stick spoke in expanding concentric circles, wrapping once around each spoke to anchor the web.
- Tie off the yarn end, glue two black plastic spiders to the radiant strands, and add a loop for hanging!
Amazon Craft Materials You Should Buy:
| Material Name | Product Link |
|---|---|
| Perfect Stix Jumbo Birchwood Craft Sticks | Buy on Amazon ➔ |
| Halloween Plastic Spiders (120 Pcs) | Buy on Amazon ➔ |
👉 Watch the Popsicle Stick Spider Web Tutorial on YouTube
5. Glow in the Dark Egg Carton Monsters
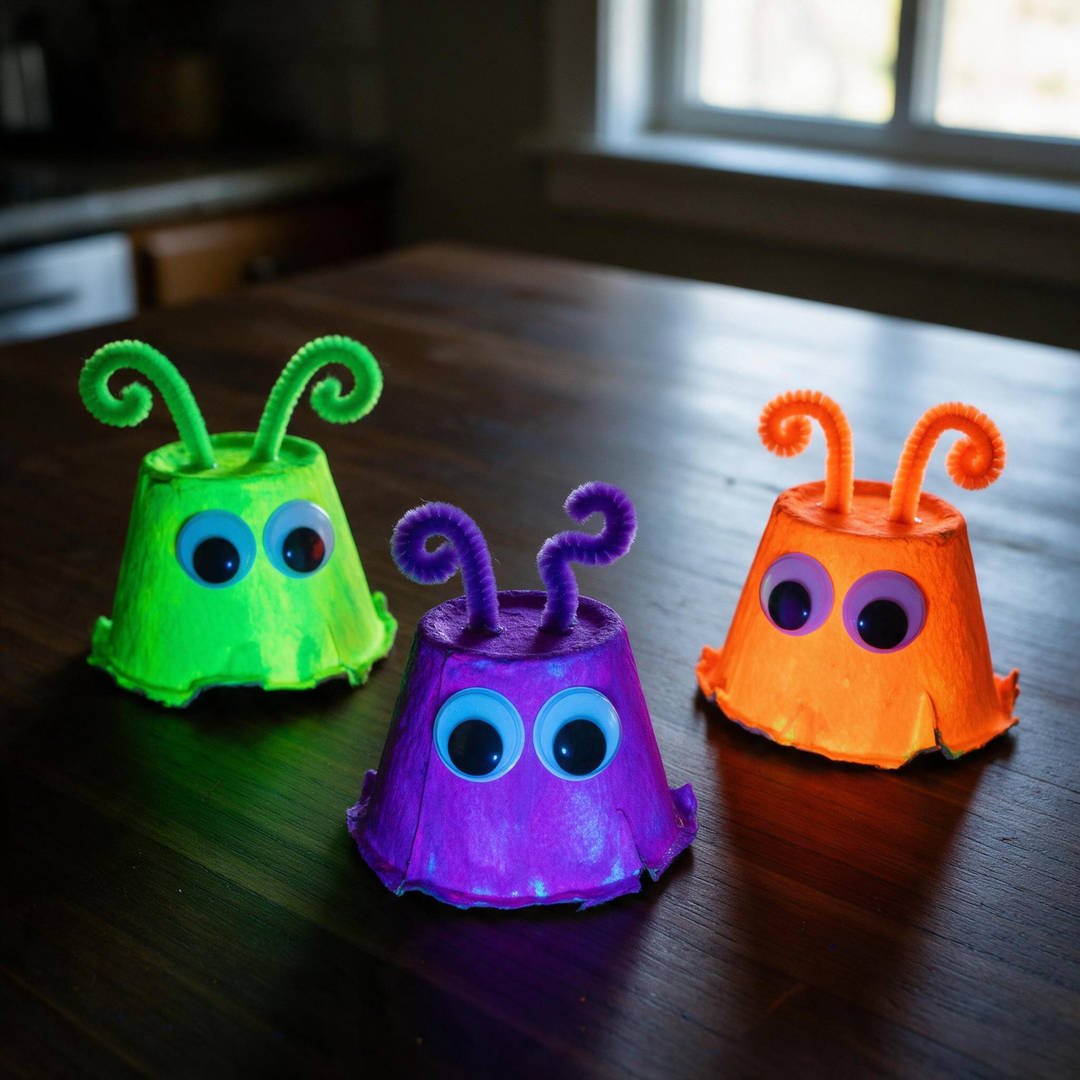
⏱️ Active & Dry Time: 20 mins active, 20 mins dry | 🧼 Mess Level: 2/5 | 👶 Age Adaptation: Ages 3+ (Pre-cut egg cups for little ones; let them bend pipe cleaner limbs) | 💰 Est. Cost: ~$1.20 total
💬 Real Mom Question (from Reddit’s r/frugal): “I have dozens of cardboard egg cartons saved up. What is the most fun, durable Halloween monster project for preschoolers?”
Nancy’s Fix: Cut the carton cups into individual pods or three-cup caterpillar segments. Cardboard egg cartons absorb washable neon tempera paints beautifully without priming, creating rich velvet-like monsters that won’t crack or chip when little hands bend their antennae!
Turning breakfast recycling into nocturnal monsters is the ultimate thrifty mom victory. My kids love giving their egg cup critters three eyes, neon fangs, and wild zigzag antennae.
These miniature beasts make darling bedside protectors that glow softly while your little ones drift off to dreamland.
How to Craft It:
- Cut out individual cardboard cups from a clean egg carton using sturdy kitchen shears.
- Paint each cup inside and out with two coats of fluorescent neon washable paint; let dry for 15 minutes.
- Poke two small holes in the top of each cup using a wooden toothpick or hole punch.
- Thread chenille pipe cleaners through the holes and curl the ends with a pencil to create springy monster antennae.
- Glue giant self-adhesive googly eyes and draw silly monster grins with black markers!
Amazon Craft Materials You Should Buy:
| Material Name | Product Link |
|---|---|
| 1200PCS Pipe Cleaners Craft Chenille Stems | Buy on Amazon ➔ |
| Crayola Neon Washable Kids Paint (10 Pack) | Buy on Amazon ➔ |
👉 Watch the Egg Carton Craft Tutorial on YouTube
6. Glowing Monster Handprint Silhouette Art
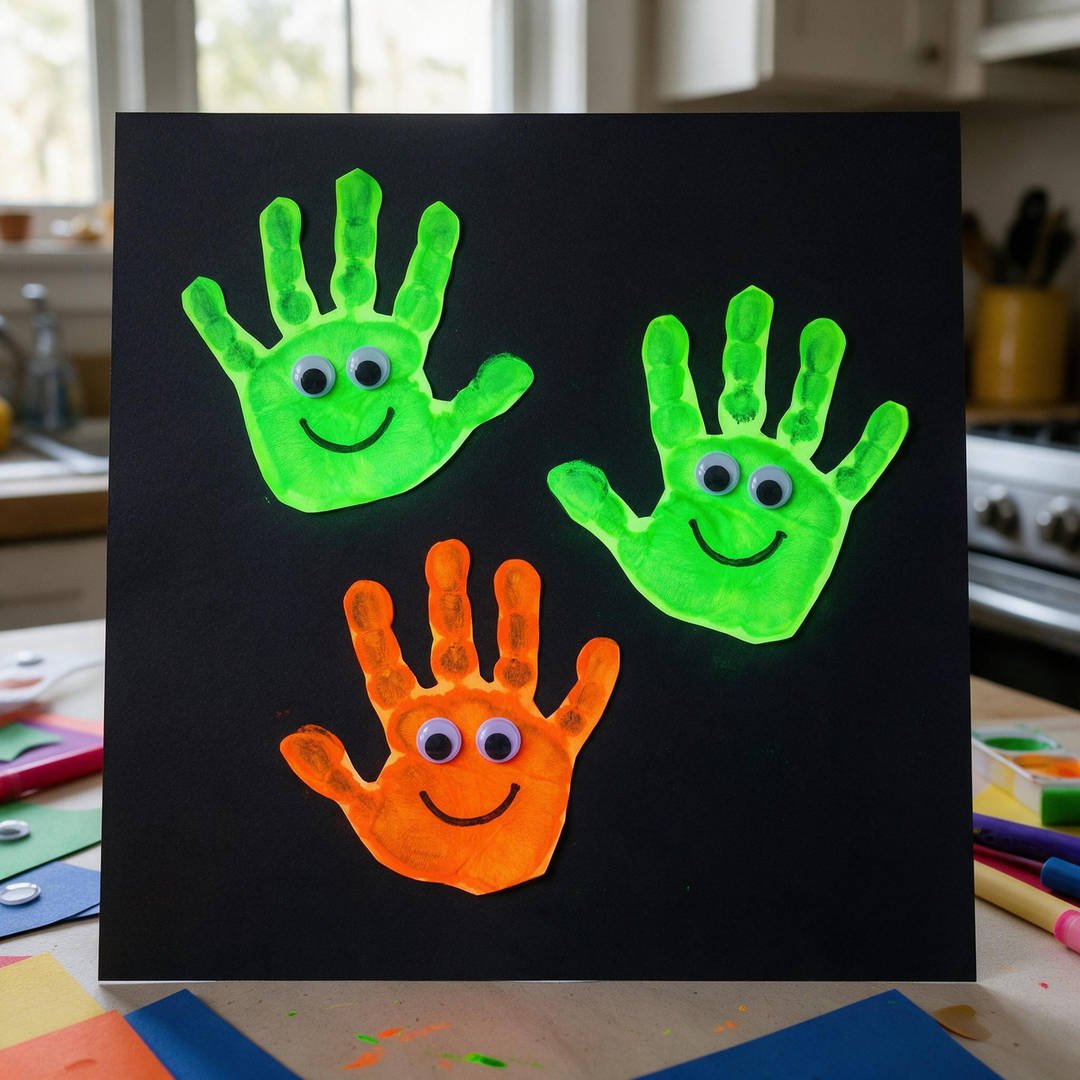
⏱️ Active & Dry Time: 15 mins active, 25 mins dry | 🧼 Mess Level: 3/5 | 👶 Age Adaptation: Ages 2–8 (Have wet wipes directly beside the craft station for instant hand washing) | 💰 Est. Cost: ~$1.90 total
💬 Real Mom Question (from Reddit’s r/parenting): “How do I keep my 3-year-old from smearing paint all over the table when doing handprint art?”
Nancy’s Fix: Tape your black cardstock directly to the tabletop with blue painter’s tape so it doesn’t slide around. Instead of letting your toddler dip their hand into an open bowl, use a soft foam sponge brush to paint their palm thinly—this controls excess paint and produces crisp, non-smudged prints!
There is nothing sweeter than tiny handprints stamped on pitch-black paper, glowing brightly like playful nocturnal imps. Turn the palm upside down, and your child’s fingers instantly transform into dangling monster tentacles or dancing skeleton ribs.
Frame these in simple black frames from the dollar store to create an annual October gallery wall your family will treasure. Find more festive family art in our roundup of halloween crafts for kids.
How to Craft It:
- Tape a sheet of heavyweight black construction paper flat onto your craft surface.
- Use a foam brush to coat your child’s hand with bright neon washable glow paint.
- Press their hand firmly onto the center of the black paper, pressing each finger gently, then lift straight up.
- Let the paint dry completely for 20 minutes.
- Once dry, let your child add personality: glue on googly eyes, draw sharp fangs with black markers, and charge the art with a flashlight!
Amazon Craft Materials You Should Buy:
| Material Name | Product Link |
|---|---|
| Crayola Construction Paper Bulk Pack | Buy on Amazon ➔ |
| Nicpro Fluorescent Washable Paint Set | Buy on Amazon ➔ |
👉 Watch the Easy Halloween Handprint Craft Tutorial on YouTube
7. Glow in the Dark Beaded Pipe Cleaner Pumpkins
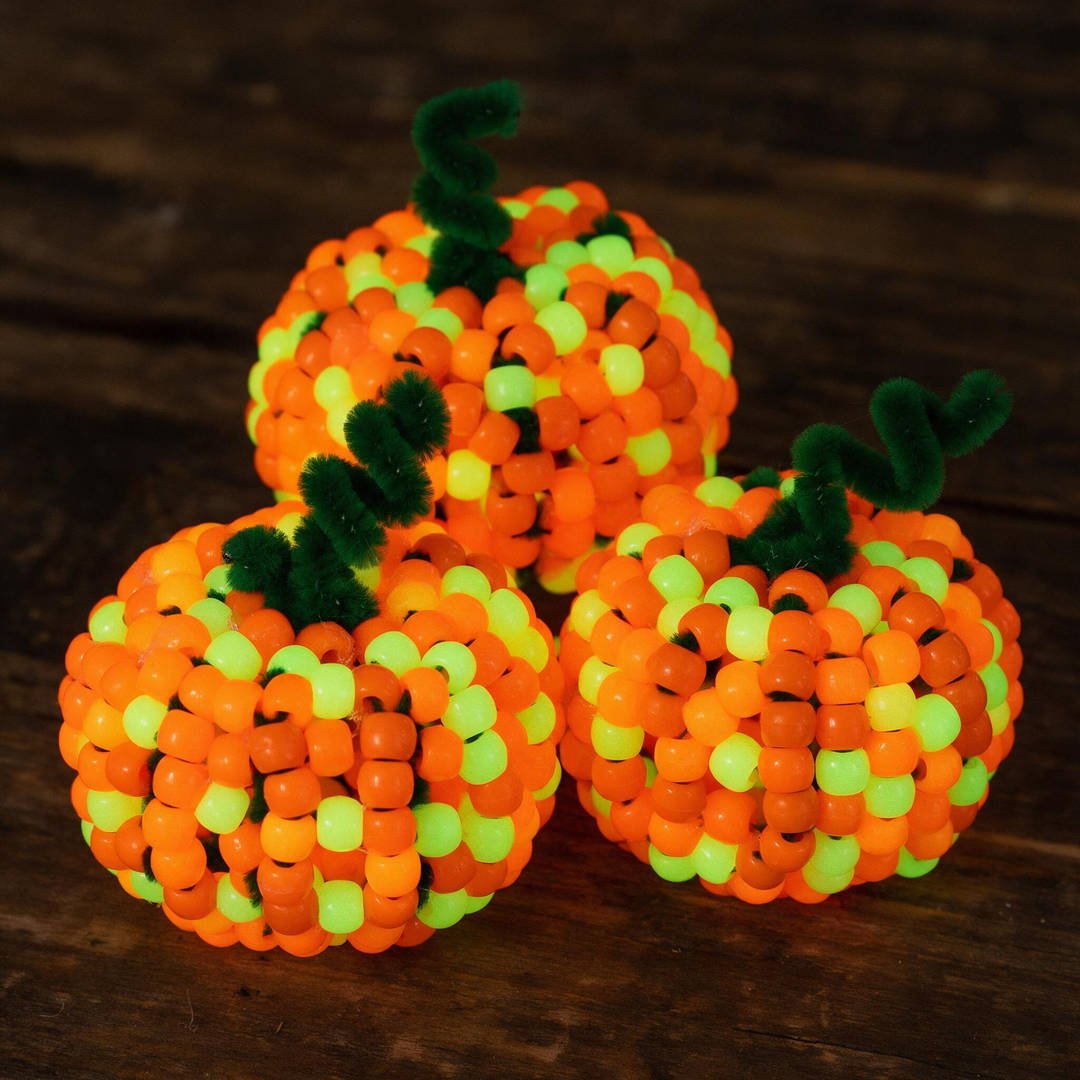
⏱️ Active & Dry Time: 15 mins active, zero dry time | 🧼 Mess Level: 1/5 | 👶 Age Adaptation: Ages 3+ (Superior fine-motor pincer grip exercise; zero wet cleanup) | 💰 Est. Cost: ~$2.40 total
💬 Real Mom Question (from Reddit’s r/toddlers): “I need a completely mess-free craft for a restaurant table or road trip. Can this beaded pumpkin be made on the go?”
Nancy’s Fix: Absolutely! Pre-count 15 to 20 glow pony beads into snack-size Ziploc bags alongside 3 orange pipe cleaners and 1 green stem. There is zero wet paint, zero glue, and zero drying time—kids can bead their pumpkins in car seats or waiting rooms without losing pieces.
When you need an engaging, mess-free craft that builds fine motor muscles while keeping little hands happily occupied, this beaded pumpkin is your secret weapon.
Preschoolers love sliding phosphorescent orange pony beads along fuzzy chenille stems, and when you twist them into 3D spheres, they stand upright on nightstands like magical fairy-tale pumpkins.
How to Craft It:
- Take three orange pipe cleaners and twist them together at their centers to form a 6-legged star snowflake.
- Thread 8 to 10 glow-in-the-dark orange pony beads onto each of the six spokes, leaving 1/2 inch of wire bare at the tips.
- Gather all six spoke ends together at the top, pulling upward to bow the beaded wires into a round pumpkin sphere.
- Twist the top wire ends tightly together to lock the pumpkin shape in place.
- Wrap a short length of green chenille stem around the top twist to create a curly pumpkin stem and vine tendril!
Amazon Craft Materials You Should Buy:
| Material Name | Product Link |
|---|---|
| Glow in The Dark Pony Beads (1000+ pcs) | Buy on Amazon ➔ |
| Black Pipe Cleaners for Crafts (200 Pcs) | Buy on Amazon ➔ |
👉 Watch the Beaded Pipe Cleaner Pumpkin Tutorial on YouTube
8. Toilet Paper Roll Glowing Bat Wind Catchers
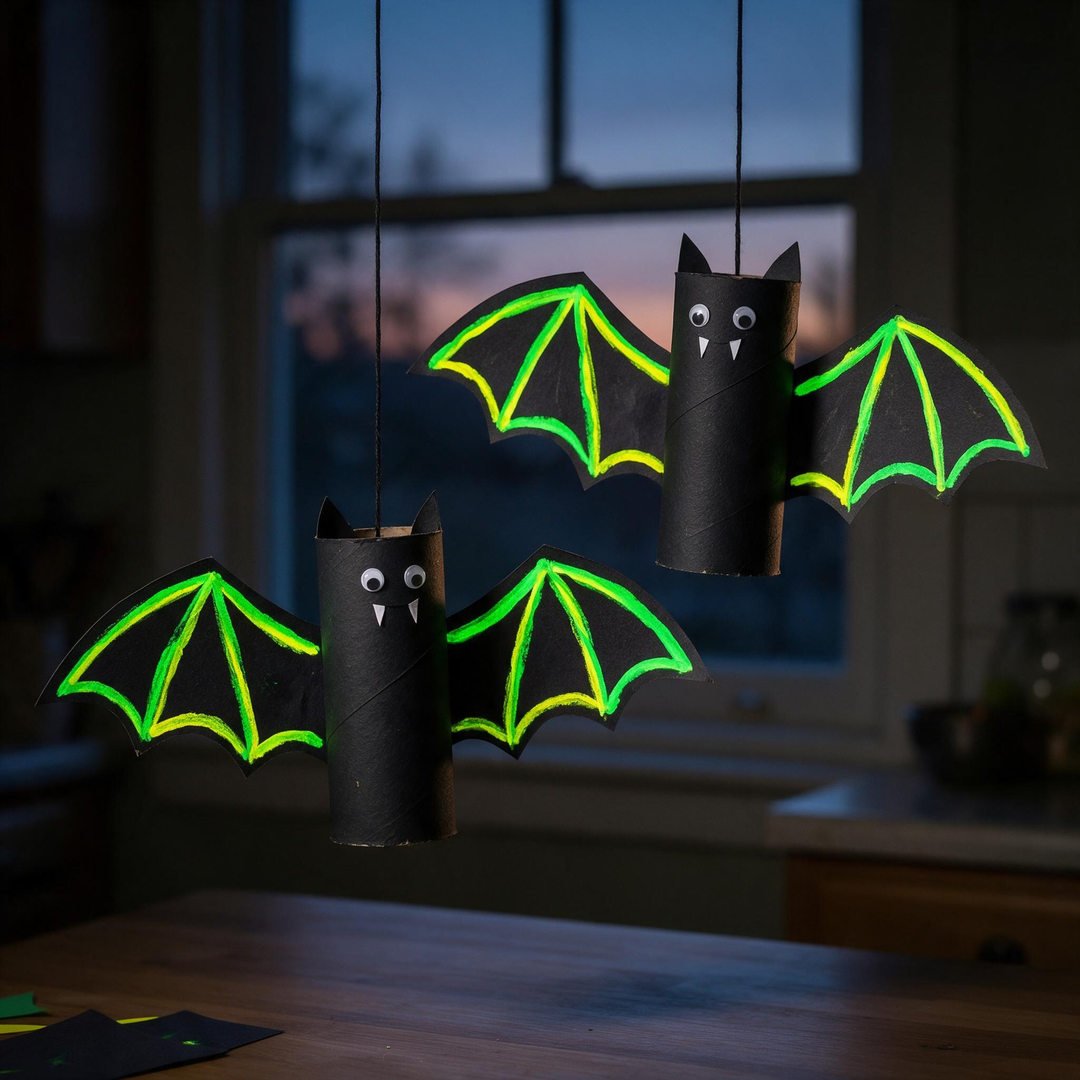
⏱️ Active & Dry Time: 20 mins active, 15 mins dry | 🧼 Mess Level: 2/5 | 👶 Age Adaptation: Ages 4+ (Great scissor practice cutting bat wings from cardstock) | 💰 Est. Cost: ~$1.10 total
💬 Real Mom Question (from Reddit’s r/crafts): “How do I fold down the top of a cardboard tube to make clean bat ears without crumpling the roll?”
Nancy’s Fix: Score a gentle semi-circle curve across the top rim with your thumbnail or the edge of a spoon first. Once scored, the cardboard naturally folds downward in two crisp overlapping semicircles, giving you pointy bat ears with zero tube crushing!
Do not throw away those empty bathroom cardboard rolls! With a simple thumbnail crease at the top, they fold into adorable vampire bat bodies that sway in drafty doorways and windows.
Painting the wings with neon glow paint and adding bright white cardstock fangs turns these gentle night fliers into whimsical room decor kids are thrilled to show off.
How to Craft It:
- Press the top center of a toilet paper roll inward with your thumbs to create two pointy pointed bat ears.
- Paint the entire cardboard tube with black washable tempera or matte acrylic paint; let dry for 10 minutes.
- Cut out two scalloped bat wings from black cardstock and outline the edges with vibrant phosphorescent yellow or green paint.
- Glue the wings to the back of the cardboard roll using Elmer’s glue sticks or craft dots.
- Glue two googly eyes and tiny white paper fangs to the front, punch a hole near the ears, and suspend with black yarn!
Amazon Craft Materials You Should Buy:
| Material Name | Product Link |
|---|---|
| Elmer’s Disappearing Purple School Glue Sticks | Buy on Amazon ➔ |
| Red Heart Super Saver Yarn Black | Buy on Amazon ➔ |
👉 Watch the Toilet Paper Roll Bats Halloween Craft Tutorial on YouTube
9. Glowing Clay Jack-O-Lantern Pinch Pots
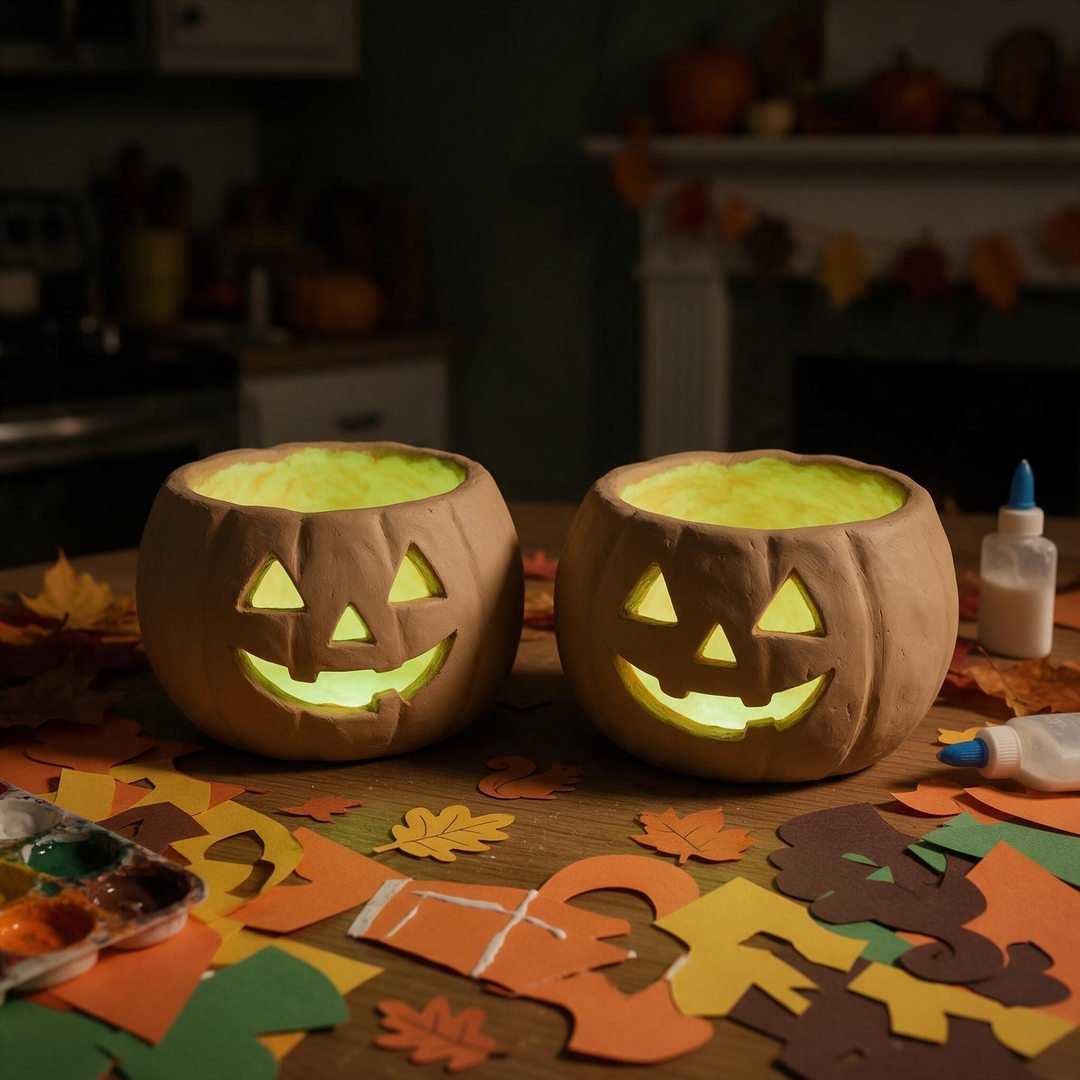
⏱️ Active & Dry Time: 25 mins active, 24 hours dry | 🧼 Mess Level: 2/5 | 👶 Age Adaptation: Ages 5+ (Calming tactile clay sensory work for elementary kids) | 💰 Est. Cost: ~$3.20 total
💬 Real Mom Question (from Reddit’s r/parenting): “Our air dry clay cracked while drying overnight. What can we do to fix it or prevent cracks?”
Nancy’s Fix: Keep a small dish of water nearby and smooth over any surface hairline cracks with a wet fingertip while sculpting. If small cracks appear after drying, fill them with a dab of Elmer’s glue mixed with baking soda, let dry, and paint over—the seam will be completely invisible!
Working with air-dry clay provides a grounding, peaceful sensory outlet during the high-energy excitement of Halloween week. Making a pinch pot is an ancient pottery technique that little hands can master in minutes.
Coating the bowl’s interior with high-intensity phosphorescent paint turns each pumpkin bowl into a glowing chalice for holding hair clips, rings, or Halloween candy treasures.
How to Craft It:
- Roll a fist-sized ball of Crayola natural white air-dry clay between palms until smooth and spherical.
- Press your thumb into the center of the ball, stopping 1/2 inch before the bottom.
- Pinch the walls outward with thumbs inside and fingers outside, rotating the clay to form an even round bowl.
- Use a plastic butter knife or wooden craft stick to carve gentle vertical pumpkin ridges around the exterior.
- Let dry for 24 hours, paint the exterior orange, and coat the interior with rich phosphorescent glow paint!
Amazon Craft Materials You Should Buy:
| Material Name | Product Link |
|---|---|
| Crayola Air Dry Clay (5lbs Natural White) | Buy on Amazon ➔ |
| Apple Barrel Acrylic Craft Paint Set | Buy on Amazon ➔ |
👉 Watch the Cute DIY Pumpkin Trinket Pot Tutorial on YouTube
10. Glow in the Dark Coffee Filter Suncatchers
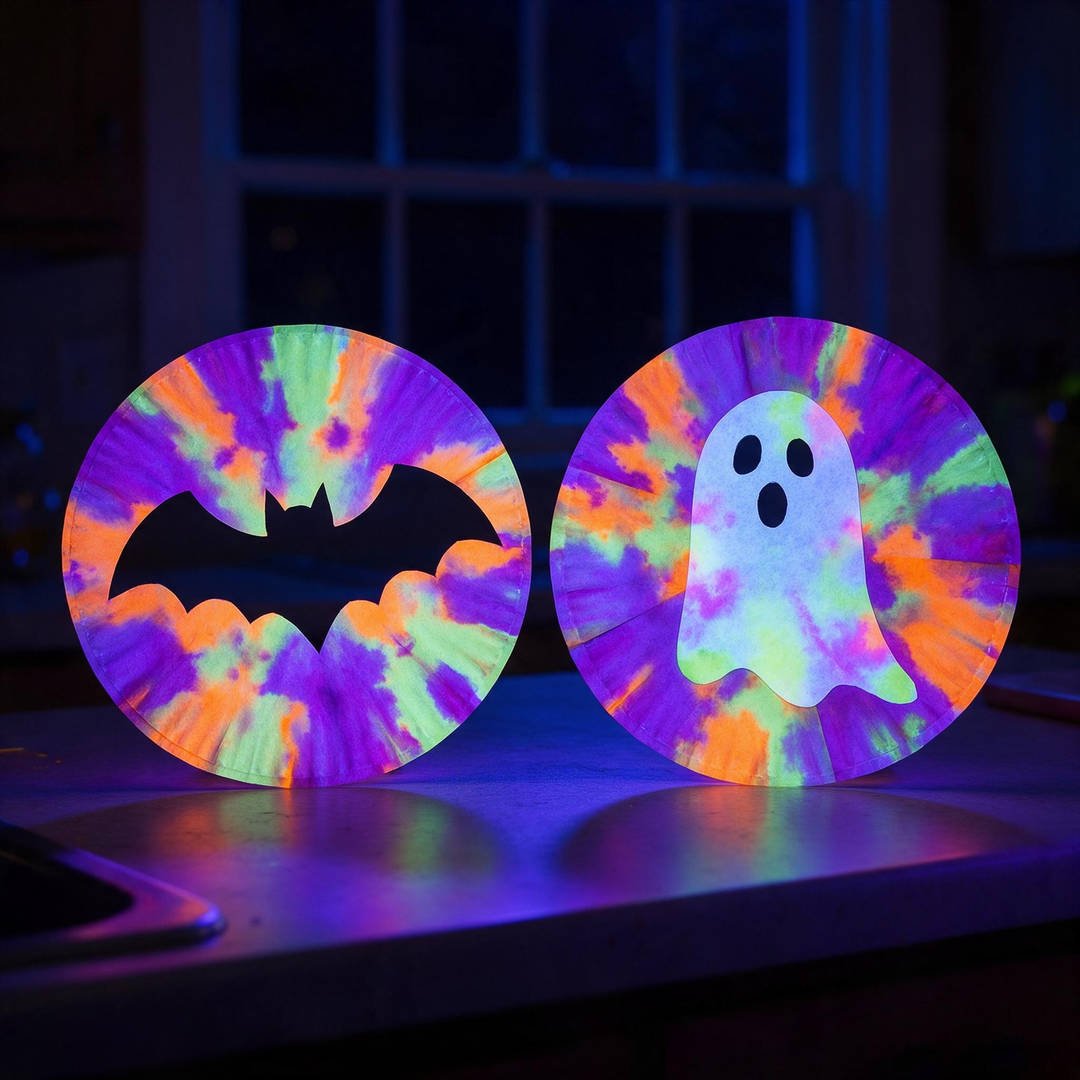
⏱️ Active & Dry Time: 15 mins active, 20 mins dry | 🧼 Mess Level: 2/5 | 👶 Age Adaptation: Ages 2+ (Pure color-blending discovery; preschool science in action) | 💰 Est. Cost: ~$0.95 total
💬 Real Mom Question (from Reddit’s r/preschool): “How do I keep wet coffee filters from tearing when toddlers pick them up?”
Nancy’s Fix: Place the coffee filter directly onto a plastic baking tray or silicone craft mat before spraying with water! Let the filter dry completely on the plastic tray before peeling it off—it will slide right off intact without a single rip.
Watch the magic of color diffusion unfold right before your eyes! Coffee filter crafts offer instant artistic satisfaction because the porous paper absorbs neon inks into breathtaking tie-dye blooms.
Once dry, fold and snip the edges like paper snowflakes to create fluttery bats, whimsical ghosts, or glowing spider webs to tape to sunny bedroom windowpanes. Looking for more thrifty projects? Explore our budget-friendly halloween crafts.
How to Craft It:
- Flatten a round white coffee filter onto a washable plastic baking tray or silicone mat.
- Color patterns across the filter using fluorescent neon washable markers or dots of neon watercolor paint.
- Mist the filter lightly with water from a spray bottle, watching the colors bleed and blend into glowing tie-dye clouds.
- Allow to dry thoroughly for 20 minutes in a warm room.
- Fold in half and cut out bat wings or ghost silhouettes with toddler safety scissors, then tape to your windowpane!
Amazon Craft Materials You Should Buy:
| Material Name | Product Link |
|---|---|
| CepuXozi 3-Pack Toddler Safety Scissors Kit | Buy on Amazon ➔ |
| Nicpro Fluorescent Washable Paint Set | Buy on Amazon ➔ |
👉 Watch the Easy Coffee Filter Bat Craft for Kids Tutorial on YouTube
❓ Real Mom Questions Answered (From Reddit & Parenting Forums)
💬 “How long will glow in the dark paint actually stay glowing in my kid’s room at bedtime?” — Reddit r/parenting
Nancy’s Answer: Quality phosphorescent acrylic paints will glow vibrantly for roughly 30 to 45 minutes after a full 10-minute charge under daylight or blacklight, gradually softening to an ethereal glimmer for 3 to 4 hours. This natural fade curve is actually a blessing for moms—it provides just enough comforting illumination for kids to fall asleep without keeping the bedroom overly lit all night!
💬 “What is the difference between fluorescent paint and phosphorescent glow paint?” — Reddit r/crafts
Nancy’s Answer: This confuses so many moms at the craft store! Fluorescent paint contains neon pigments that reflect bright color under normal light and ignite into fiery electric hues ONLY while an ultraviolet blacklight bulb is actively shining on them. Phosphorescent paint contains micro-crystals that physically absorb and store light energy, allowing them to glow independently in pitch darkness after the light source is turned off.
💬 “Can I wash glow paint out of kid clothes if an accident happens?” — Reddit r/toddlers
Nancy’s Answer: Yes, provided you act before the paint dries! Acrylic polymer cures into plastic when dry. If your child gets glow paint on clothing, flush immediately with cold running water from the back of the stain to push pigment out of the weave, then scrub gently with liquid dish soap or rubbing alcohol. For peace of mind with younger toddlers, stick to washable fluorescent tempera paints or mess-free pony bead crafts.
💬 “Is glow in the dark paint safe if my toddler touches it or puts fingers near their mouth?” — Reddit r/parenting
Nancy’s Answer: Reputable craft brands like Crayola, Apple Barrel, and Nicpro manufacture paints certified AP Non-Toxic under ASTM D-4236 standards, meaning they contain no hazardous chemicals, heavy metals, or radioactive elements. However, craft paints are not edible, so keep watchful supervision over toddlers under three and encourage washing hands thoroughly once craft time wraps up.
🧹 Real-Mom Cleanup & Storage Checklist
- Rubbing Alcohol Miracle for Brushes: If glow paint hardens slightly in paintbrush bristles, soak them in a small cup of 70% isopropyl rubbing alcohol for 5 minutes. The alcohol dissolves acrylic resins instantly without damaging delicate bristles.
- The Wet Wipe Prep Rule: Keep a pack of unscented baby wipes or damp microfiber cloths directly beside the craft table before opening paint bottles. Wiping sticky fingers immediately prevents luminous handprints from appearing on dining chairs, walls, or door knobs!
- Cardboard Baseboards for Drying: Move wet paper plates and clay pots onto baking sheets lined with parchment paper or wax paper. This keeps your kitchen counters clean and lets you transport projects to a sunny windowsill or porch for quick UV charging without tipping over.
- Zip-Top Keepsake Storage: Store flat paper plate UFOs, bat wind catchers, and beaded pumpkins in gallon Ziploc freezer bags layered between sheets of tissue paper. Store in a cool, dry plastic tote to protect them from moisture so they are ready to glow again next October.
Healthy Play & Child Safety Guidelines
Creative crafting supports essential childhood development, from fine motor pincer strength to sensory integration and visual processing. To ensure your Halloween crafting sessions remain safe and joyful:
- Choking Prevention & Small Parts: In accordance with the U.S. Consumer Product Safety Commission (CPSC) regulations, small plastic googly eyes, pony beads, and miniature plastic spiders present potential choking hazards for children under 3 years old. Ensure constant adult supervision, and for toddlers, substitute beads with large threaded pasta or cut foam shapes.
- Non-Toxic Pigments & Skin Health: Always confirm that art materials carry the ASTM D-4236 non-toxic label as recommended by the American Academy of Pediatrics (HealthyChildren.org). Avoid industrial glow powders or unverified online chemicals that may contain skin irritants.
- Low-Temp Adhesive Safety: When bonding craft sticks or cardboard, utilize low-temperature mini glue guns with dual-temp settings or double-sided adhesive glue dots to prevent accidental fingertip burns.